HOMEMADE BOAT TRAILERS
Part I – Design
Part 2 - Part 3
After a season on the road and in the water, I think this trailer is working well enough to get the story out there. But as always, let the builder beware! I’m no engineer!
I’d like to preface this discussion by mentioning that building your own trailer is often just as big a job as building the boat that will go on it. Maybe bigger. Metalwork is a whole different set of skills than what most handymen are used to, and some different tools are required. Many of those tools are quite expensive, but many can also be rented. That said, I find that the ability to work metal vastly enhances both my abilities and satisfaction in building my own things.
Potential Cost Savings
There was some real overhead getting into welding. I spent $80 on an arc welder at an auction, which later needed a new switch for $30 and a new fan for $30. I was lucky in that the shop I was using already had a 240v 50a outlet, but I needed an extension cord to reach the work area. This had to be three 6 gauge wires! So I spent about $50 making an extension cord. Make sure you get the terminals right when you’re playing with this kind of power.
I also had access to my dad’s rather nice Makita 4” angle grinder, which would have been about $60 new. You don’t want to use a metal-cutting saw for a project this size. You really want a cutting torch, but an angle grinder with a cutoff wheel will do. Buy the grinder before you buy a welder. You can rent a welder and you’ll use the grinder much more.
You’ll go through some cutoff wheels, which are about $2 each. There are cheaper ones, but they don’t work at all. Get name brand cutting wheels. I had access to a cutting torch for the heavy channels, and I went through about 4 wheels on the thin stuff. I would estimate 10-12 if I’d cut it all with the angle grinder. I also spent about $25 in eye protection. It’s easy to scratch safety glasses right at the spot where you want to look through them. $30 on coveralls made it a lot more pleasant.
I also spend $112 on a welding class from the local technical college. This was money well spent. It gave me access to their cutting torch for the big stuff, and it was nice to start in class under the supervision of a real pro. I won’t go too much into the details of welding, because I think you really need someone who knows what they’re doing to look at your welds and tell you what you did wrong. That diagnostic ability helps you correct your mistakes right away and learn a lot faster.
That’s about $350 in overhead just to get started on the project. I only had a few welding classes before I started on the trailer.
For materials, I spent $150 on scrap steel, about $50 on welding rods and about $25 on paint. The suspension kit was $223 from abctrailerparts.com, and I doubt you’ll find a better price anywhere. There was also $33 in sandblasting abrasive. I should have spent more and replaced it sooner. About $500 in materials.
I spent about 132 hours for the metal frame, starting with a pile of scrap metal and ending with a painted frame. About another hour and a half to assemble and mount the suspension kit. I’m not counting making the bunks, since you’d have to do this even if you bought a new trailer. It could take a lot less time and material for a shorter trailer, since this long one needed lots of truss work for stiffness.
Is it worth it?
It depends. If you are building a boat that would fit on a standard trailer, you can probably find a solid used one and fix it up cheaper and easier than you can build one. Often this can be done by buying a “must sell” boat that nobody wants, but that comes with the trailer. Of course then you have to figure out what to do with the boat! (I bet Dave “Shorty” Routh, the salvage king, would have ideas on that. See his article for an example.) In areas where fishing is very popular these deals are not uncommon the autumn and winter. Auctions can also be a good source for similar deals. If everybody else showed up for other stuff, you might be the only one seriously bidding. It’s even better if it rains. I would work pretty hard to find an existing frame to work from. If it is a very small trailer, you might even be better off buying new after figuring in all the replacement parts on a rusty old trailer. It pays to do your homework.
But adapting a fishing boat trailer doesn’t always work. Sometimes we build our own boats exactly because we want an uncommon configuration. In my case, it’s the Bolger Light Schooner. It’s 24 feet long but only 500 lbs. Any trailer made for that long a boat has two beefy axles and can carry 7000 lbs. My boat wouldn’t even flex the springs, and the stiff ride would beat the hull to pieces. (Mine’s actually so light that 2000# springs are a bit too stiff.) At the other end of the scale, a trailer made for a 500 lb. boat would never be long enough to put its extreme rear end under my centerboard, much less the motor well. Add to this the fact that many states have a law about how far a boat may overhand the end of the trailer. Wisconsin says 4 feet at most. True, you can build long wooden bunks that are part of the “trailer” to get around this, but this is not structurally sound for more than a few feet.
So my case illustrates one of those special needs for a custom job.
Structural Engineering
Don’t let that heading make you think I’m a real engineer or even really know what I’m talking about all that much. I did some heavy-duty reading and observation on trailer design, though. How to Build Boat Trailers by Glen L. Witt gave some basic design parameters for various weight classes. The serious information was in Trailers: How to Design and Build by M.M. Smith. Volume 2 Structure is the one you want. Volume 1 is useless without Volume 2. It’s not cheap, so see if your library has it or can get it through inter-library loan. That’s what I did. Take notes and photocopy the engineering tables in the back.
I actually did work out all the force vectors that Smith recommends. I did this by individually looking at the engineering tables to see how much each type of steel weighed per foot, and weighing any I wasn’t sure about. I got weights for various wood dimensions and estimated the weight of each part of the bunks and plotted the centers of all these weights on a scale drawing. Then I made a spreadsheet to figure the torque around the fulcrum point (the axle) that all these weights generated, and also added some math to convert those figures back to regular weight to give me the tongue weight. Jim Michalak’s boat design page has a lot of information in the back issues that can get you used to these kind of force diagrams.
After doing some of this reading, I started taking special notice of trailers. In parking lots I would stop and take some photos and measurements. I’d be especially interested in areas that looked like they had been repaired or were wearing out. Then I’d try to figure out why, and what design change would have avoided the problem.
I will not attempt to duplicate Smith’s deeper analysis here. Just a simple overview of some of the forces involved.
Static Forces
First you need to be sure the trailer can support its load and self weight at rest. Picture a 2x4 laying flatwise, suspended between two chairs. If you hang a weight from the middle, it will bow. That deflection is strain. The bottom surface is in tension and the top is in compression. Now turn the 2x4 so the narrow edge is down. The same weight (force) causes less deflection (strain). The top and bottom are subjected to the same forces of compression and tension, but those forces are further apart, so they have less leverage to bend the wood. This is why carpenters have “span tables” to tell them how deep a joist must be for a give span and spacing. So a deeper section does not make a member stronger, but does make it stiffer in one dimension. This is important.
Racking
Racking of rectangular shapes is easily solved. There is nothing but the welds to prevent a rectangle from racking – where a square becomes a diamond, then closes up so all 4 pieces are right next to each other! Triangles, however, are very strong because they cannot rack. All three sides are locked by the other two. Whenever you have a rectangular shape, create triangles. Brace the corners with diagonal braces of the same material or plate gussets on top and bottom. Plate gussets are easier to fabricate, as we’ll see later.
Torsion and Tubing
Torsion is when a member gets twisted. No matter how you shape a piece of sheet steel, it will have the same strength in torsion. But is you weld it together into a tube, it gets much stronger in torsion. The problem is that it tends to rust from the inside out! I would only recommend using tubular steel for the trailer’s tongue, and make absolutely sure you have holes drilled so it will drain whether you park it with the tongue uphill or downhill. You do not want ANY water pooling in there, because it is nearly impossible to paint the inside of a tube. The best you can do is eliminate pooling spaces and spray some phosphoric acid rust converter in there when it starts to look rusty. If you can run your side channels all the way to the coupler, skip the tongue entirely and avoid this problem. If you need a tongue, you probably need the torsional stiffness of tubing. But you’ll have to keep a sharp eye on it. Remember what happens if the tongue rusts out!
One strategy I haven’t tried yet, but am musing on is welding the tube completely closed and drilling a hole in the top so I can pour in a quart or two of oil and cork it. It’s hard to make totally liquid-tight welds, though. Particularly now that the coupler is already in the way. I’ll be thinking on that one, and let you know if I make any progress. Practically speaking this probably doesn’t matter a lot in freshwater lakes. I haven’t treated the inside of the tongue with anything, so we’ll see how long it lasts.
Fatigue
Stiffness becomes very important here. Think of our 2x4 and weight, and imagine them bouncing down the road. The 2x4 will want to oscillate like a guitar string. That creates fatigue, which is where a repeated flexing motion eventually weakens the material. Wood is very resistant to fatigue, but steel is not. This is why I have always made cartop racks of wood, and why trailer bunks should also be made of wood. They absorb these fatigue stresses without breaking.
You can see how fatigue would not be a big deal in a 12 foot trailer made from heavy 3” steel channel. Very stiff. However, my 24’ trailer made with the same stuff would be very floppy indeed! In fact, the main channel-built part of the trailer was nowhere near that long and was still very floppy when I jumped on it with my mere 180 pounds. Road stresses under load would be vastly greater because the boat is heavier than me, and every bump in the road magnifies that weight with a shock loading. A given weight seems like much more when forced to change direction very quickly. Three inches just isn’t enough depth to stiffen that structure on the road.
Trusses
So how do we increase stiffness? A heavier section of steel of the same size increases strength a lot, but stiffness rather little. It also adds undesirable weight. A taller section of the same steel – say a 5” channel will also add more weight than we’d like and will probably be nearly impossible to find. What we use is a truss. This is where we build something that looks like a ladder turned on its side. Picture our 2x4 above, except we rip it into two 2x2s and glue and nail pieces of 1/4” plywood (say 3”x8”) between them so the 2x2s are held 5” apart. This can be very stiff indeed, at least in one dimension, with little added weight. Boats with open gunwales make use of this phenomenon to create stiff-but-light gunwales. We also see trusses in bridges, towers and the roofs of houses.
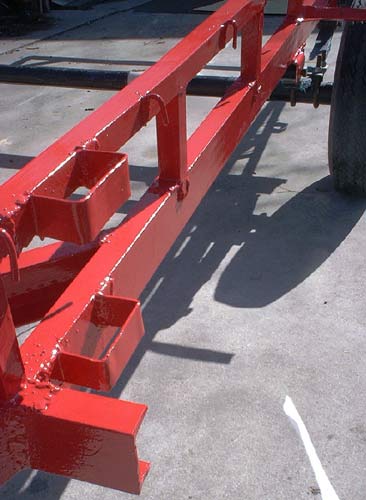
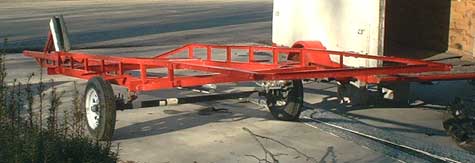
My trailer uses a light truss of 1/8” x 1” angle iron 4” above the side channels, and a similar truss under the tongue. It’s only under the tongue because it would have gotten in the way if it were above. It doesn’t take a lot of steel to prevent the oscillation, so long as the spacing is wide enough. The ideal solution would probably be to make the entire frame from two ladder frames made of of two smaller equal-sized members running all the way from the tongue to the stern. Maybe 2” channels. I couldn’t find good scrap that was small enough to do this, so I had to settle for a main member to carry the weight and a small one to stop the oscillation.
Selecting Steel
New steel is expensive. I built this trailer mostly from scrap steel. But there’s a catch. Unless the scrap was painted, it will probably be too rusted to use. I would only accept painted scrap. The only exception I made to this was some 3/16” tread plate, because it was thicker than necessary and the parts were small enough that the extra weight wasn’t a problem. There are other reasons to avoid rusty scrap. It’s really hard to prepare it well enough so the paint will stick! Also, you are never sure how much of the steel’s original strength remains.
The hard thing about shopping for scrap is that you are looking for steel to fit a design you’ve made already. But you might need to modify that design based on what good scrap you can find! I went through several modifications for this very reason.
Have the engineering tables with you so you can actually look up the strength figures for a given type of steel, comparing them with types typically used for trailers of the weight class you are designing. You’ll quickly see why iron plumbing pipe, for example, is typically not used for these applications.
Also watch for discarded bed frames on trash day. These are a great source of rust-free 1.5” x 1/8” angle.
Design Evolution
I started out knowing the size and weight of the boat I had to carry. I thought it possible to find a fishing boat trailer – maybe for a 15’ boat – that I could modify. I’d move its wheels all the way aft to be under the middle of my boat. Sailboats are much more center-weighted than aft-heavy fishing boats, so this might work out. I’d need a longer tongue to keep the bowsprit from going through the rear window of the tow vehicle. And I’d need to add onto the rear to support the stern. Unfortunately, all such trailers I looked at were so bad that I could easily do better from scratch. Had I allowed a whole summer to attend auctions, I might have done better.
On my first trip to the scrap yard, I got a 13’4” piece of 3” square x 3/16” thick tubing. I also got some 3” x 4.1 lbs per foot channel. These were bent, but I had two good sections 7 feet long, and maybe 4 sections that were 5 feet long.
So how to use all that?
I photocopied the plans of the boat so I could draw trailer plans on the back, seeing the boat drawing through the paper. I also made a paper ruler to scale. I guessed that the center of gravity of the boat would be a little aft of center, and that the wheels would need to be a little aft of that to provide some tongue weight. I assumed I’d form a rectangular frame 7’ long by 5’ wide, attach the tongue to the front, and brace it with two 5’ diagonal pieces. Pretty standard. Then I would need the bunks to support 5-6 feet of boat aft of the frame, which was a little optimistic. I’d also need to extend the tongue by 7 feet or so! This was definitely in the realm of fantasy. And I was thinking to do so by inserting a 2.5” tube inside the 3” tube and welding it. There was no way such a long, thin tongue would hold up long. Fatigue would break it in short order. But I hadn’t realized that yet.
In fact, I already had this assembly put together in welding class before I realized how floppy it was even without a tongue extension. I had the suspension kit, and was going to tack weld the suspension on to get it home very slowly, but I took a week to think about it instead.
It occurred to me that the area of highest strain was the tongue, so it should be stout indeed. Like 3” tubing. OK, making a new drawing I could see that if I put the coupler right on the 3” tubing, I might still fit the wheels at the far aft end of the rectangular frame and be in the right ballpark. So I did Smith’s force diagram to determine precisely where they should be. Fortunately, they came out further forward than I expected due to the weight of the heavy tongue. Essentially, that big tongue IS the tongue weight of this trailer, and the boat sits on it completely balanced over the wheels. This puts the tongue weight at 10% loaded, and about 20% empty. Going to higher percentages actually provides better control as long as you don’t stress the tow vehicle. Hence 5th wheel hitches.
I also had to fix the floppiness and get some support under the stern. I decided I didn’t want more than 2’ of boat supported only by bunks, and that I wanted bunk support all the way to the transom, in case I dragged it going over ramps or speed bumps. Solving these two problems went hand in hand by adding a truss from the front of the main rectangular frame back to about 5’ aft of its rear. (Conveniently provided by some very nice 20’ angle iron at the scrap dealer. Only the ends were bent, which I would not be using.) I added a piece of 1.5” angle to connect them transversely. Then more angle iron created a triangle by connecting that aft point to the bottom of the aft side of the main rectangle frame.
This was more like it. But still there was a lot of oscillation in the tongue. I bounced the trailer and had my dad look to see where it was flexing. It was where the tongue joined its diagonal braces. I’d known I might have to add a tongue truss, so I was prepared. I flipped the trailer and added a similar truss to the bottom of the tongue.
It’s still not quite as stiff as I’d like it, but I hope the bunks help stiffen it. You can see them in the photo, carpeted with gray outdoor carpeting, waiting to be bolted on with dabs of PL400 to hold the carpet down over the bolts.
Some specs
Guesses have to be reasonably close to the mark with a trailer, since too much excess weight magnifies the forces trying to break the trailer! The tongue is 3” x 3/16” tube, and the main sides are 3” x 4.1 lbs-per-foot channel. The big gussets are 3/16” tread plate. The rear lower truss web is 1/8” x 1.5” angle from a discarded bed frame, and the rest is all 1/8” x 1” angle. All the welds were made with 6013 rod when horizontal, 6011 when not. (6011 sticks better but is harder to clean up.) You don’t need anything stronger than 60XX rod, and the higher numbers are harder to work with.
Most importantly, keep in mind that I’m no engineer! I’ve just been making guesses that seem reasonable and getting the results inspected by a knowledgeable instructor with an agricultural engineering background. I recommend you have your guesses checked too.
Next time we’ll look at the actual fabrication process.
Rob Rohde-Szudy
Madison, WI
robrohdeszudy@netzero.net
On to Part II