
 Custom Search
|
| boat plans |
| canoe/kayak |
| electrical |
| epoxy/supplies |
| fasteners |
| gear |
| gift certificates |
| hardware |
| hatches/deckplates |
| media |
| paint/varnish |
| rope/line |
| rowing/sculling |
| sailmaking |
| sails |
| tools |

| join |
| home |
| indexes |
| classifieds |
| calendar |
| archives |
| about |
| links |
| Join Duckworks Get free newsletter CLICK HERE |
|
|
| A Home Depot Sailboat for the Sea Cadets - 2 |
by Richard Ilfeld - Apollo Beach, Florida -USA |
Part one - Part Two - Part Three - Part Four
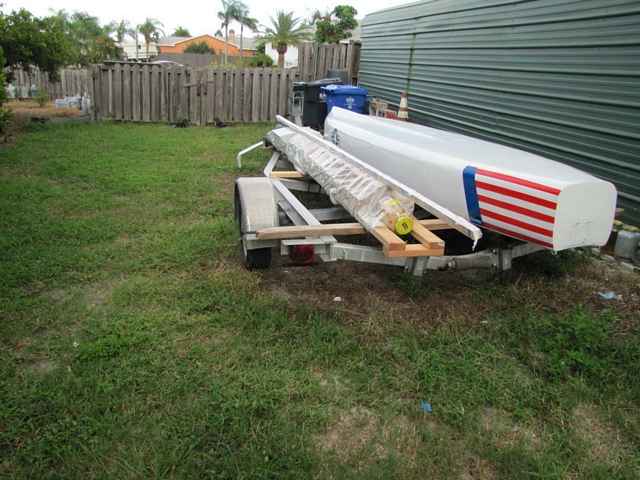
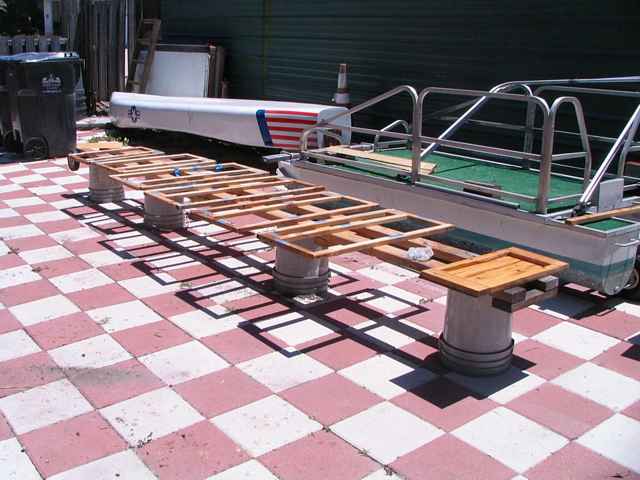
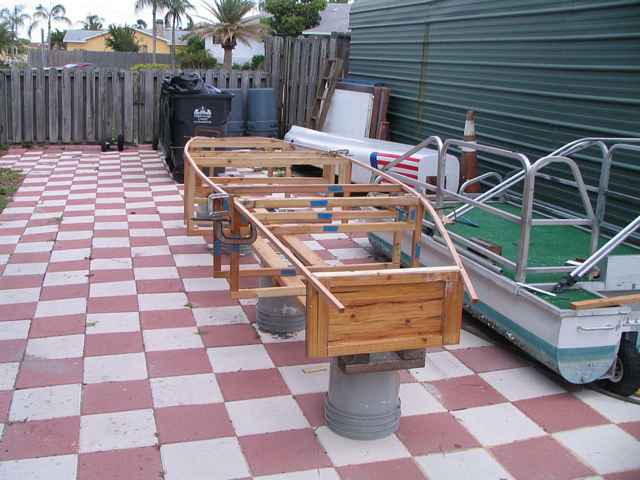
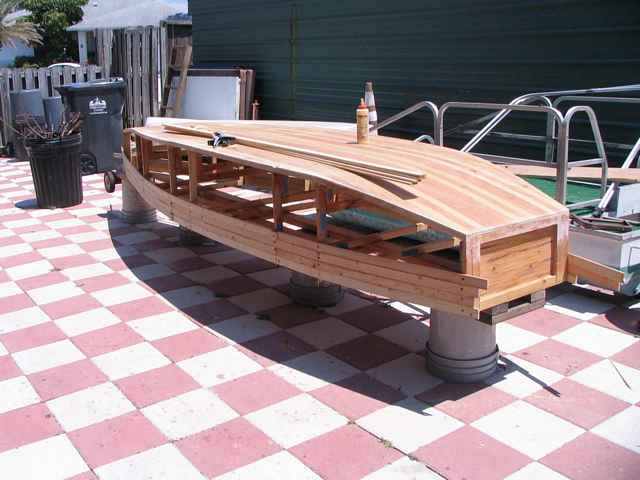
Here is the "kit" wrapped for transport, on a trailer next to a foam pirogue. The jig is the Pallet. As the ends are clear, they are stackable. The prototype kit lived in its 6 mil poly wrap outdoors for 6 months before I got around to building it. Goal met: easy to rip & frame in an ordinary garage, transport in multiples to the building site, or do one at a time & store on site till you have enough. I built up the frames first, but they could be loose as they require only a card table size bench for building. The long piece is the mast blank, 4 ¾ squares laminated into a 16 foot pole. Off to 'boat camp'. Even though strip-built, the hull geometry is the same as the plywood boat. This hull has been proven. I'm not smart enough to second guess Bolger on how a boat works on the water. I ripped a bow post to the proper angle on the table saw. It is 1 ½ " overlength to mount depressed on a jig crosspiece. It will need sleepers to build it out - I want it laminated rather than a single piece for strength. It should sand to a flat 5/8 nose when done- easy to drill for a bow eye. It can be slightly rounded to shape at and below the waterline - we don't want to bang docks or people with a sharp edge. The jig is two by fours 1' X 14'. We'll reuse the jig for oars and a car top frame or a pull-around dolly. One could also build one or more really strong jig with legs and build multiple boats on it if this is going to be a repetitive exercise - the frame design allows the boat to be self supporting quite early on, but a good jig might make hammering easier if you're one of those people who will use nothing but brass brads on a boat. The lawnmower wheels provide mobility when working alone. Not in cost list & optional (and salvaged, anyhow). Helpful in later providing a down-to-the-water dolly - but two people can carry this rig around at all stages of construction. Very high tech plastic buckets bring the jig to a convenient working height. Frames on the jig - mounted the frames using sheet rock screws & the transom & bow post with a couple of steel angles. I didn't put in diagonals to make sure the frames stayed square. I should have. You should.
The geometry is set by the ¾" rails. These were lap spliced 3" to go on as one piece. You want clear, even grain, knot free pieces for these longerons. If your longerons are too stiff to work with, you can score them with a cut about 1/3 way through on the inside of the curve radius to allow them to bend. With several sets of hands you won't clamps to pull anything into position on this boat, but a few to hold things can be helpful.
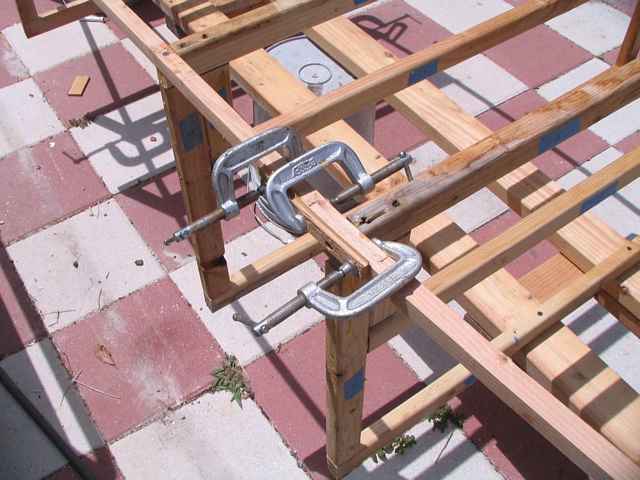
Drill (with a #6 countersink) and use fine thread sheetrock screws for all frame fasteners. If you don't use the countersink, when you pull the heads flush the wood will likely crack. You can use these on the strips and remove them for glassing, or use finish nails. For reference here, I mostly used pins on the bottom, screws on the sides. You will probably find a use for a couple of clamps along the way. At joints, you may add a 1 ½ X 1 ½ X ¼ Pad as a clamp. Also, screws can be angled a bit to get two onto a ¾" rail.
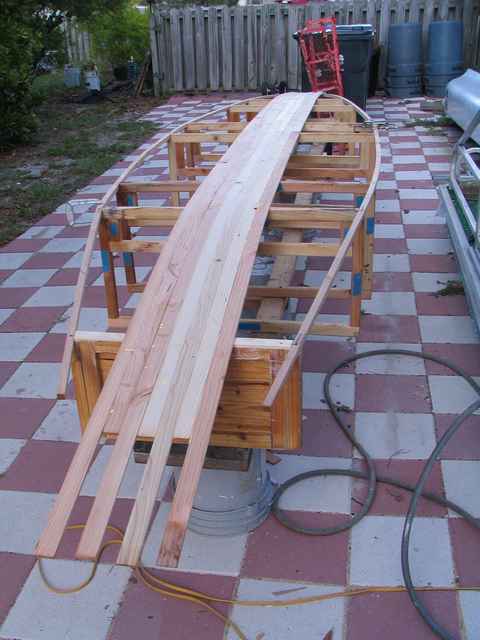
If you have to fix a spot - fix it with a splice & five minute epoxy using screws or clamps. Remove the screws and sand flush later. This longeron split. Not fatal! Patches and Bondo are OK, as we are really making the core of a fiberglass sandwich panel, and the core mainly keeps the skins apart. It's fine to be careful and want everything Bristol, but perfect is the enemy of good. Kid's boat, remember, and we actually want to finish it pretty quickly so they can go sailing. Perfectionists may spend the extra bucks for clear cedar and do furniture grade joinery. I'm not sure I could if I wanted to. I will fill all the gaps and sand everything. Bondo (or wood tone putty) is my friend! Lay up the hull bottom strips, starting with the center. Be careful here: when you fasten the ¾" rails and center strip you set the square of the frames relative to the jig and the straightness of the boat. Worth double checking. For a little keel function we'll use 1 ½" skid strips on the hull surface, but don't add these until after the hull is glassed. The original design calls them Bottom Skids. They are a good idea as they are sacrificial as the hull is dragged about, and add a little strength to a thin hull. They go on later with screws from the inside. Use white carpenters glue to hold the hull strips including the edges. Disposable latex exam gloves are good for handling both glue and epoxy. Assign one person the job of "wiper" to clean up the squeeze out and force glue back into the joints. Excess glue gums up sandpaper. Glue the both the strip edges and the points where the strips hit the frame. Lots of stress here! Fill any open or mismatched edges with wood tone putty or Bondo after gluing before sanding. If you are going to paint the boat, Bondo is your friend and universal structural filler. I recommend paint, because epoxy doesn't like UV much. Paint also offers some interesting creative outlets - use gloss latex acrylic house trim paint, roll a base white then give them colors and have at it. I favor sharks teeth & fins. The pictured boat was left clear and varnished because it's a prototype - clear allows future project leaders to be able to see all the details (and mistakes) clearly.
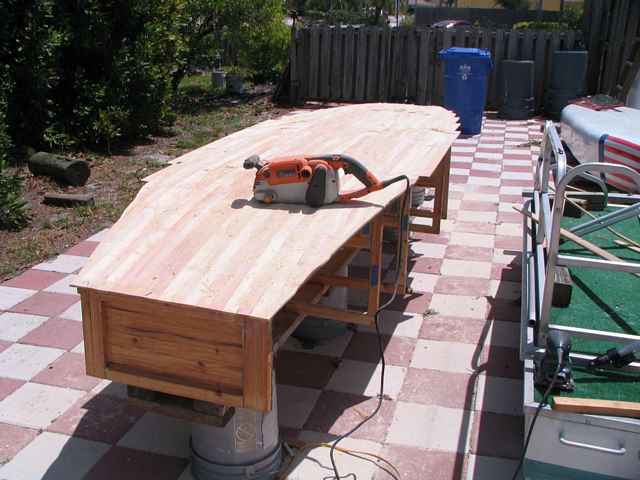
Add the bottom strips one at a time. Stagger the joints. If they don't fair to the same radius, use a staple gun & ¼ staples to tie the edges together. I needed these on the sides but not the bottom. Trim leaving a generous overhang. Sand the bottom 60 grit then 150. Lay up a single layer of 6OZ nominal boat glass on the bottom. True Confessions: in the tool set I specified a pad sander. It saves a lot of time to cheat and make the first few passes with a belt sander if one is available. Save all your cutoffs! We'll find a use for pretty much everything.
In laying up the fiberglass, paint the bottom first, roll out the glass or if you have several people spread it as a sheet. Use a disposable fiber (not foam) brush to stipple the surface. When it is fully transparent you are done. Use as little resin as possible. Extra resin adds weight and cost, not strength. There are many web resources available on how to apply fiberglass and epoxy.
Work from the bottom up on the sides. The sides at the bottom of the two longer runs are pretty "bendy". You may wish to brace them with a midpoint cripple to make alignment easier. It wasn't necessary but would have reduced some sanding and filling.
We can't put on the gunnel pieces here. We have to cut the sides to a curve: they aren't straight in the plans. Of course they could be if you wanted them to be. I treat plans as a strong suggestion, you may treat my building techniques as an opinion and feel free to use your own. I didn't exactly think everything through correctly here. That's why we build prototypes, right? To keep using 8' strips the joints will have to line up on the side. This worked ok; the better practice of staggering joints made the curves harder to fair. I did some of both: didn't seem to make much difference. Keeping the fairing even is one of the challenges of this plan. The ¼" staple across the edges works well (use a backup like a brick while it is driven) - they are pulled out before finish. If you have c-clamps clamping a couple of stiff boards vertically will pull difficult strips even. Or you can screw on little tabs bridging two boards which I did here for a couple of hard cases. It is pretty important to pull the strips level +- 1/16 - but not fatal if you miss a few. Fill most of the gaps BEFORE you pull the screws and staples; the adhesive properties of the fill will be helpful. Use bug spray outdoors. You can create interesting problems for yourself swatting at bugs while working with epoxy & bondo.
When the frames are covered trim and sand. Use the pull saw or jig saw with a scroll blade to trim the sides within a quarter inch or and fair with the sander. Scuff the edge of the bottom about 2" in to get a good bond for the glass tape joining the bottom and sides. Sand a slight rounding at the hull bottom/side junction. We need to wrap a 4" tape over the edge before we glass the sides. The longer glass side pieces then go on flat overlapping the tape. No bubbles. Since I assume the boat will get rough treatment, place a second tape over the edge after the sides are covered. Check the bottom carefully. You can brush a little epoxy over any holes, gaps, imperfections as you lay up glass on the sides. You can use small glass patches if you need to. You can cut out any bridged areas with a razor knife and patch them. Not all fiberglass cloth is identical. Let's assume you bought from the bargain bin. If you are worried about strength, a second layer adds weight but also adds durability. I like to keep boats light and assume modest care in handling, but add glass to suit. You can lay up a small test piece and destroy it to get a feel for the strength of the finished product. Some time playing with the materials if you have never used them before might save you a lot of grief. When applying fiberglass over cured glass surfaces, you need to scuff the surface. |
To comment on Duckworks articles, please visit one of the following:
|


 |