Before hauling out to build the Navigator conversion, “Oink” had
suffered damage while lying neglected on an exposed mooring. Thousands of
slaps and bangs under that flat bow had caused ongoing damage, culminating
in the mast coming down due to wear around the fid and mast step. Extra
inertia caused the tabernacle supports to rip out the top layer of the
marine ply side, and down she came, splitting the main bulkhead clear
across. There are often posts to the Bolger Group,
|
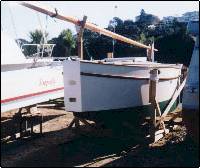
Oink as originally built |
requesting ways to reduce flat bow slaps and gurgles, which keep people
awake at night, and it seemed to me a permanent solution was
best, and now was the time to do it. By the way, the flat bow
is fine while sailing, and people with less difficult conditions
have no problems with damage, except getting some sleep!
A false rounded bow underbody seemed the best answer. I wanted to
leave the ply bottom in place so she would stay in shape, and first
thought of a molded ply fabrication, but this would have been difficult
because there would be no access to the upper side. A solid lightweight
shaped addition appeared to be more practical. Bolger has shown ideas for
solid timber shapes glued in place for larger boats, but their roundness
was limited and probably inappropriate for lightweight Navigator. Newer
designs have sacrificial ply bow extensions filled with foam, and this
would be a very good method for a new boat. Styrene and epoxy, surfboard
style looked practical for my situation, and questions to
rec.boats.building popped up some very helpful advice from a surfboard
maker in Asia! Ah, the miracle of the Net.
|
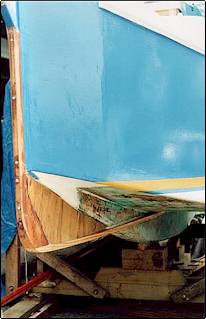
stem piece first then keel
battens
faired to hull with fitted hardwood deadwood infill |
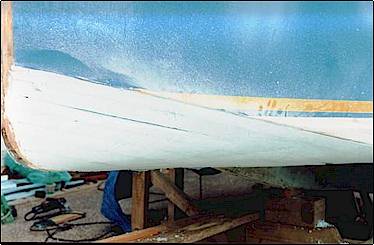
To achieve a rounded softer entry, one is limited to the space between
the existing chine line, and a new lower keel line; any deeper and one
would end up with a Yorkshire Coble, and the bow would take charge of
steering the boat. Measurement showed I could add onto the existing bow, a
new stem, extending 250mm (10”) below the present stem/chine/bottom, and a
keel line could run aft and blend with the deepest point of the existing
chine/bottom. The stem was glued in place first, followed by a false keel,
150x20 (6”x1”), slotted to fit the existing keel and tapered to the new
stem. The space left was filled with solid deadwood as pictured.
Blue Styrofoam in sheets was the recommended base material, because
it can be epoxied without melting. The first sheet, 35mm thick, was glued
flat against the ply bottom for the full length of the new shaping, and
subsequent sheets were shorter each time to match the new bottom line, and
to reduce wastage. Epoxy was used for bonding the first layer to the flat
ply bottom, and here the most difficult part of the whole operation reared
its head - working on your back applying glue, goo and pressure upwards.
All epoxy had to be thickened to stay up. A system of cross-timbers,
vertical struts and wedges gradually forced the gluey sheets (one each
side) firmly into place, but it was a real struggle, involving every curse
known to civilised man. As one wedge was tapped into place, inevitably the
previous wedge, or two wedges ago, strut and caboodle would drop out, due
to the flexible 6mm ply of the original bottom. Every one of the 40 wedges
on each side was re-jigged 2 or 3 times. Then when I had finished,
struggled out and leaned against the boat in relief, the whole damned ship
swayed and nearly toppled! She was now floating above the cradle on many
little hands. I was very relieved when the epoxy set and the boat could be
sat down again.
|
Sheets stepped towards bow
to follow keel line
and glued with contact adhesive for easy fairing. |
The first life-saving tip from my surfboard friend came next – fix
subsequent layers of foam with contact adhesive, never epoxy. Fairing is
fun enough, without hard lines of glue sailing across the fairing lines.
One quickly learns just how soft the foam is. Even a swipe with the back
end of a plane will gouge a chunk out. Contact adhesive worked well, but
you must force yourself to wait for the glue to “set” before you place the
sheet, as the manufacturer states. And when it is ready, the sheet must be
held exactly square before pressing upwards, because you get only one
chance. No clever sliding fits! But with care it went well.
|
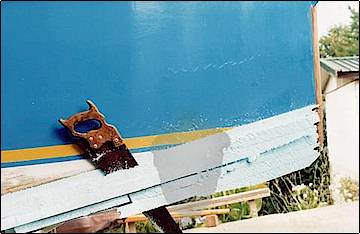
Faired with saw electric
planer
and sandpaper boards |
Fairing. Uggggggh!!!!!! Sawing the side projections took seconds. The
rest took hours and hours and hours. I tried all possible tools, and found
the best tool to form the basic shape was an electric hand planer. I hate
this effective but most dangerous of electric tools, and swinging the
plane above my face, blinded by a snowstorm of blue confetti was no fun at
all. But very effective. It shaped cleanly with little tearing, though if
the day had been windy, the whole neighbourhood would have been blue!
Earlier, I had drawn a measured and faired drawing of how the bow would be
shaped. In the end it was all too difficult, and I threw the drawing away
and shaped by eye. This was not as hard as it sounds, because the layers
of styrene could be faired evenly by comparing the curved joints on both
sides – rather like shaping a plywood centreboard. Sanding blocks and
boards were tried, but were not greatly useful because of the tight curves
in this bow region.
The second life-saving tip came next – don’t try and fair the styrene
to perfection before filling, glassing and epoxying. It will drive you
mad, because you will damage the surface everytime you go near it, and
cause further damage trying to correct the first damage. If you try and
fill raw styrene, the softest filler is denser than the foam, and sanding
rips away the surrounding styrene, leaving a lump of filler! When the
shape is reasonably fair, with no major lumps and bumps, coat the foam
with epoxy and glass cloth. This gives a firm base to which you can then
apply and sand filler. Overhead glass and epoxy was another trial by fire,
but I got there in the end.
|
You cannot completely fair
the foam because it is very soft.
A nudge with the plane will dent it |
First I epoxied wide tape along the chines and keel, in case the
fairing ever decided to come off in one lump! Two layers of the heaviest
cloth stocked by the boatshop were used for the main surface(10oz I
think), and two further coats of epoxy. The amount of fairing you can do
towards achieving perfection is infinite, and as my surfboard man said,
you will know when you reach the balance between perfection and
condemnation! For the larger concavities I used epoxy thickened with
microballoons, and on wider thinner areas, house type exterior white
acrylic paste, applied with a plasterers steel float. I have used this
before, and found it to be just as durable as much more expensive and
unfriendly materials (epoxy), but only in non-structural applications.
|

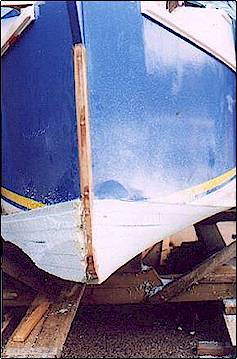
Bow rounded primarily to
stop noise
and destructive pounding while moored. |
I think the bow will work. It is certainly much more solid than before;
hitting it with your fist sounds more like a Rolls Royce door closing than
a kettle drum! Probably the stem will be an inch or two below water. If
not, ballast may have to be added inside to compensate and adjust the
trim. If we hit anything, I would expect collision damage to be less than
before the addition. The foam may be dented or chewed, but should be
easily filled and faired. Extra floatation will be a benefit in the
unhappy event of a hull breach.
I also hasten to add that I have not asked, and don’t have the blessing
of Mr Bolger for this change; it’s at my own risk. The more I work at
changing this boat to meet my needs, the more I admire Bolgers original
concept of Micro - extreme simplicity and economy. Every change I make
seems to involve yet more sheets of ply and expense. But hey, we are
supposed to be having fun.
Other Progress
|
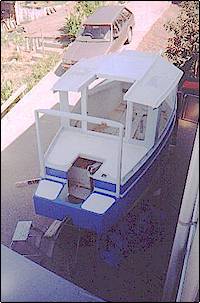
windows in roof to come,
rear deck tiller enclosure to come,
extended stern floatation both sides
and future hinged motor hatch |
The photo from above the boat shows the main rear deck completed. This
space is really just for access and a platform from which to tend the
outboard. Bolger intends Navigator to be steered from inside the cabin,
where crew weight is best positioned for the trim of such a short boat. My
added low deck extension aft, is to provide protection for the motor; also
Micro though a tiny boat, when approached in choppy water can be
dauntingly high above a small dinghy. The low rear decks should provide an
easy boarding point, with the stanchions right there to heave oneself
aboard.
I connected the stanchion tops with a hardwood plank, to provide a
base for a mainsheet traveller, and to help support my standard Micro
mizzen mast. The plan showed a heavier alloy tube, because the chinese
mainsail sheets are sheeted to it, but I reused my old mast to save cost.
The plans are short on detail about the sheeting in this area, but seem to
show them running into the cabin above the rear deck at cabintop height.
Stumblebums like myself would be prudent to lead them under the deck and
through the tiller slot, to cabin cleats. Angled uphill so water will not
run down them and into the cabin!
|
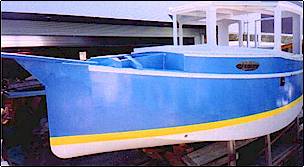
gunwale cut down and bow
extended, bowsprit for possible extras |
The front shot shows the new mast support in place. A fly speck below
the yellow boot top is actually a drain from the forward well. The bottom
of the well has been lifted towards the rear by floating in an
epoxy/concrete reinforced mix. This was to avoid drain tubes through the
styrene layers to exit through the bottom, which if disturbed may have
allowed water penetration into the foam, and would also be vulnerable to
blockage by marine growth. I once bought a 30ft trimaran for a good price,
because the owner was sick and tired of mysterious flooding. I later found
that an underwtaer cockpit drain would block with marine growth, and at a
certain point the main hull filled with a rush through a toilet fitting,
sinking the boat down to the level of the bunks.
Next job, the cabin interior and rigging.
Don Baldwinson
oink@paradise.net.nz |

