Polysail Dave Builds a (Second) Sharpie
by Dave
Gray
(Dave Gray is the proprietor of HR-Solutions/Polysails)
 I’d
been out of the boatbuilding business for a while—at least
since Christmas—and my wife was beginning to daydream aloud
about being able to park two vehicles in the garage this year.
But I had been secretly designing boats ever since I finished
my new grandson’s Christmas present, a miniature rock and
roll 5’ skiff of my own design. The Jackson Doyle was probably
the only boatbuilding project that ever had my wife’s wholehearted
approval since I acquired this vice. My grandson’s boat
now serves as a giant toy box in the family room at my daughter’s
house. A future sailor needs a giant toy box for his giant toys,
apparently. I’d
been out of the boatbuilding business for a while—at least
since Christmas—and my wife was beginning to daydream aloud
about being able to park two vehicles in the garage this year.
But I had been secretly designing boats ever since I finished
my new grandson’s Christmas present, a miniature rock and
roll 5’ skiff of my own design. The Jackson Doyle was probably
the only boatbuilding project that ever had my wife’s wholehearted
approval since I acquired this vice. My grandson’s boat
now serves as a giant toy box in the family room at my daughter’s
house. A future sailor needs a giant toy box for his giant toys,
apparently.
For a while, I toyed with the
idea of building a catamaran. I thought that our 24 year-old son
and his wife would probably like a boat like that. They’re
a Navy 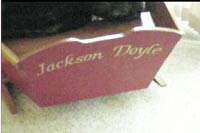 couple,
and they like to go fast and spend time in the sun. Of course,
his idea of fast is sailing along in the space shuttle while my
idea of fast is sailing along in a home built dinghy in a modest
wind. couple,
and they like to go fast and spend time in the sun. Of course,
his idea of fast is sailing along in the space shuttle while my
idea of fast is sailing along in a home built dinghy in a modest
wind.
Our son had recently completed
his last submarine patrol and had tried to trailer the OK Dinghy
I had restored for him from his post at Kings Bay, GA to his new
location at Saratoga Springs, NY. But the salt air had taken its
toll on both the trailer and the boat, and when the trailer tongue
broke and carved a trail in the highway just outside the Kings
Bay base, he made the wise decision to make a gift of the whole
package to the tow truck driver who was called to the scene of
the disaster. I believe he received counsel on this decision from
a representative of the local sheriff’s office.
 A
month into the catamaran research and design, I decided to build
a half-size model of one of the hulls. Once I started spending
a little too much time in the garage, the cat was out of the bag.
Initially, I tried to persuade my wife that the PolySail business
was booming. However, that story came under immediate suspicion
due to some mysterious feminine profiling ability combined with
the bank examiner's financial instinct she seems to possess. Instead
of buying my tale, she suggested that I had taken up smoking again
after a 25-year lapse. Confronted with that accusation, I needed
a quick explanation for the secrecy. Let's see, I was now working
undercover for the CIA—no, that would never fly. She could
check that story out with her uncle, a CIA retiree who knew everything
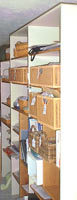
about me before he even met me for the first time. Then it came
to me! I was actually building her a surprise birthday gift in
the garage—the wall of shelves she had wanted for her scrapbooking
supplies!. It was the perfect evasion?-a stroke of genius?-except
that, damn, the project took weeks to complete. What a setback!
But the shelves were beautiful, and my birthday gift was a resounding
success. A
month into the catamaran research and design, I decided to build
a half-size model of one of the hulls. Once I started spending
a little too much time in the garage, the cat was out of the bag.
Initially, I tried to persuade my wife that the PolySail business
was booming. However, that story came under immediate suspicion
due to some mysterious feminine profiling ability combined with
the bank examiner's financial instinct she seems to possess. Instead
of buying my tale, she suggested that I had taken up smoking again
after a 25-year lapse. Confronted with that accusation, I needed
a quick explanation for the secrecy. Let's see, I was now working
undercover for the CIA—no, that would never fly. She could
check that story out with her uncle, a CIA retiree who knew everything
about me before he even met me for the first time. Then it came
to me! I was actually building her a surprise birthday gift in
the garage—the wall of shelves she had wanted for her scrapbooking
supplies!. It was the perfect evasion?-a stroke of genius?-except
that, damn, the project took weeks to complete. What a setback!
But the shelves were beautiful, and my birthday gift was a resounding
success.
 Being
in good graces with my wife of 30 years is a rare event, so I
decided to take advantage of the moment, take her out to dinner,
and privately discuss the dire need to build a boat—not
for myself, of course, but for our son who had so tragically lost
his dinghy. I even admitted to having a half-size model of a catamaran
hull stashed above the garage. Seeing that there was going to
be no stopping me, Dixie tried a final diversion, suggesting that
I get our son’s input on the catamaran I was so eager to
build. The strategy made too much sense to avoid, so I made the
call. Try as I might, I couldn’t detect much enthusiasm
in my son’s voice for another boat. No doubt he was still
mourning his earlier loss. Being
in good graces with my wife of 30 years is a rare event, so I
decided to take advantage of the moment, take her out to dinner,
and privately discuss the dire need to build a boat—not
for myself, of course, but for our son who had so tragically lost
his dinghy. I even admitted to having a half-size model of a catamaran
hull stashed above the garage. Seeing that there was going to
be no stopping me, Dixie tried a final diversion, suggesting that
I get our son’s input on the catamaran I was so eager to
build. The strategy made too much sense to avoid, so I made the
call. Try as I might, I couldn’t detect much enthusiasm
in my son’s voice for another boat. No doubt he was still
mourning his earlier loss.
Her diversion worked, but only
for a short time. I abandoned the catamaran R & D project,
and reassessed my options. Eventually these ramblings recalled
the piece I’d written for Chuck Leinweber’s Duckworks
Magazine in late January. In Decision
Time I concluded that, besides helping others learn
to enjoy messing about in boats, I might have to design and build
a catamaran or a flattie skiff to add to the PolySail
repertoire. Ahah! What a revelation! I was truly back on track.
Sharpies forever! Back to the drawing board.
First I reread Reuel B. Parker’s
The Sharpie Book and parts of Howard Chapelle’s
American
Small Sailing Craft. Next I picked back through my
library of Phil Bolger books looking for his smaller sharpie designs.
Then I took a long hard look at some plans that had been sent
to me a few years ago by Christopher Ring of Austin, TX. The plans
are for a nifty little15’ cat-rigged sharpie that a New
England builder once built in small quantities. I almost decided
to build that boat. But then I picked up Jim Michalak’s
new book Boatbuilding for Beginners and Beyond and was reminded
again of my decision to keep things simple. After all, simplicity
is the essence of sharpie design and building. Here are the six
basic steps.
-
Fasten a couple of
identical sides with the chine logs and wales already attached
to a (nearly plumb) triangular stem.
-
Spring the sides around
a central form, and fasten them to a trapezoidal transom.
-
Add a keelson (a bow
to stern plank along the inside of the bottom)
-
Then, either plank
across the bottom or cut a plywood shape to fit the bottom
outline.
-
Add some seating, bracing
where needed, and a means of propulsion.
-
Seal everything with
epoxy, glue, sealant, and/or paint.
 Voila!
You have a small version of a very uniquely American workboat/racing
design nearly ready for the water. Voila!
You have a small version of a very uniquely American workboat/racing
design nearly ready for the water.
I’d built a 16’ sharpie
a few years back and learned a few things from that experience.
I tried to rush Foolhardy
into existence in order to have her ready for the annual Lake
Monroe Messabout, and I took too many shortcuts, both in design
and execution. As a result, she had a leak I could never find,
and her finish deteriorated quickly. However, the few times I
had her on the water, she lived up to the Sharpie’s reputation
for speed and stability. She now sits down by the bank of our
little lake awaiting major repairs or break up depending on what
I find when I turn her over after completing this project.
With Foolhardy, I did
little more than sketch out some drawings and cut out a cardboard
scale model before I started slapping together the boat. That
ease of construction could be considered both a weakness and the
strength of sharpie design. It’s thought that the sharpie
had its origins in New England, where it’s stability, load
capacity, and speed proved valuable for harvesting oysters on
the shallow, rough bays. Oystermen could easily copy rough designs
from other builders and construct their own boats in very little
time. No plans were really necessary. Like the oystermen of old,
I didn’t really keep a record of Foolhardy’s
lines and offsets. I promised myself I would keep measurements
this time because I hoped to end up with a boat others might want
to replicate. (But as it turned out, I didn't)
One of the lessons learned from
Foolhardy was that slight alterations in the central
form, stem angle, and transom change the appearance of a sharpie
dramatically. For this boat I hoped to keep the design simple
and easy to copy. I had visions of providing novice builders with
a boat kit consisting of the stem, central form, transom, and
instructions that could be easily shipped. The builders could
provide the plywood and wood needed for the sides and other pieces.
To make the design even more foolproof, I hoped that the novice
builders would need to make only three cuts in creating their
sides. With the right combination of stem, transom, and central
form, I reasoned, the sheer could start as the straight line formed
by one edge of two pieces of 4’ x 8’ plywood butted
together.

By altering the angle between the
bottom and the side made by the central form, the sheer would
have a nice fair curve when bent to shape.
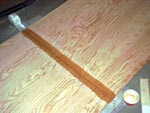
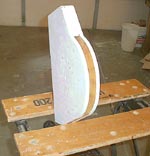
To try to get the right combination
of these elements, I decided to build a simple hull model from
1/8” lauan at a 1:4 scale. Building the model would at least
preserve some of the more important measurements as this project
took shape. When I didn’t like the hull shape on the first
model, I built a second one that was much more to my liking. The
first model joined the catamaran hull in the garage attic. Below
is the second hull model.
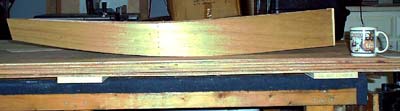
Note how the central form has shaped
the originally straight edge into a nice fair curve. Note also
that the chine of a sharpie has a slight S curve between the center
and bow. This slight S curve is apparent on the side view of the
model but not on the diagram.
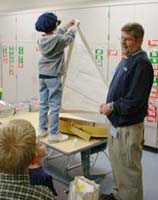 The
hull model later became a full-fledged sailing model. I’ve
since experimented with the model on our small lake to help get
a feel for the way the full-sized version will sail. The model
was also put to use in a couple of school classrooms at a rural
elementary school shortly before the end of school. In the picture
at left, “Captain Drew,” a first grader I tutored
in reading, places sailing vocabulary words on the model to show
off his newfound knowledge to his classmates. Later, the class
took the model out to the school pond to see if we could sail
it across the pond. We had to place a fairly large rock in the
bottom before we could make it across the pond without capsizing
when the wind gusted. If the boat capsized, it was Captain Drew’s
responsibility to drag the model back to shore using the attached
line. It might have been the first time all
year that Drew was the envy of his first grade classmates. The
hull model later became a full-fledged sailing model. I’ve
since experimented with the model on our small lake to help get
a feel for the way the full-sized version will sail. The model
was also put to use in a couple of school classrooms at a rural
elementary school shortly before the end of school. In the picture
at left, “Captain Drew,” a first grader I tutored
in reading, places sailing vocabulary words on the model to show
off his newfound knowledge to his classmates. Later, the class
took the model out to the school pond to see if we could sail
it across the pond. We had to place a fairly large rock in the
bottom before we could make it across the pond without capsizing
when the wind gusted. If the boat capsized, it was Captain Drew’s
responsibility to drag the model back to shore using the attached
line. It might have been the first time all
year that Drew was the envy of his first grade classmates.
One thing that became clear from
the tests with the model was that the full-sized boat would require
significant flotation if I wanted to be able to right the boat
single-handedly after a capsize. (I'm still concerned about that
revelation.)
 In
reality, some of the model building occurred at the same time
the full-scale hull was being built. The side view of the model
hull above provides an edge view of some of the 4’ x 8’
sheets of plywood I had obtained. One of the local specialty lumber
companies had advertised a special price on their ¼”
“marine” plywood in February, so I had purchased about
six sheets in anticipation of a future project. (I’m still
a little suspicious of this “marine” plywood. It looks
like plain old AC grade to me). I also had several 8’ lengths
of mahogany and white oak boards in stock that I had purchased
last year. Some of the oak had found its way into the Jackson
Doyle as boat parts and rockers, leaving me with more mahogany
than oak, so I figured I would use the
mahogany for framing up the sharpie. In
reality, some of the model building occurred at the same time
the full-scale hull was being built. The side view of the model
hull above provides an edge view of some of the 4’ x 8’
sheets of plywood I had obtained. One of the local specialty lumber
companies had advertised a special price on their ¼”
“marine” plywood in February, so I had purchased about
six sheets in anticipation of a future project. (I’m still
a little suspicious of this “marine” plywood. It looks
like plain old AC grade to me). I also had several 8’ lengths
of mahogany and white oak boards in stock that I had purchased
last year. Some of the oak had found its way into the Jackson
Doyle as boat parts and rockers, leaving me with more mahogany
than oak, so I figured I would use the
mahogany for framing up the sharpie.
The fact that I already had invested
in the ¼” plywood predetermined the thickness of
the sharpie’s skin. Since I mostly sail on smaller lakes
and protected waters, I wanted a lightweight boat that I could
muscle around by myself both in the building process and in trailering
the boat to other locations later. My experience with Foolhardy
suggested that a finished sixteen-footer with even a thin skin
was a little more weight than I could now handle, so this hull
was intended to have a modest 14’ 6” length overall
(Loa), a relatively narrow 3’ 7” waterline beam (Bwl),
and a short 10’ waterline length (Lwl). I found John Teale’s
How to Design a Boat a useful reference
in determining many of the designed dimensions.
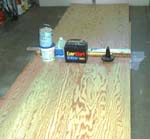
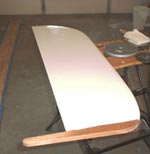
I had used 4' x 8' panels butted
together, glued with epoxy, and covered with fiberglass strips
on both sides to form long side and bottom panels on three previous
boats with no signs of failure, so I decided to use the same approach
with this sharpie. The trick is to sand out a slight hollow where
the boards butt together so that the joint will appear flat after
you epoxy the fiberglass tape over the joint on both sides. Of
course, this approach isn't a cure-all. You still have to fill
and sand, fill and sand, fill and sand...to get any joint to disappear.
The joint will have a better chance, though, if you have an absolutely
flat surface to work on and plenty of weight on the joint to keep
it flat throughout the process.
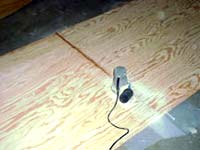
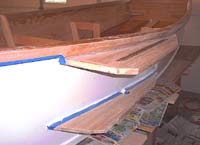
After creating two 4' x 16' panels,
one for the sides and one for the bottom, I marked out the sides
on one of the panels to my station marks and cut out each side.
The masking tape helps prevent splintering along the cut. In most
cases I used clear packing tape for this purpose because the marks
and lines will show through the tape. However, I used the blue
masking tape in these pictures so that the lines would readily
show. The portable saw in the picture made cutting along the long
chine lines a simple task. I highly recommend buying one if you
plan to build shelves or boats and happen to have a couple of
hundred dollars that might be otherwise employed in less worthy
endeavors like grocery shopping and such.
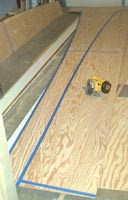
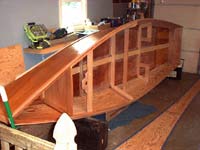
Once the sides, stem, transom and
central frame were cut out and assembled, the hull began to take
shape. I used a chalk line down the middle of the leftover 16'
plywood as a centerline and matched the center of the stem, middle
frame and transom to that line as the pieces were assembled. To
use this method requires a good eye and pieces that are symetrical
within about 1/16". For those kinds of tolerances, one really
needs that $200 portable saw.
Attaching the chines and gunwales
to the sides before assembling the sides is a recommended procedure.
Usually this method leads to fairer lines than are possible with
the method I used.
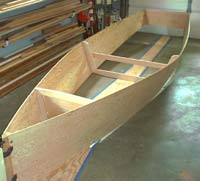 Note the small arc on the bottom of the center form. I reasoned
that I might get away with a tortured plywood bottom if I kept
the arc small and flattened the run to the transom. (I wanted
a flat area aft for possible planing.) I don't think that I would
try that experiment again. That decision complicated numerous
measurements and caused trouble in attaching the bottom later.
Knowing that many of those results could be expected, I chose
to experiment with this reputedly faster bottom anyhow?even after
promising myself that I would keep things simple. After all, one
never knows when he is building his last boat.
Note the small arc on the bottom of the center form. I reasoned
that I might get away with a tortured plywood bottom if I kept
the arc small and flattened the run to the transom. (I wanted
a flat area aft for possible planing.) I don't think that I would
try that experiment again. That decision complicated numerous
measurements and caused trouble in attaching the bottom later.
Knowing that many of those results could be expected, I chose
to experiment with this reputedly faster bottom anyhow?even after
promising myself that I would keep things simple. After all, one
never knows when he is building his last boat.
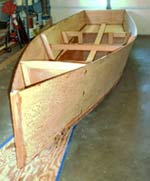 After
attaching the outside chine logs, completing much of the interior
framing, and adding the cedar keelson, I attacked the attachment
of the bottom. Lots of stainless steel screws and epoxy helped
draw the bottom up snugly. At least there were no gaps large enough
for a lurking hippo to crawl through. I had used up some leftover
fiberglass on the inside of the bottom, thinking that I would
only need to cover those areas that got heavy use. In retrospect,
I wish that I had covered all the interior of the bottom for better
protection, appearance and strength. I also wish that I had placed
a couple of temporary thwarts across the hull at this point to
protect the lines of the sheer. Adding fairly heavy wales later
in the process tended to move the widest point in the boat aft
of the central frame. After
attaching the outside chine logs, completing much of the interior
framing, and adding the cedar keelson, I attacked the attachment
of the bottom. Lots of stainless steel screws and epoxy helped
draw the bottom up snugly. At least there were no gaps large enough
for a lurking hippo to crawl through. I had used up some leftover
fiberglass on the inside of the bottom, thinking that I would
only need to cover those areas that got heavy use. In retrospect,
I wish that I had covered all the interior of the bottom for better
protection, appearance and strength. I also wish that I had placed
a couple of temporary thwarts across the hull at this point to
protect the lines of the sheer. Adding fairly heavy wales later
in the process tended to move the widest point in the boat aft
of the central frame.
 At
this point I was faced with a difficult design decision--centerboard,
dagger board, leeboard or... something else. I considered all
kinds of crazy options, including double-hinged boards, scissor
affairs, and the folding brass centerboards advertised in Messing
About in Boats. In the end I decided that I would have to try
out a leeboard. In part, this decision was determined by the expected
location of the mast and the center of effort of the initial sail
plan. In order to place a centerboard far enough aft for slight
weather helm, I would have to split the central form with the
centerboard trunk. Visions of Old Faithful springing from that
unstable juncture washed away the centerboard option, and left
me with the happy prospect of enough room forward that I would
always have the option of adding a small cuddy cabin. At
this point I was faced with a difficult design decision--centerboard,
dagger board, leeboard or... something else. I considered all
kinds of crazy options, including double-hinged boards, scissor
affairs, and the folding brass centerboards advertised in Messing
About in Boats. In the end I decided that I would have to try
out a leeboard. In part, this decision was determined by the expected
location of the mast and the center of effort of the initial sail
plan. In order to place a centerboard far enough aft for slight
weather helm, I would have to split the central form with the
centerboard trunk. Visions of Old Faithful springing from that
unstable juncture washed away the centerboard option, and left
me with the happy prospect of enough room forward that I would
always have the option of adding a small cuddy cabin.
 Cutting
and attaching the leeboard supports almost proved to be my undoing.
I worried those measurements and cardboard templates to a new
level of exhaustion before cutting the mahogany supports. Even
then, I blew a compound angled, curved cut that would have had
the leeboard on the starboard side rather than the leeboard side
where it finally found a home. The finished leeboard is 4' long
and includes a 10 lb. weight near the bottom forward edge to keep
it down. Jim Michalak's new book was very helpful in suggesting
how to mount the leeboard. I'm not certain that I followed all
his instructions, but I like the finished look. Viewed from the
front with her leeboard stored, the sharpie appears to have a
jet intake on the port side. Cutting
and attaching the leeboard supports almost proved to be my undoing.
I worried those measurements and cardboard templates to a new
level of exhaustion before cutting the mahogany supports. Even
then, I blew a compound angled, curved cut that would have had
the leeboard on the starboard side rather than the leeboard side
where it finally found a home. The finished leeboard is 4' long
and includes a 10 lb. weight near the bottom forward edge to keep
it down. Jim Michalak's new book was very helpful in suggesting
how to mount the leeboard. I'm not certain that I followed all
his instructions, but I like the finished look. Viewed from the
front with her leeboard stored, the sharpie appears to have a
jet intake on the port side.
 The
big leeboard and Scimitar sword-inspired rudder assist with tight
tacks?not a characteristic of most sharpies. Since the original
sharpies were conceived as simple workboats, they had long, shallow
centerboards and rudders that allowed the boat to float with the
rudder virtually untended in a straight course across the oyster
beds. One of the original 30-35' sharpies would nearly create
a bridge across the shallow channel where I live, so I need good
tacking ability and kick-up boards to get around and out to the
main body of my little lake in Indiana. The
big leeboard and Scimitar sword-inspired rudder assist with tight
tacks?not a characteristic of most sharpies. Since the original
sharpies were conceived as simple workboats, they had long, shallow
centerboards and rudders that allowed the boat to float with the
rudder virtually untended in a straight course across the oyster
beds. One of the original 30-35' sharpies would nearly create
a bridge across the shallow channel where I live, so I need good
tacking ability and kick-up boards to get around and out to the
main body of my little lake in Indiana.
|
Now I understand where
the term rudder "cheeks" originated. |
|
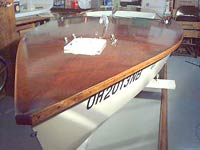
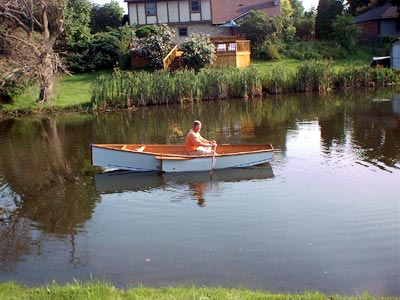
Since I've now had the opportunity
to test the boat, I can say that I'm pleased with her agility.
In the picture below, I am checking the hull for leaks and trying
to determine the actual vs. the designed waterline. I'm sitting
on a cooler just aft of the central frame which will later support
a seat. Only about 9' of the 14' 6" hull appears to be touching
the water. With her rudder on, I think I'm going to like this
design. But I'm definitely going to have to find some longer oars
if I'm going to row her.
This boat was built, in part, as
a testbed for my PolySail
Kits. The mast step slides along the keelson and
is secured by a single screw. Mast partner thwarts can be screwed
to the inside gunwale at nearly any location. The leeboard and
rudder angles and depths are adjustable. Floatation can be added
or removed. The center seat and the aft "jump seats"
are easily removable to allow the skipper to relocate his 190
lbs to the bottom for sailing in heavier air. But in lighter air
or when rowing, it's nice to be able to sit on a seat and cushion
and enjoy some conversation with the crew. Over time, I hope to
test a variety of PolySail designs, mast locations, and rigging
options with this little boat's flexible design.
Up to the point of putting her
hull in the water, I hadn't thought much about a name for the
design or the boat. Once I had completed and painted her 18' mast,
though, naming the boat started climbing my priority list. My
nephew Andy forced the issue one weekend when he said he would
cut out the boat's new name in stainless steel when I trucked
Hot Tub III up to him to replace the aging and waterlogged Styrofoam
version Hot Tub II. Forced to make a decision, I settled on Essence,
hoping the boat would have the substance and heart to match the
name.
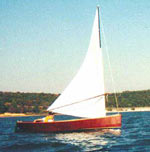
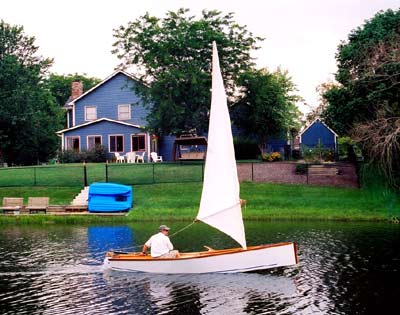
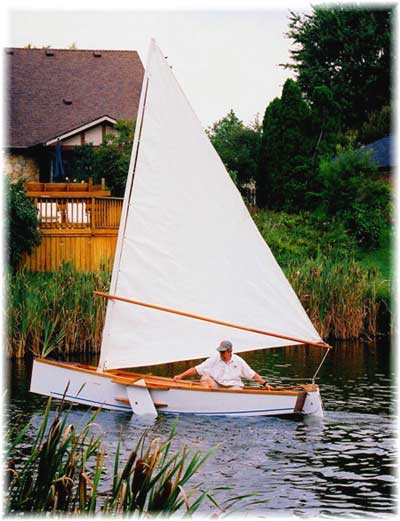
I hoped to get Essence finished
and and officially launched at an amateur messabout in Kingston,
Ontario, that I wanted badly to attend. Unfortunately, circumstances
arose that prevented me from preparing my trailer and the boat
for the long trek. Now my sights are set on an official launching
at the nearby Lake Monroe Messabout held each September near Bloomington,
Indiana. Of course, I've quietly been testing here at Lake Vista
since early August. The unofficial sailing date was Sunday, August
10th, 2003. The following Saturday morning was photo day with
my daughter snapping away from the hillside at the Gray residence.
Below is a photo from that day.
I wasn't happy with the 20 lb.
wood mast I made for Essence. My Hollowood spar weighs
just ounces, and I wanted something similar for the mast. However,
getting lightness and strength usually means spending big bucks
for a carbon fiber or production aluminum mast. Nephew Andy has
been turned loose with some money and an idea for a lightweight
steel mast that appears fairly stiff and strong up to about 17',
but I don't have a progress report yet. The prototype is 18' by
1" 5/8" x 1 1/4" and weighs just 7 lbs. At least
2 of those 7lbs. are probably in its vinyl tape wrapping which
I hope to eliminate in favor of paint. Even with its tape wrapping,
this lightweight steel mast floated on the surface of Lake Vista.
I might have to patent a kit form
of this mast if Andy's modifications can be made inexpensively.
 Using
this mast will require some adjustments to the partner and the
mast step of Essence. The current wood mast is plenty beefy at
the base and at the partner, so a new partner is in order. I might
be able to get by with the current step if I cut some wedges to
fit the much smaller base of the steel mast. I've tried the steel
mast out in light airs once with an "Ohio" version of
my jib-headed, sprit boomed PolySail. Although this "Ohio"
spreet sail has only about 80% of the area of the sail in the
photos, it seemed to perform even better. Using
this mast will require some adjustments to the partner and the
mast step of Essence. The current wood mast is plenty beefy at
the base and at the partner, so a new partner is in order. I might
be able to get by with the current step if I cut some wedges to
fit the much smaller base of the steel mast. I've tried the steel
mast out in light airs once with an "Ohio" version of
my jib-headed, sprit boomed PolySail. Although this "Ohio"
spreet sail has only about 80% of the area of the sail in the
photos, it seemed to perform even better.
 The
sail in the photographs of Essence is a five-year old PolySail
that I originally made for Foolhardy. Taking it off its original
mast, I found the sail to be in good shape considering that the
edges had only been taped with double-faced tape. Except for an
18" strip along the leech, the adhesive was still holding.
I was able to run a stitch around the edge, make some adjustments
to the leech so it wouldn't hook quite so much, then take the
sail out and use it. However, I think that at nearly 80 sq. ft.,
the sail might be a little large for all but the most tranquil
sailing conditions. With the shallow draft on Essence, she behaves
more like a 9-10 foot pram than a 14 footer. I'd feel a little
more comfortable with this sail if I had crew along to lengthen
the waterline and counterbalance the force of the wind. The
sail in the photographs of Essence is a five-year old PolySail
that I originally made for Foolhardy. Taking it off its original
mast, I found the sail to be in good shape considering that the
edges had only been taped with double-faced tape. Except for an
18" strip along the leech, the adhesive was still holding.
I was able to run a stitch around the edge, make some adjustments
to the leech so it wouldn't hook quite so much, then take the
sail out and use it. However, I think that at nearly 80 sq. ft.,
the sail might be a little large for all but the most tranquil
sailing conditions. With the shallow draft on Essence, she behaves
more like a 9-10 foot pram than a 14 footer. I'd feel a little
more comfortable with this sail if I had crew along to lengthen
the waterline and counterbalance the force of the wind.
I like the idea of having a craft
that can be fine-tuned for many different sail configurations.
For me, finding the optimal combination of board adjustment, weight
distribution, sail "set," etc. is what makes sailing
so intriguing. I'm looking forward now to the "official"
launching of Essence at Lake Monroe and to experimenting
with her for years to come.

Dave Gray is the proprietor of
HR-Solutions/Polysails
|