LongJon
by Larry Pullon
Prelude
When my brother Lewis showed up last November for what has become our annual fishing trip the river was way up and the fishing was way down. So with less time spent catching trout we talked about things brothers usually talk about on the river, and finally got around to TV. Turns out both Lewis and I are big fans of Monster Garage where they seem to work miracles making crazy stuff in a single show. We also made plans to try the trout again over the President’s holiday in February.
January 2005. During a phone call to make sure the February trip was still on Lewis idly mentioned too bad I couldn’t do a "monster" boatbuild in time for our trip the next month. It was January 7th, a Friday, if I recall correctly, and I quickly estimated the number of days until the fishing trip- da, da, da, carry your one… "It’s doable," I said. I don’t remember his response, or even the rest of the conversation, even though we talked awhile longer as I have a 45-minute commute. I was lost in the greatest place one can ever be – the moment of deciding to begin a new boat project! Lewis and Anita, would show up on February 19th expecting to see a brand new trout boat – I had better stop for wood on the way home from work!
LongJon Comes To Life!

I don’t want to mislead you into thinking that I decided to build a boat that Friday and just "knew" what wood and materials I would need like magic. The truth is I have been thinking about a foldable 18-20 foot river skiff for a couple of years and have even conversed with Chuck about it a few times. I wanted to develop a foldable river skiff to carry on the deck of another bigger project – Tentboat – and a full-sized plywood prototype would let me work out the bugs before building a fancier lighter version out of cypress strips.
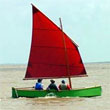
Those 45 minute commutes to work and back are good thinking times – gives me plenty of time to mentally build and discover problem areas. That evening after work I decided in the Home Depot parking lot that LongJon would be a 20 footer – if you are going bigger than 16 you might as well make it 20 as the cost difference between 20 and 18 will be negligible. Besides, 20 feet is a good length for a trout boat – you get a lot of floatation for dew deep water, and you don’t have to worry about somebody knocking your hat off when they cast a lure.
OK, 20 foot long, by…? With plywood 48" is normally a good bet. The boat will be very stable and plywood comes from the mill in that width. On the downside, in moving water there is a lot of drag from a "wide" boat and it would take a 25hp motor to get a decent upriver cruising speed. More importantly, I had a pair of 15hp Evinrudes in the shop – saved from last season’s horsetrading just in case something like this came along. So, it would be narrower than 48". 36" is an excellent width for a river boat. Not much wider than a canoe, but with flared sides it would be less tender, especially loaded. But, I had been thinking about an experimental tunnel hull for awhile now, and the itch to try it was overwhelming. A "normal" dime a dozen tunnel would not do, it would be offset from the centerline, and there is hardly enough room in a 36" bottom for that - which means I would need a 42" bottom.
By this time I was looking at the stacks of plywood. It wasn’t much to look at. To me the AC fir plywood was BD at best (if there is such a thing). Then I spied a pallet of cabinet grade birch- seven ply ½", probably not waterproof, but mummified in paint and epoxy it would never see water anyway. At least it lay flat on the pallet. Yes marine plywood would be better, but around here that stuff is $55 a sheet, if you can find it, and I have never even seen a sheet of the okume plywood "real" boatbuilders talk about.
I estimated I needed about five sheets, but bought six just to have an extra, and then added two sheets of matching ¼" birch to make the sides of the boat. I think I got some deck screws, 2 quart mixing buckets, a few tubes of PL construction adhesive, and some other stuff as well. Oh yeah, I bought a professional caulking gun for $12. Put that one on your list – it is the best $12 I have spent for tools in a long time!
Anyway, by the time I got home I knew LongJon would be 20’x42" with 15" sides and have an offset motor mount and tunnel, and it would have to fold in the middle.
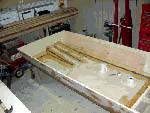
Every now and then you get to build something that was meant to be. That is the way of LongJon. There were no drawings, no written plans, not even a sketch (although I did do some ciphering now and then on the workbench). I placed the strongback leftover from Matt’s squareback canoe on the alignment marks still visible on the shop floor and proceeded to let the boat out of the stack of plywood.
The transom is three layers of ½" birch plywood – 42" at the bottom and 54" at the beam (two layers would work). The flare looked just right to me so I went with it without looking back. The livewell bulkhead and front and aft hull section bulkheads are all the same 42"x54"x15" deep ½" plywood. It is a good fishing boat shape.
I secured the transom to the strongback with scrap 2x4s and built the two "folding" transoms by gluing plywood on either side of a scarfed 2x4 frame to end up with what I hoped would be strong enough transoms to support the front section when it was being folded.
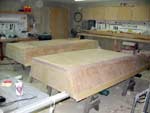
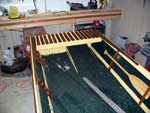
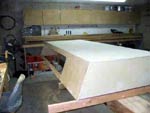 After ripping three sheets of plywood for the bottom I was pondering the large useful looking scraps and decided they would be boat – not firewood. I split the 6"x8’ scrap plywood into 3"x8’ strips to use them as inwales and chine logs. The 4’ end left over from the bottom became a sturdy "box assembly" to strengthen the front and aft transoms where the boat folds – it also served as a ready-made butt block for the side panels. Look at the picture – what looks like a side panel with a hole cut in it is really glued together scraps!
I used ¼" scrap plywood for the bottom butt blocks (bolstered with a layer of six inch glass "tape" on either side of the joint). Not as nice as a scarf, but faster and I was looking at a deadline steaming ahead like a runaway freight train and had no idea if I even had a chance of making it.
I worked first on the back section with the intent of stretching the 16’ strongback a few feet with 2x4s and then setting up the front section. After the aft section was pretty far along I made the front transom and mounted it to the strong back extension. The bow transom is 42" on the bottom and 48" on the top and 8" deep (if I recall correctly) and is made of two layers of ½" birch. Two layers because the 20 footer will have a lot of inertia and I was afraid a run in with a dock pylon on a windy day would crush a single layer. Although the bottom is a straight 42" all the way, the bow would narrow six inches at the beam, creating a gap between the hulls when folded. That would be a trade off, a better looking hull for a small gap when she was folded – fair enough.
I did attempt to start building the front section on the strongback extension only to discover a wiggly strongback was a great way to mess up a promising boat project. So, I postponed the front section until I glassed the external seams on the aft section with 6" fiberglass "tape" and epoxy and moved it out of the way onto saw horses. Setting the front section bulkheads on the now vacated strongback, I used the same angle on the bow transom as the aft transom – if you get far enough away it looks symmetrical.
 You might be wondering about the tunnel. I may write another essay on the tunnel, what I learned, the dimensions, what is gained (and lost), how I think it works, and why you need one if you want to fish skinny water without building some kind of high power freaky boat…
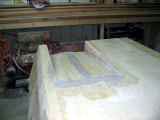
"Hey, how did that "secrete" tunnel picture get in here? Chuck! Sandra! Shame on you."
 As I worked it dawned on me I have never bent plywood into a curve for a bow, so I did not know what to expect, only knew I needed it curved, right now. I set up the front and back transoms for the front section and leveled at it a little with my 24" carpenter level. I thought about using a laser level (Christmas gift), but I wasn’t sure how to set it up and it had pages of scary instructions with lots of "you’ll put you eye out" warnings I would have to read before risking my vision. I made an "I" out of 2x4s and screwed it to the strongback – it was about four feet or so (guess) from the bow and would serve as the bending point for the bow curve. Going back and forth and back and forth I soon discovered clamping was not going to work – the clamps would pop off with gusto about the time I got to the other side. So, I got out the PL construction adhesive and some 2" deck screws and fastened the leading edge of the bottom to the bow transom – take that you rascal! Now I could easily bend the bottom section, and did so, holding the shape with a variety of Harbor Freight clamps.
To attach the bottom to the chine logs I used PL construction adhesive (waterproof) and a pneumatic nail gun. This allowed me to remove the bottom clamps right away to install the side panels. Real boat designers know on paper what shape the sides are going to be before they start – that is very impressive, almost amazing to me. I did not have a clue what they would be until I clamped the ¼" plywood sides on and traced the shape to cut – don’t know if they are exactly the same, but the boat looks fine. Before permanently attaching the sides I used a belt sander to sand an angle onto the bottom to match the flare. This ensured no gaps and a stronger bond between sides and bottom. For both bottoms I applied a single layer of six inch fiberglass tape on all the outside seams and topped that with a layer of 9 oz "E" glass and medium cure rate epoxy. That reminds me, I still like epoxy better than polyester – the cure rate is more predictable.
 The inside seams were done in a single step with seam filler made of micro balloons, talc, and epoxy squeezed out of a freezer bag and topped off with a layer of 6" wide fiberglass tape. I have to get a military gas mask – even with a expensive (to me) respirator I got a little "dizzy" down in the hull where all the fumes accumulated. It wasn’t as bad as polyester but every evening I epoxied a lot I tossed and turned all night at a time I really needed the rest.
(Another "secret" picture!)
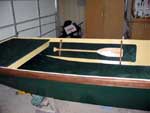
 From here on out I could work either on the front or back sections. As one dried or cured I sanded the other, working back and forth, just like I was building two boats. The back section has a livewell sealed with seam filler, 6" tape, and a very fine weave 4.2 oz glass. The fine weave cloth and epoxy gave me plenty of bubble problems! I used the cloth before, but it was with polyester resin which was thinner than the epoxy – note: if you buy a roll of that 4.2 oz stuff on ebay use polyester with it and avoid a headache. The back section also has a back bench with tapered boards that make up for the six inch narrowed bow. The front is simpler (and lighter) with only a front deck. There are also ash strakes along the bottom of the front section. I did this so I could beach without a concern and still not increase draft on the heavier aft section, a side benefit is increased stiffness in the floor. Each section has custom fishing rod and paddle holders made of cypress and I should mention the gunwales are 3" wide cypress stained to match. I could use a couple of matching cypress cleats and will make them one day when I think of it.
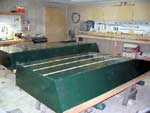 For paint, I bought two gallons of Armorepoxy on ebay for $39 a gallon – turned out to be pretty good paint, although the "beige" was a lot more yellow than I thought beige should be. Before long I had two painted and varnished hulls ready to come together.
If you see a trend with ebay, there is one. Planning ahead, every morning before work I would search ebay for items I would need. There is only one marine store with a decent stock of boat and trailer parts in the entire area and even paying shipping I can usually beat their prices (a lot) on ebay. I bought 9 oz fiberglass cloth, trailer fenders, water pump impeller kit, prop, seats, livewell hinge, stainless screws, 2 gallons of epoxy paint, and probably stuff I don’t recall on ebay auctions. It was all waiting on my doorstep when I got home from work. Harbor Freight was my source for wheels/tires, trailer jack, trailer lights, and 2" throw away paint brushes. And the large bolts, safety chains, bearing buddies, hitch, and welding stuff came from Tractor Supply. I am not advertising for them, only letting you know where I got the stuff I used.
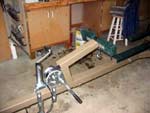
 Oh, I forgot to mention, when I wasn’t at work, or working on the boat, or sleeping, I had a junk trailer to modify. I bought a windshield for my long-term 1959 Duracraft project a few months ago and the owner insisted I take the boat and trailer as well. It wasn’t much to look at, needed everything, but it wasn’t bent or rusty (beyond surface rust). The mission – make a trailer that held a 20 foot boat and a 10 foot boat equally well. The solution was extending the 3x3 tongue through the trailer crossbeams all the way to the aft crossbeam. Fortunately, I had a scrap piece of 3x3 metal from a previous trailer tongue repair that just fit the bill. Next was to cut off a few feet of the original tongue – it was originally made for a 14’ - 16’ boat. Then all I had to do was find a tube that slid into the original tongue and install hardware, bowstop, etc, and live happily ever after.
 Oops, hold up there cowboy! I searched high and low and could not find a square tube that fit just inside the 3x3. I rejected a 2.5x2.5 several times before finally deciding it was the only option (encouraged by the quickly moving calendar). It required attaching 4 1/8"x2"x12" shims to ensure there was not too much slop. One the first attempt I welded the shims to the smaller 2.5" square tube – it did not slide in and out like I wanted, even hung up pretty bad a few times on burs and whatnot inside the old tongue, so how would it do under the weight of a 20 footer?
 In a moment of self proclaimed brilliance it occurred to me that moving the shims to just inside the front end of the original tongue would eliminate the extra gap while leaving the smaller tube free to extend and retract through whatever was snagging it inside the original tongue. I moved all the shims except the top one. That one I left in place to act as a stop (with a small plate welded on top of the tongue for it to hit) when the trailer was fully extended. I momentarily had visions of boat and half a trailer rolling down the ramp – forever lost in a raging, bottomless, river!
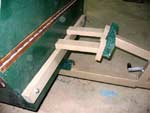
A quirk in the extending trailer is I could not make a 10 foot tongue into a 20 foot tongue without some sticking out of the back of the trailer or the front section being a little longer (to allow for overlap inside the tongue). I would bang my shins every time I walked around the boat if the tongue stuck out the back, so that meant I would have to make it a little long in the front which would require a spacer to hold the hull for towing. The picture really helps you see what I am talking about. So I made and painted the "towing adaptor" that does the job very well.
 The trailer also required fenders, tires, lights, bunks, winch, chains, hitch, dolly, paint, and probably more stuff gratefully blocked from my memory. I feel like I put as many hours in the trailer as the boat. Probably not, as I started the trailer late in the project and was becoming fatigued, so it just seemed like hours and hours. But, I would not be denied, and one day I rolled the finished trailer out of the shop – ready for years of problem free service (I hope).
The next step was installing the giant stainless steel hinge. It is a 3"x 54" heavy stainless steel piano hinge that cost $100 from an industrial supply because I did not have time to shop around. Things like that can’t be helped – time is money you know, and they got me - this time.
 After drilling 104 holes in the hinge and using an old rounded off punch to make countersinks to match the 2" stainless screws I had on hand, it looked like a beat up piece of junk – kind of curved, full of holes, and beat to heck and back!
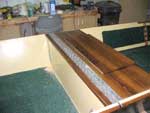
But, it went on easy enough and looked pretty good with all the screws to level it out. One drill for pilot holes and another with an apex bit. I wasn’t sure if it would hold, but the three broken apex bits were a sign my pilot holes were not too big. In any case, once installed, it looked like it always belonged there on the varnished cypress bench top. About the same time I installed a much smaller aluminum piano hinge on the livewell door – so much easier than its bigger cousin!
Oh, sorry, I failed to mention all the britework is varnished cypress stained with Minwax "Provincial 211" stain. It was supposed to be pecan, but I was in such a hurry (shopping on my lunchbreak) that after looking at the pecan can and reading the label I must have grabbed the Provincial. So, if you like the hunter green and dark brown (I do) it was fate that brought them together – certainly not my artistic ability.
 After the two sections were joined by the hinge, the next step was to install the four metal plates with 5/8" holes that would act as washers for the two ½" x 6" bolts that would secure the boat in the open position. I thought about more bolts – but stopped at two, they are, after all, so much stronger than the wood, I felt sure more would be wasted. After a few trial fits I welded the nuts to the plates located inside the livewell. I did this because I knew I would need to attach the towing adapter to the hull and with the hull folded would not be able to reach in the boat to hold a nut.
I traded sleep for time to install carpet with outdoor carpet glue and making rod and paddle holders and other odds and ends. I also took a minute to design and order LongJon decals from Jim in Nevada who has made all my boat and motor decals for a fair price. Email: js1802@charter.net
 Two days before my deadline I put Longjon on the trailer for the first time and rolled her out into the sunlight to see if she would fold without breaking into splinters. I tried the first fold by myself and watched in horror as the boat tilted away from me and the front hull slipped from my hands and fell the last few feet – crashing together with a thunderous noise. It didn’t break anything, she is too overbuilt for that, but it did let me know I could not manhandle the front section while standing to the side. This was not going to be a boat I could fish alone! In the folded position the back of the boat is held to the trailer with a strap that passes through the bow eye and an eye bolt welded to the trailer. This eye bolt came in handy later to allow a "deckhand" to man a rope to help lower the front hull while unfolding.
With one day to go I finally got around to taking a vacation day to go to the Game and Fish Commission to get hull numbers. I could not do it earlier because I needed photos of a "completed" rig. In Arkansas you take a couple of picture of the boat (to prove it is home built) to the Game and Fish Commission in Little Rock and they issue you a letter with a hull identification number. You then take that letter to your county seat and get the boat and trailer added to your personal property tax and take a copy of that to the County Clerk to get a stamp showing your property taxes are paid. Next, you take the Game and Fish letter and stamped tax form to the Revenue Office where they issue hull and trailer registration documents, and trailer tags. The final step is stopping by a hardware store and getting 3" hull numbers to stick on the side of the boat. It can be done in five or six hours – if you are motivated.
 Arriving home in the afternoon I finally had a chance to look at the motors, surely one of them would run, and if I had bad luck most of the parts would interchange. That sounds strange, but I got them at different times in the fall and just never looked at them beyond the initial lookover to ensure they were complete. One was a moderately used 90’s motor and the other was an 80’s motor that appeared to be hardly used at all. The 80’s motor was my first choice. A compression check showed it had 130 psi compression – meaning it had spent its life as an unused auxiliary motor. The lower unit had a coffee can under it as it had a steady seep from dried out seals. This is not a big problem to fix – I had ordered seals a few months ago after noting a growing pool of gearcase lube on the floor. I had also ordered a new water pump rebuild kit as even an unused impeller becomes brittle over time.
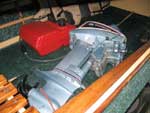 So, I shot a squirt or two of oil/gas mixture in the cylinders and gave the rope a good pull. She fired right up and kept running! A couple hours later, the new seals and impeller were installed and I rounded up life jackets, fuel tank, throw cushion etc, and was ready to go for a boat ride just as the sun was touching the horizon on my final day! But my wife was working late that day, and I already knew I could not set her up alone. There was no time left. My brother would arrive in a few hours – it looked like the shakedown and fishing trip would be at the same time and that made my stomach churn!