Rope Stropped Blocks Revisited
by Frank A. Butler
s/v Intuition W32 #0825
I have a wooden block on my boat and have maintained it for quite a few years. However, until I read the article about making a Rope Stopped Block by Derek Waters in Duckworks it never occurred to me to make one. Since then, I have made quite a few for the boat.
I have made mine out of packing crate material that I collect from a local automotive parts importer. I have no idea what kind of wood I am using, but the price is right and it holds up pretty well. I have made some 5” blocks and have successfully moved my camping trailer with them with no ill effects.

However, I really enjoy making small blocks about 3 ½ inches tall and 2 ½ inches wide, but with a twist. I do not care for any of the methods of pinning the blocks together suggested by Derek. He suggests using brass or stainless rods, or perhaps 8d bronze nails. I ended up with a modification of ducktails and pins. There isn’t a great deal of stress trying to pull the blocks apart and so far I’ve had no failure. However, I would not trust my life to this method, or any other, until I had put the block through some pretty rigorous stress tests.

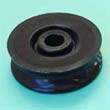
I start with two 3 ½ inch by 2 ½ inch blocks of ½ inch material and cut the ends at an angle by gluing a paper pattern to the ends. See the plan. After I have both ends of each piece cut properly, I cut the connecting duck tails on a band saw. I generally glue the pattern to the wood and cut just outside of the lines so that I can custom fit each of the four pins correctly. This does take a bit of fussing about, but not too much.
I then go ahead and glue everything up using epoxy. Any mistakes in the fit can be corrected easily by adding a little saw dust to the epoxy and I am not above doing this. I then glue the oval outline of the block to one side and bandsaw the whole thing oval, finishing up pretty much as Derek has guided us.

One other modification I make. I really enjoy knotting, but for the life of me I cannot make a grommet. Yea, sometimes they come out kinda round but generally with a twist or two in it. They are never the correct size. Finally I gave up and just push the right size eye in the end of a line with a fairly long tail. Then I just tie the tail wherever I want and use the block in this manner.
As an aside, in his article, Derek introduced me to the Microplane rasp. I use it to make sheaves just as he suggests, but I also cut the grooves in the sides of the block with it. I have found it so useful in my shop that I bought several other versions of it.

click image above for printable PDF version.