The Story Of The Sailboat Rudder
By Phil Keck
This was my first attempt at making a rudder. There have been lots of discussions in the PDracer group about the best/easiest/cheapest way to make a rudder and opinions are all over the place. Power planers vs. hand planers; this shape vs. that shape; simple vs. complex. When I decided to start this project, most people sounded like they were making rudders that were basically a flat board that had a rounded front and a slightly feathered edge, and it sounded like those rudders were working just fine.
I like to make life difficult, so I decided to go for a real live NACA 0012 foil.
 |
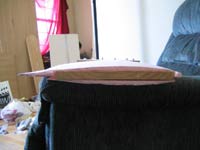
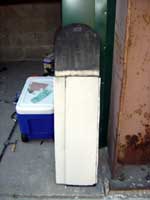
Here's how my rudder started out. Just a flat board.
(click images for larger views) |
|
I don't own a power planer, and the
thought of planing off more than a few millimeters of wood with a hand plane is
enough to make me want to cry, so I decided to look around for another method.
Finally I found what I was looking for at: https://www.bluemoment.com/emergencyruddersprint.html
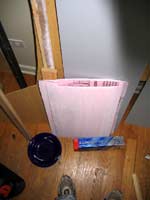
Basically, you take some pink insulation foam from the hardware store and use that to make the wing shape. It's much easier to shape foam than it is to shape wood. I decided to stick the pieces of foam onto the wood rudder I already had, so the wood would provide the strong foundation, and the foam would create the wing shape.
| I didn't take pictures along the way because I forgot, so these pictures were done (poorly) in Paint. |
|
|
The drawings help explain what I did. Each of these images is looking at the bottom end of the rudder, as if you were a fish below the boat looking up at it.
First, I cut the pieces of foam that make the sides of the rudder. In the picture here, they are foam 1 and foam 2. Notice that they stick out past one end of the board. My wood board is a 1"x12" (which in reality is actually 3/4" by 11 1/4"). I wanted a rudder with a chord length of more than 11 1/4" (the chord length is the length from the front to the back), so I cut my foam pieces to be 12 inches long and 24 inches tall. I temporarily attached them to the board with masking tape.
 |
Then I stuck the nose piece on (it's foam 3 in the picture).
|
|
I arbitrarily chose my nose piece to be 1 inch long, and it worked out well. It's 24 inches tall, just like foam 1 and foam 2 are.
| Next, I did some math to start figuring out the shape of the foil. |
|
|
I got my numbers from the
table at:
https://www.sitexpress.com/slrmbc/foil_chart.htm
Remember that my rudder has a 14 inch chord length. So I took all of the
numbers in the first column of the table on that webpage, multiplied them by 14,
and then divided by 100. Let's do the point at 7.5% as an example. We take the
chord length, multiply it by 7.5, and then divide by 100.
14 x 7.5 / 100
= 1.05
So the 7.5% point is 1.05 inches back from the front of the
rudder. I put a dot there.
I repeated this for all of the other points,
and my rudder ended up looking something like this. (I actually didn't do every
single point. I started at the 7.5% point, and then only did maybe 10 or so of
the rest. Also, I didn't measure the points for this drawing, this is just to
give you a rough idea.)
 |
Then I took the numbers from column two of the table, and multiplied them each by 14 and divided by 100. |
|
I took each number and measured that many inches to either side of the dot in the middle of the board. Let's do the 7.5% point as an example. From the table, we see that we'll need to measure 4.2% from either side of this dot.
14 x 4.2 / 100 = 0.58
So we'll have to measure 0.58 inches from either side of that dot.
It looked something like this (notice the dots in the corners of the foam pieces).
| Repeat this process for all of the other dots. |
|
|
 |
Then connect the dots. Mine actually did look about this sloppy, I just did it by hand. |
|
Then I repeated the above steps to mark the curve on the opposite ends of foam 1 and foam 2. Make sure you keep track of which end is the front and which is the back!
Once I had the curve marked on both ends of foam 1 and foam 2, I peeled the foam pieces off of the wood. To shape them, I took a 1x2 that was about three or four feet long, and I stapled sandpaper along its length. All you do is run this sandpaper stick back and forth on the foam until you sand down to the curve you marked. Go slow at first because the foam can be shaped very quickly. Sand a bit, then check the ends of the board to see how far along you are. Sand, check, sand, check, sand, check. I also recommend you wear a dust mask for this part because you make an unbelievable amount of dust.
| Once I had foam 1 and foam 2 shaped, I stuck them back on the wood board. I cut out a final piece of foam for the trailing edge. |
|
|
I made it about 5 inches long to start out with so that I had plenty of excess. All I did was take a straight edge and continue the lines from foam 1 and 2. It looked more or less like this. Then you shape it with the sanding stick just like the other pieces.
To shape the nose, I just took a piece of sand paper and pulled it taut around the nose piece. Then I ran it up and down along the foam until it was rounded. It only took a minute or so.
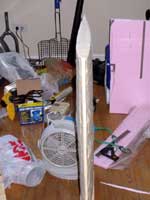
 |
The actual finished pieces. You can kind of see my sanding stick standing up along the left edge of the pieces.
|
|
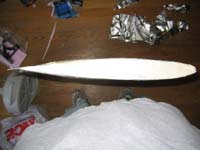
| The finished pieces on the wood. |
|
|
 |
I wrapped the entire thing in masking tape because I was going to cover it in fiberglass and use the resin that they sell at home depot.
|
|
It's a styrene based resin, and since the foam pieces are polystyrene, I assumed that they would dissolve on contact (but I didn't actually verify this with a scrap piece of foam). So here it is wrapped in masking tape.
| A view from the end. With a rudder this smooth, my boat will be negligibly faster than all of the others. It'll be great! |
|
|
After this I wrapped it in fiberglass and coated it in resin. I'm terrible at doing this. The fiberglass was sloppy, and I got resin everywhere. The next time I do it, I'm going to wet out the fiberglass with resin in a tub first, and then drape that onto the rudder.
While my finished rudder is hideous and covered in gobs of resin, this whole process only took about two hours of actual work. So I'll just use the rudder I have now and I can always make a better one later. Making all of the calculations took up a lot of the time as well, and now that they're done, making more rudders will be a snap.
Excel file to calculate
your rudder
To use this file, all you do is put
the chord length of your rudder in inches into cell G-1 and hit enter. Don't
actually type the word inches, just put the number. G-1 is the only cell you
need to type into...if you type into any other cells, the formulas might get all
mixed up.
There are two data sets that come up, one for a 0012 foil and
one for a 0015 foil. The column labeled "Point #" is to help keep track of which
point is which. The column labeled "Distance From Nose" gives you how far back
that specific point should be placed from the nose. The column labeled "Distance
From Centerline" is how far you measure left and right from that specific point.
For example, enter 10 as your chord length. For a 0012 foil, the chart
tells us to measure 2/16" (or 1/8") back from the center of the nose of the
rudder. Do this and then put a point there. It then tells us to measure 3/16" to
the left of that point and 3/16" to the right of that point. Do that and put
points there. Continue for all of the other points, and connect the dots.
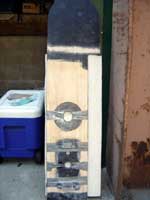
The Sequel:
| For this rudder, I decided to try a couple of new things. As you can see in this image, I added weights. |
|
|
I wanted to try using exercise weights instead of melting lead, and
here's what it looked like.
I used quiksteel epoxy (from Home Depot) to glue the weights to the
wood, and then used duct tape to hold them in place while the epoxy
cured. I actually left the duct tape in when I sealed everything
because I didn't see any real reason to take it out. The bottom weight
is the same kind of weight that you find on the big multi-station work
out machines at gyms. I got it at a used exercise equipment store for 8
bucks. The other weight is a 2 1/2 pound weight. I calculated that I
would need this much weight using the same formula that can be found in
the article that Andrew wrote
on how to use lead in a rudder. The extra width of the foil shape
displaces more water than when you have a flat plate, so you do need
extra weight, but I ended up using so much resin on this thing that it
weighs more than it needs to.
 |
Here you can see the second change that I made in the design. Instead of using pink foam and sanding it down, I used acoustic ceiling tiles.
|
|
Refer to the article above to see how I got the shape. The tiles are much easier
to shape, but they produce loads of dust, so be sure to use a dust
mask.
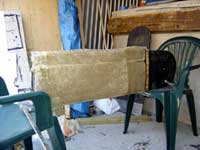
| This (kind of) shows the third and final change to the procedure: a good fiberglass job. I experimented with doing a craptacular fiberglass job on the first rudder I made, and the results where unsurprising. |
|
|
The fiberglass separated from both the foam and the wood after just a couple of trips out. This let water in, so whenever I pulled the rudder out of the water, it looked like it was pregnant. The first thing I did was sand a band of paint off of the wood this time around to allow a better bond around the "neck" of the rudder. You can see this in all of the pictures. I read some great step by step instructions on how to do a good fiberglass job at another website, and chose not to follow them the first time. Which was stupid.
Here's what I did this time:
1. Stand the rudder so that the leading edge is pointed up to the sky, and the trailing edge is toward the ground (I clamped mine to some lawn chairs to hold it steady). The final picture on this page is with the rudder flipped over the other way around, so ignore it.
2. Get your pieces of fiberglass cut and all ready to go. I recommend starting off with pieces that span about 15 inches of the leading edge, and when draped over the rudder, will cover the entire length of the rudder from leading to trailing edge plus an extra inch. If you have a friend helping, you can do bigger pieces, but this size is more or less manageable for one person.
3. Take the pieces of fiberglass and roll them up like a scroll of paper, so that you have two rolls that meet in the middle of each piece.
4. From here on out, you have to work quickly, so have all of your stuff ready to go. Mix up your polyester or epoxy or whatever you're using, and pour this mix onto one of the scrolled up pieces of fiberglass and smear it all around with a plastic spreader. Continue doing this until the entire piece of fiberglass is more or less transparent.
5. If the fiberglass is going to be in contact with wood anywhere, smear some resin directly onto the wood first. Then lay your scroll of fiberglass so that the middle of it is right on the leading edge of the rudder. Unroll the fiberglass and smooth it out. Smear some extra resin on there, as some resin will get absorbed by the ceiling tiles, and then smooth that out. Smooth from the leading edge toward the trailing edge.
6. Continue on down for the rest of the rudder! I recommend two or three layers of glass because there always seems to be a hole somewhere in every layer.
7. To seal up the bottom of the rudder, I stood the rudder straight up with the bottom toward the sky, and just started pouring resin all over the bottom of it. Some ran down inside the rudder, which is fine, but eventually, it just started filling up until I had a solid block of resin at the bottom! It weighs a ton, which sucks, but feels very sturdy, which is good.
I only took one picture during the fiberglass procedure because I didn't want to stop halfway through and screw up the glassing job. So, as long as you have all of your stuff together everything should go great!