Repairing a Sad Old Boat
by Chief Redelk
Redelk is Chief of the Many Nations Tribe. Fortunately for us he often dispenses his compelling brand of practical, homespun advice and humor on the Duckworks Discussion Group. The following is an example of his down-to-earth method of boat repair: |
Patching the hole
|
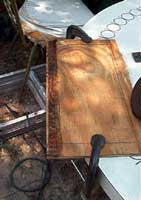
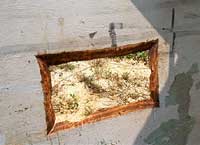
STEP # 1 - remove damage
soft wood removed. Make outside lines the size of the patch. Draw inside lines one inch smaller. Remove wood between lines to create angle to accept patch
|
 |
|
|
|
STEP # 2 - make patch
The size of patch was determined. Patch was cut out to fit between outside lines of patching area. Draw inside lines one inch inside of patch and sand between lines to create angle like the angle on the hole to be filled. |
|
|
STEP #3 - Modify hole angles
Hole should look something like this when all angles have been completed. Do not worry to much about perfection IF you are using a glue like PL Premium. Gap filling glue is forgiving. |
 |
|
|
|
STEP #4 - patch and hole ready
Check the patch and the hole to see if the angles are compatable. Remember to keep the arrow up on the patch when checking for a good fit |
|
|
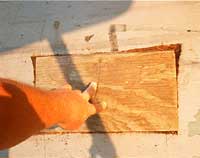
STEP #5 - check patch for fit
Here Chief hand fits patch into opening. Notice arrow on patch so it is fitted the samp way each time. All sides are even with or slightly below the boat bottom. The leading edge must NOT allow forward moving water into the seam. |
 |
|
|
|
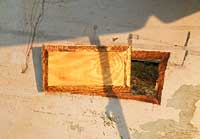
STEP #6
plastic wrap keeps glue from sticking to back up plate which is held in place with screws. This back up plate will allow the plug patch to be screwed tightly in place until glue dries. |
|
|
STEP# 7 - patch in place
plug patch glued and held in place with screws onto back up plate which will be removed once patch is firmly glued. |
 |
|
|
|
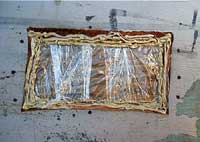
STEP #8
Overlay patch with fiberglass tape. Sand area and remove dust. Extend tape 3 inches past glue seams. Remember the tape is to reinforce the glueing of the patch. Next we will repair the hole in bottom at transom. |
|
|
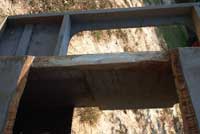
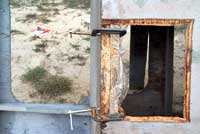
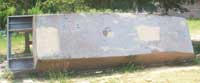
Hole at transom
We have removed all soft wood. The hole is larger now. It has been beveled on 3 sides and will attach to the transom for more support. The damage to transom will be repaired also. |
 |
|
|
|
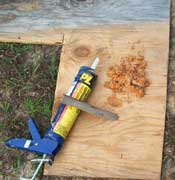
Patching and filling material
This is what it takes to put new wood into those voids created when we steel wire brush all of the old soft wood out of the grain. This stuff will actually build wood to level out and fill large voids. What you see is wet saw dust, a stick and glue. |
|
|
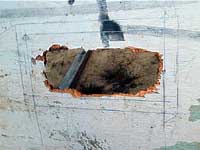
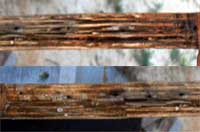
Close up of damage at transom
We must fix this before the bottom patch can be attached. When I finish this will look new. |
 |
|
|
|
Repaired damage at transom
Here is what it looks like when we actually make fiberboard filler. This stuff will hold a nail, screw and glue. |
|
|
Patching filler applied
Apply glue all the way down. Do not leave any voids. Hand pack the wet saw dust and using a stick pack it into the cracks. Add new glue and saw dust to completely fill voids. |
 |
|
|
|
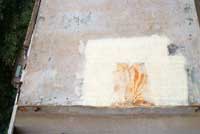
Paper over wet patch
As the filler is packed the glue should mix with the saw dust. Smooth glue. Rub hard to remove as much moisture as possiable. Paper helps keep glue off your hands, also keeps the glue from bubbling during cure. Sands off once glue dries. |
|
|
Transom Patch installed
Patch glued in, screws were removed and patch sanded. Notice glue match sticks in screw holes and install screws before glass is applied. |
 |
|
|
|
Transom taped
Three sides are scarphed but the back is not. This is the way chine patches and other pathes that have something solid to attach to are done. To complete patch the tape will be floated, sanded, and pained. Float will be Heavy Duty Liquid Nails glue. |
|
|
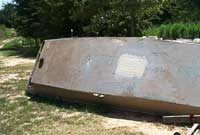
Bottom repaired like new
The bottom holes now repaired with flush patches, bottom is sanded ready for paint. Next set the boat on something and start on the sides and on the insides. |
 |
|
Editors Note: When I asked Cheif Redelk if we could post this information in Duckworks here is what he replied:
Good morning, Chuck anytime I can be of help I am always glad to do so, thanks for asking and yes use any of my material you like. I have added TWO more pictures in the Boat repairs folder in the photo's section of the dwforum. I am adding photo's as I go along. I already had photo's of the patch being fitted, NOW I have the back plate attached with the plastic wrap, the glue spred and the other photo of the actual patch installed. I think I will use waxed papper instead of plastic wrap next time because the plastic is unstable and can get into the glue seam and make it fail. Wax paper being more rigid is easier to use. I use both from time to time but on this patch I noticed a small bit of plastic extruding with the fresh glue. The glue and pulled it into the seam when expanding. SO I had to take the patch off and re glue. Incidentally the glue was still soft and it was easy to do. Getting the back plate attached required help since it is held in place from inside the boat. IF the patch were installed in reverse it would be to easily knocked out of the boat. I like the flairs on the outside but I do not necessarily like the idea that water could peel the patch so it must be over laid. Once this patch is completed a bottom runner will go over the top and insure that the patch will remain in place. Also the inside of the hull on the bottom where the hogg was may need reinforcement. IF that is the case I may laminate a 16 inch wide strip of luan all the way from aft to fore on the deck. IF I do that this patch will have back up on both sides. It is hard for me to do a half way job since after all I am an artist and engineer. I have always over built and everything had to be perfect. Once I did a job over, {took a MONTH} just because something was 1/32 off. The wife I had in those days declaired me mentally insane. After she took the kids and everything I had worked all my life for and I may have acutally experienced a few moments of real insanity, reality like the sun shone on me and I am working on trying to be more laid back. This old over worked, shot up body is teaching me the value of siting in a chair and letting my mind create. I get a lot less done in a not so perfect way but life has become more fun. Ironically once we learn HOW to live, the show is almost over, smile. My wife is nearly 62 and still pretty to me but her photos reveal that when she was young and dumb she had a great body. BUT young women give great bodies to hairy dumb brutes, have kids by them and suffer abuse from them for years. I think young ladies should look 70 and regress until they reach the looks of a 21 year old at 70. Then those older women with great bodes would be wise enough to seek intelligent men for having babies. That way our world would increase in I.Q instead of being on the slippery slopes of decline that I witness daily. WHY do those young loucious ladies seek tattoed low brow gorillas for mating? Then after they reachd menopause, obtain a divorce and look for a laid back, decent man who actually has a brain, for a partner to spend the rocking chair days in the shade with. Oh well, that is why I took up boat building in the first place, getting that crap off my mind. Got tired of designing radio control planes. The price of one and then one crash and it was gone. For the same money I can build a boat, share it with kids, give it away or what not and it is alive for years to come. Got to make a run up north, Have a great day, Chief.
|