That’s about all I can think of at the moment but there are doubtless other reasons.
Me? Probably 1,2,and 4.
After selling a small keeler I’d owned for 10 years I had become antsy at not having a means of getting out on the water. My sailing aspirations had veered towards owning a multihull, but a dearth of suitable boats in NZ pretty much means having to build one. Due to other demands on my time this wouldn’t be happening any time soon. As I had no boatbuilding experience a small, relatively quick project that would give me some skills usable later seemed a good idea.
Picking a Design
 click images to enlarge
 |
I wanted something relatively simple to build, able to be car-topped on a small hatch-back, seaworthy enough to cope with a decent chop with two on board. I decided to forgo sails for simplicity sake which meant that it had to row well. I had a look at various designs in the 12 to 15 foot range before deciding that a flat bottomed skiff type, with a transom to take a small outboard as an alternative power source, would fit the bill. Why the Seagull? It was the one I liked the look of best. A lot of the available designs have a long, pointy bow which I personally don’t like. The Seagull has a rounded forefoot, a nice sheer, and is, I think, a very well proportioned boat. Also John Welsford the designer, was a known quantity, I had read his book and liked his design philosophies.
Getting Started
I bought a set of plans off John Welsford, a set of roof bars for my car and went hunting for some ply. It pays to shop around. I eventually settled on 5 sheets of 6mm BS1088 occume for 59 dollars a sheet. I’ve since found it a couple of bucks cheaper elsewhere. Why occume? It was hardly any dearer than meranti and is lighter. Rather than rip my own timber for frames etc I bought knot free PAR (planed all round) pine in appropriate sizes (20x20mm and 20x40mm) from a local hardware. I was able to get this in lengths up to 5.2 metres, which saved having to scarf the gunwales etc. What else? A 5 litre kit of International HT9000 epoxy (came with a bag of glue powder), some glass cloth, some disposable paint brushes, and a pack of 1,000 cable ties were enough to get started. In the months preceding the project, in various hardware sales, I had bought a reasonably good jig-saw, an electric screwdriver and 20 F-clamps for about 250 dollars all up.
 |
 |
My goal at this point was to make all the main parts before Christmas so I could build the boat over my vacation. The available workspace was a 5 x 5 metre open ended carport behind the house. As we have occasionally had stuff stolen from here (usually cans of spray-paint), I decided to build a large lockable cabinet for tools and materials next to the work bench. I also had a 3 metre long pallet which, with a sheet of construction ply on it and sitting on a pair of saw horses, I used as a temporary bench/cutting table. An old chest of drawers with a 1.2m x 600 cm piece of ply screwed on top served as a movable work top. I also used the pallet as a support when car-topping long lengths of timber.
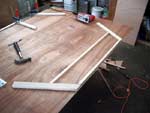
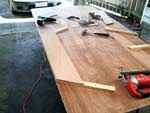
 I lofted my panels onto 3 mm MDF. I’m glad I did as I found, after I had cut them out, that I had measured the hull side patterns short by 2 cm. And yes I did check them, but obviously not well enough. The corrected shapes were then cut out of ply and put to one side while I made the frames.
It took me about half a day to make the first frame while I nutted out how I would assemble it. I found it was easier to draw the frames on the work bench, cut out the parts and screw them to the bench while the glue set. If you do it this way you know that nothing will move while the glue is going off. The following day I made the other two frames. The next weekend I made the transom. It took me a while to draw a shape I was happy with on cardboard. Which I then used as a pattern to ensure both sides were the same. Life interfered over the next two weekends after which I glued the hull panels together with butt straps and put them to one side in anticipation of Christmas which by now was about 3 weeks away.
Putting it Together
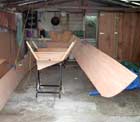
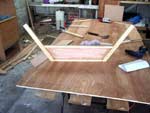
The hull came together quite easily. I followed the instructions and set up the bottom panel on saw horses 2.5 metres apart. Next step was to screw the frames and transom to the bottom panel. I bevelled the edges of the frames to roughly match the shape of the bottom paneI. The transom didn’t have enough meat in it to allow bevelling, so has some large fillets and glass tape to keep it in place. If I was doing it again I would make the transom a little bigger (like about 12 mm) all round to allow for shaping.
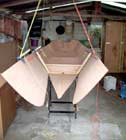
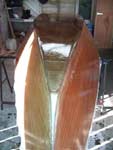
I had already pre-drilled the stitching holes in the side panels. Then I hung the side panels from the rafters of the carport, attached them to the transom and proceeded to stitch the side panels to the bottom, 600mm or so at a time, alternating sides as I went. Before long I was at the bow and she was all sewn up. Or tied up I should say. I used cable ties and would absolutely do so again. They are simple, quick, relatively cheap (12 bucks for 1,000 ties) and can be trimmed off when shaping the chines and left in the hull.
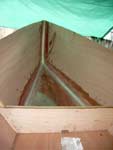
I made sure the hull was level and square from bow to both stern quarters, then I hung a plum bob from the bow to check the stem was vertical. All was in order so I mixed up some bog and applied a large fillet into the stem and then down the chines to the first frame. I cut my own tapes from cloth instead of buying glass tape and glassed all fillets wet on wet as John suggests.
The following day I continued filleting and taping the rest of the chines. After that had gone off I removed the frames and glued them in and glue/filleted/screwed and taped the transom in place. Next job was to fit the bottom stringer up the middle. I left about 300mm sticking out the transom to use as a lifting handle.
 At this point I made a major departure from the building sequence as specified. I decided I wanted to completely glass the outside of the hull and to have a solid inwale. It seemed sensible to glass the hull before attaching the outer gunwale, but I didn’t want to turn the hull without some support around the top of the hull panels. So I attached the inwale first. It was laminated out of two lengths per side of 20 x 20mm and then shaped with a power plane. Be wary, these things remove wood very quickly and I very nearly over-did it.
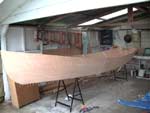
With the inner gunwale shaped the hull was turned upside down, the cable ties trimmed with a Stanley knife and the chines rounded off. I used a belt sander with a 60 grit belt for this. Then I shaped the stem and trimmed off the bottom stringer. I then went and filled all the screw holes from butt straps, frames or whatever and gave the whole hull a once over with the random orbital sander my brother had given me for Christmas.
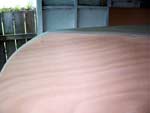
 Glassing the hull was straight forward once I had got some advice from a boatbuilder friend. Unfortunately only one metre wide cloth is available (or if the wider stuff is available I couldn’t find any here) these days which meant an overlap. I also added two extra layers at the forefoot for abrasion resistance. To fill the weave I added five coats wet on wet at 4 hourly intervals. Auckland weather is very changeable and inclined to be humid that time of year (it was January). Unfortunately the ambient temperature increased between the start and finish of this operation and there was some out-gassing which had to be filled. It was also the only time I worked on the boat at night. Damn the mosquitoes I say. Otherwise there was very little fairing. I ground the glass overlaps down with the belt sander and filled where necessary. The weave of the cloth itself was nicely filled by the resin. I gave the hull a good scrub down with cloudy ammonia and water to get rid of any amine blush and sanded the hull ready for painting. The outside pad for the outboard and the centre skeg/keel timber was also added at this point.
A digression on The Saga of Paint
Painting (and as I write this I am sitting in a room I just finished painting yesterday) is something I don’t enjoy. Although I get a huge sense of satisfaction looking at the finished job, I find the work of painting and the preparation onerous. So anything that makes this easier is fine by me. One book I had read some time previously was Jim Browns ‘Searunner Construction’. In it he devotes some ink to his thoughts on appropriate finishes, emphasising the practical aspects of what he calls a workboat finish. I had also read in Sam Devlin’s boatbuilding book of a paint called ‘Ditzler DP Epoxy Primer’, used normally in car painting, which seemed compatible with Browns ideas.
 DP Epoxy Primer comes in 5 colors; DP-40 (Grey-Green), DP-48 (White), DP-50 (Gray), DP-74 (Red), and DP-90 (Black). It can be left without a topcoat or used as a base for most other systems. This, I thought would be the ticket. A couple of coats of white on the outside, grey on the inside and all done. I found an automotive paint shop that sold DP primer in small quantities and went to buy some. Went like this…
ME: I’d like a litre of DP 48, a litre of DP 50 and two litres of hardener.
Paint Man: What is DP 48?
ME: (showing PM the page downloaded from an American website that lists the colours) this stuff here.
PM: (Takes list and shows it to colleague who looks extremely puzzled)
PM’s Colleague: We only have the grey. I’ve never heard of these other colours. I don’t think they are available in New Zealand.
Turns out there are a number of Ditzler products that are unavailable outside the US. Go figure. Anyway, I bought enough grey to do the outside of the hull. I put two coats on and a sense of deja-vu developed. It reminded me of all the beaten up project cars I’d had in my teens/early 20’s that never got finished off properly. I didn’t like the association so I decided to finish coat the outside while the boat was upside down. I figured on dark green for the outside with a varnished interior.
Finishing the Interior (well ok, building the seats)
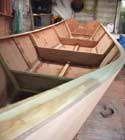
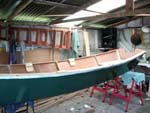
With the outside of the boat finished, if some what out of sequence, my attention returned to finishing the interior. First though, I trimmed the fibreglass at the top of the hull and fitted the outer gunwales, glueing and screwing them in place after dry fitting them first.
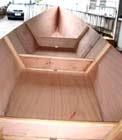
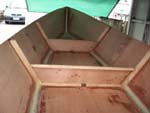
To support the seats there is a stringer that runs up the middle. The towing eye had already been fitted to the bow and it is just as well as it would have been difficult to mount low enough once the seat support was fitted. I added some small wooden blocks around the hull sides to support the seat edges at the bow and added a couple of fore and aft stringers at the stern to do the same. I made a cardboard pattern for one half of the bow seat and cut it out. It was not a particularly good fit. I cut the next one a little bigger and it was a better fit. There was quite a gap down the middle which was filled with epoxy when the seat was bogged down and filleted in. The rear seat top, I made in one piece. Starting larger and trimming it to fit by trial and error. I’m not sure why, but my efforts at making cardboard templates seemed only partially successful. Thank (name your deity) for the gap filling properties of epoxy is something that seems written into many boatbuilding stories, with good reason.
Once the bow and stern seats were finished it started to look more like a finished boat. I made the centre thwart out of a piece of 200 x 20mm pine rather than ply. Next step was to drop the boat down on the floor, jump in, and measure up for the foot rests. When epoxying these and other small items in place I positioned them with a few spots from a hot glue gun to secure them while the glue cured. I made the transom knees from off cuts of 20mm pine and the small foredeck and bow breast-hook from the same.
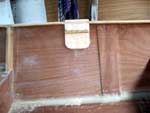 The last construction job was making the rowlock socket mounts. Having experienced dinghies that had substandard fittings come loose or break I wanted them strong. I added 150 x 150 x 20mm blocks to the hull sides up under the gunwale and a smaller support piece next to that. Then I shaped some wedges to go on top of the gunwale to give the correct angle to the rowlock sockets. I drilled a drain hole right through the support block and drilled oversize holes for the sockets. When I was ready to fit them I mixed up the last of my epoxy filler and used this to bed the sockets into the oversize holes as I screwed them into place. They should be bomb proof.
 I decided to forgo the varnished interior. I didn’t like the idea of white glue lines showing through it. I had been a bit messy with the epoxy in places as well. A bit of a shame as the Occume looked nice with its two coats of epoxy on. I went to our local paint store and had them mix up a sort of cream colour in low gloss interior enamel for the inside and a darker shade in gloss for the gunwale. The finished result looks good to me and the low gloss paint is easy on the eyes in the sun. I had completely forgotten to fit the 200mm inspection ports in the bow and stern seats. So the poor boat got its first touch up before it was even launched. I also fitted a plastic cleat front and rear, a fairlead on the ‘foredeck’ and a couple of threaded stainless eyes were screwed into the keel stringer just outside the front and rear seats. The foremost of these is to tie the end of the anchor warp on to and the rear one is a tie-down when roof-racking the boat.
The oars were bought and cost $110.00 for the pair. I don’t like traditional open rowlocks, preferring the closed type with plastic sleeves (another $20). Other purchases near the end were a pair of buoyancy vests, an emergency paddle and a small folding grapnel and warp.
Launching
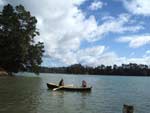
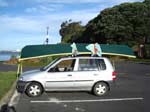 My folks live across the road from a small beach on the Manukau harbour. It is very tidal but seemed an appropriate place for a first splash. We christened her with some cheap bubbly and I took her for the first row. It is amazing how well these long narrow boats move. Unlike a short fat dinghy they hold their way much more between strokes. I nosed out around the point into the small chop and deliberately took the wake of a passing powerboat beam on to see how she handled it. No problems. I went back in, picked up my partner and took her for a short jaunt. The falling tide curtailed activities. It had all gone well. When we got home I threw the Sid Vicious version of ‘My Way’ on the stereo and cracked a beer.
Post Project Diagnosis
I think it’s been a great success for a number of reasons.
The boat was straight-forward to build, even though I made it more difficult by building partly out of step. John’s book was a big help as it has a number of photos of Seagulls in various stages of build. Most importantly it does everything it was reputed to do in the water. I could go on waxing lyrical but I won’t save to say that IMO this is a great design for a first time builder. If you are thinking of having a go you shouldn’t have too many surprises building one of these. Cheers John.
As a first effort for someone who has long thought about building something a bit bigger, but never done any more woodwork than building a bookcase, it was a great introduction into boatbuilding and handling epoxy and fibreglass. I had everything happen that can occur on a bigger project, just in smaller doses. I had a cost overrun, a time overrun, had a container of mixed epoxy start to flare off while I was holding it, out-gassing, epoxy slivers under the finger-nails etc etc. It has taught me skills (and given me the excuse to buy some tools) that I can use in future.
Cost
Here I’ve only listed materials that went into the boat not life jackets and power tools. If I’ve missed anything it won’t be far out. All materials were best quality and I did no scrounging for free bits. Most things I have rounded to the nearest 5 or 10 dollars.
Plans |
- |
$120 |
Ply |
- |
$300 |
epoxy |
- |
$414 |
Glass cloth |
- |
$50 |
Solid timber |
- |
$200 |
Oars |
- |
$110 |
Sockets, rowlocks and sleeves |
- |
$50 |
Fastenings, insp. ports, fittings |
- |
$140 |
Paint total |
- |
$420 |
Sanding discs, belts |
- |
$100 |
Disposable brushes, rollers |
- |
$100 |
Gloves dustmasks etc. |
- |
$75 |
Total (New Zealand dollars or thereabouts) |
- |
$2079.00 |
There are any number of areas where money could have been saved; using a cheaper grade of ply, ripping my own timber from demolition material, using acrylic house paint, not wasting and overusing epoxy (the plans say 7 litres to build the glassed version. I used 15. Sure, some of it flashed off and some was spilt, but I am forced to conclude I may have been a bit [OK a lot] heavy handed with the epoxy in some places). With careful consideration to cost one could probably build one for half what I spent.
Time
Except when I had my Christmas Vacation I never kept track of the time spent as it was generally a few hours here and there. I would suggest something like 50 to 100 hours. You could easily spend more. Some people (like me) like to sit and muse about things a lot. Also not having any power or lighting in an open shed is not conducive to working at night. I do know that if I built another one AND I had all the bits I needed to start with I could do it a lot quicker – but it might not suit to do it that way. One further point; the completed hull is only part of it. You will spend just as much time doing all the interior fiddly bits and painting.
Hints
Read some books on the subject first. Other than John’s book I’d recommend ‘Devlins Boat Building’ and any of the Payson books (love to know how Dynamite got his nickname BTW, sounds like the sort of guy you shouldn’t argue with). There are no doubt others but find something that covers the construction method you are considering.
Don’t rush, take the time to think things through.
Don’t be afraid to ask for help if you get stuck. If you don’t know of anyone personally there are lots of building resources on the web.
Try and work clean (yes Mother)
Make sure you understand the safety implications of the materials you work with.
Acknowledgements
Thanks to Rick Carter and John MacDonald for encouragement and advice during the build.