|
Make and Make Do |

|
The fabrication of one’s own boat trailer is laborious, but fairly straightforward. The rectangular frame comes first. Be aware than cutting channel is a pain. It takes a long time with a wheel, and is messy with a torch. A torch can cut very cleanly when set up for the right thickness, but channel steel is thicker in the corners, so you have to adjust the torch for the thick part. If you’re really good you can move fast enough on the thin part to compensate. I’m not. So I cut wide of the line and cleaned it up with the grinder. Buy spare eye and hearing protection. You’ll need all you can get.
Another difficulty is that you’ll need to make a cutting pattern so the longitudinal pieces can “keyhole” into the interior of the transverse channels. Be sure to leave excess length on the transverse channels, as an outside corner is difficult to weld without melting it. If the transverse channels are overlong, they are all inside corners.
 click images to enlarge
 |
Also be sure to grind the weld areas to shiny steel. Welding is an electrical process and doesn’t like dirty conductors. Worse, anything on the steel could contaminate and weaken the weld.
Once the channels are cut, lay out the pieces on the shop floor and square them with an accurate carpenter’s square. You can test the accuracy of the square by measuring from 9” on one leg to 16” on the other. If it’s not 25”, there’s a problem. If it’s too long, lay the square flat on the floor and whack the outside of the “heel” with a heavy hammer. This will slightly flatten and widen the outside corner and make the legs pivot inward slightly. Check again. Obviously, you whack the inside corner of the heel if your measurement was short of 25”. Don’t overdo this, or eventually you’ll have too much of a gap at the inside corner for the test measurement to even be accurate. Another thing to watch for is a floor that’s not flat. It doesn’t matter if it’s level, but it has to be flat. Say within 1/8” over 8’.
Once squared, tack weld. When you weld, you’re melting and re-freezing metal. All that radical temperature changing can cause some radical warping. Keep it small until it’s all locked in place.
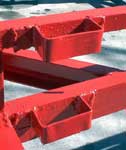
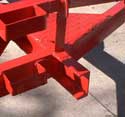
Once your rectangle is tacked, you need diagonal braces to make it solid. If you have the choice, make flat gussets from 3/16” plate steel. They are easy to cut and weld. I used more channel to make diagonals about 18” long. Don’t do this if you can avoid it. It is a HUGE pain in the butt to get the brace cut right to keyhole into the main channels at a 45 degree angle. I tried every fancy trick I know to scribe them just right. But I wound up with serious gaps, laboriously filling some with welding rod and ignoring others. I would only use channel braces again if it were really important for the top or bottom surface of the channels to be flat. Like if the suspension hangers had to mount where they’d be interfered with by a flat gusset. This was the case on my trailer, but actually, I think it would have been easier to find a way to work around that with plate gussets. So use plate gussets, not diagonal channel braces. The only real disadvantage is that you’ll need a full-length welding rod to reach the inside corner welds that join transverse to longitudinal channels. This creates a pile of partly-used rods. Annoying, but you’ll use them later. Just make sure the other side of that joint is welded really well.
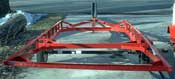
Channel Diagonal Bracing – like the big gap? |
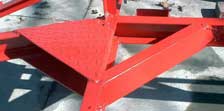
Plate Gusset on left, diagonal channel brace on right
|
So tack your gussets on. Now your rectangle is pretty solid. Double check dimensions and squareness. If something is wrong, it’s a lot easier to grind a couple tack welds. Once the welds are whole, it’s a solid piece of metal and you have to cut it apart. Not fun, and you lose part of the parent metal. Get it right before you finish the welds. Also take some scraps of channel and run some practice welds to be completely certain you have enough amperage to get good penetration. It’s a lot easier to do this than grind off bad welds. After you double check, flip the rectangle over and check again. You never know.
If all is well, weld all the horizontal seams on the bottom. Don’t forget the “inside” seams of the gussets on the underside. Try to do it like torqueing lug nuts, where you weld one, then weld the one opposite it. This way any tendency to warp is cancelled out. You’ll want 1/8” 6013 rod at about 120 amps for this. Cleans up nice and easy. The flux chips right off like glass.
Recheck your measurements! You really can’t be too careful. Trust me. I wound up grinding off a set of suspension hangers and buying a new set because I was 1/4” off. Now weld your verticals. You’ll want 1/8” 6011 rod at maybe 110 amps, since it burns a little hotter than 6013. It also spatters a lot more and you need a wire wheel in your drill to get the flux off. You can weld vertical up or vertical down. Vertical up gives tremendous penetration, but makes a huge mess because you have to move the rod away and let the puddle begin to freeze a little every second or so. Of course the rod is still spewing metal droplets all over. But with these relatively thin gauges we can likely get enough penetration with vertical down. This is where the puddle doesn’t fall out because the rod is below it, spewing out more metal. This sort of creates a “current” that keeps the filler metal in place. Do some practice runs on scrap. Better yet, tip the frame up against a wall and weld them as horizontals with 6013. This is what I did, and avoided all vertical welding until there was no way out!
OK, so now your rectangle is accurate and solidly welded. Now we add the tongue. Mark the centerline of the tongue and rectangle at both ends. I find the easiest way to line it up is to tape a string to the furthest aft and forward marks. Adjust until the string passes the other two marks and you’re set. Tack weld it. I made the mistake of welding a whole bead, and boy did that thing warp. I broke the weld straightening it with a sledgehammer. Use tack welds. They don’t warp much.
Then cut the diagonal tongue braces. Here you’re probably stuck using channel. Fortunately, we designed this so none of them have to keyhole into the other channels. This means we can simply lay the channel across the top of the assembly and mark the angles on the underside. Finish the marks with a square and bevel gauge. Make the cuts and grind the metal shiny. Again, tack weld and check measurements. If all looks well it’s time to complete the welds like before.
 Where the angles meet the tongue it’s easy to miss part of the paint. Be sure to get the paint off the scrap. Overdo this, if anything. It’s most likely lead-based industrial enamel which makes toxic fumes when heated by welding. You don’t want that. When sandblasting this stuff, it turned my skin bright red and created lots of tiny infected pimples. If I were starting over, I’d sandblast it outside BEFORE welding anything together. Where the angles meet the tongue it’s easy to miss part of the paint. Be sure to get the paint off the scrap. Overdo this, if anything. It’s most likely lead-based industrial enamel which makes toxic fumes when heated by welding. You don’t want that. When sandblasting this stuff, it turned my skin bright red and created lots of tiny infected pimples. If I were starting over, I’d sandblast it outside BEFORE welding anything together.
Once you’ve again checked your angles and measurements, you’re done with the basic frame. Indeed, for a great many boats, you are almost done! Weld on the coupler, then flip the whole works and finish any welds you missed on the bottom. Figure out how far back from the coupler your axle should go. Use a square and a straightedge to transfer that mark to one of the side channels. Make a mark for front spring hanger 12” forward of that, the rear 13” aft. Make sure the coupler is now upside down or your suspension will be on top! Tack the hangers on. Then tape a tape measure down to the center of the coupler. The center of the tongue just behind the coupler is good enough. Measure the distance to the very front of the front hanger you just tacked. Take the tape to the other side and tack the front hanger at the same distance. Repeat this process for the aft hangers. This is by far the most critical measurement of the entire process, so take a break, come back fresh, and triple check these measurements.
Also check the width between spring centers and measure the transverse distance between hangers, both front and rear. I screwed this up so you won’t have to. Check the longitudinal distance between hangers, and distances from coupler to hangers. When you are 100% positive that all is in order, check again. Remember, I was sure when I screwed up. If someone saner than you verifies your measurements, weld the spring hangers.
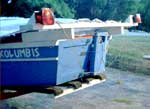
Now it’s a trailer frame. This is how I towed mine home from welding class, actually. In fact this created a couple hours more work for me, as I had to remove and replace the suspension again.
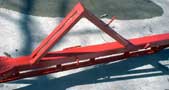
Now it’s just a matter of adding parts until it’s done. First some terms. A flange is the long part of a truss – in this case the top and bottom. A web is the part that holds the flanges together. In this case, the webs are 5” of angle iron, cut and bent to stand the flange 4” off from the main channel (which is technically the other flange). Making all the truss webs was tedious simply because there are a lot of them, and all involve both cutting and bending. Made from angle iron, I cut each to 5”, and then slit the “spine” for 1”. One or both of these “ears” was folded over on each web to increase weld area. Those that were not bent over were welded flat against the sides of the main channels. Both were bent over for corner webs. I recommend taking measurements and then assembling each truss flat on the floor before installing it. This allows you to make many more welds the easy way – horizontal. I made my upper truss flange “turn the corner” and angle down to meet the diagonal tongue braces about 2’ forward of the frame-to-tongue joint. This means notching and re-welding the flange in two dimensions. This works best after welding the truss assembly to the frame.
This work in 1/8” steel calls for 3/16” rod, 6013 at 90 amps and 6011 at 75-80. On my home welder I found I needed a little more for both. This is why practice welds are so important. Every welder is different. Even trickier, the amount of current available from your mains is not exactly the same from day to day, or even hour to hour. If everyone turns on their air conditioning, it means adjusting your welder until the utility responds with increased output. The utilities do their best, but they can match output to demand only so accurately. Have lots of scrap ready for testing. I am convinced I would have saved many hours of fixing crappy welds had I more rigorously followed this recommendation. Please be smarter than me. I’m going to try to be!
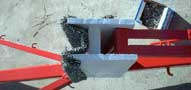
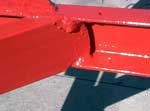
A mistake
Speaking of being smarter than me, check all measurements. I missed one. Check out the rear photo below. Notice the difference in angle between the rearmost transverse angle iron and the axle? Yup, I got it a little crooked when I welded the lower rear truss webs to the upper. I didn’t realize how much I was bending them when I clamped it all in place.
 Actually, you are seeing a partly corrected version, since I had to weld on that upper angle for the bunks to bolt on. So I put it on a bit cockeyed to partly make up for the earlier mistake. To avoid twisting the hull when it’s tied down, I had to get it the rest of the way level with wood shims. Oh well. 30 seconds sighting down the length of these before welding could have saved all this. Actually, you are seeing a partly corrected version, since I had to weld on that upper angle for the bunks to bolt on. So I put it on a bit cockeyed to partly make up for the earlier mistake. To avoid twisting the hull when it’s tied down, I had to get it the rest of the way level with wood shims. Oh well. 30 seconds sighting down the length of these before welding could have saved all this.
Little details
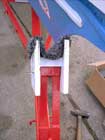
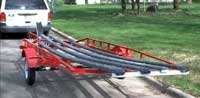
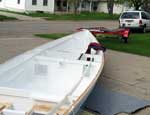
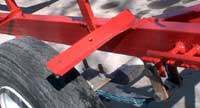
Don’t forget the metal bits that you don’t immediately think of. You’ll need hooks and cleats to tie the boat down. You might want a piece of 1/2” threaded rod to hold the spare tire. You’ll want to bore a hole in that rod for a padlock so nobody can easily steal your spare. You’ll need to finalize your plans for how you’re going to hold the bow in place. I used a sort of a double channel made from 3/4” plywood and 2x4. One side is bolted to the bow tower, the other is padded with outdoor carpet to hold the bow. The bolt holes are not yet drilled in the photo below, as I did not drill them until I could have the boat loaded and fit is exactly.
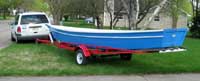
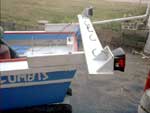
Here’s the same bow chock bolted down, after I loaded the boat:
I discovered later that this was not a great way to do it. My assumption was that having the chock in fairly continuous contact with the bow would result in less stress on the boat. Practically, though, this is not true since it’s very difficult to get the boat that intimately in contact with it.
When loading the boat, the trailer is angled down into the water and the boat is level. The bow meets the chock that way. But when they are both back in the same plane the bow winds up about 3” aft of the chock!
 By backing the trailer in so it just floated the stern I could manhandle the bow forward far enough to close this gap. To make it touch, you have to lift the bow to get it in the final resting place before the bottom is settled on the trailer to support it there. When the stern is just barely floating, there’s enough friction between the boat and bunks to keep in it place while tying it off. By backing the trailer in so it just floated the stern I could manhandle the bow forward far enough to close this gap. To make it touch, you have to lift the bow to get it in the final resting place before the bottom is settled on the trailer to support it there. When the stern is just barely floating, there’s enough friction between the boat and bunks to keep in it place while tying it off.
Now I know why bow posts only touch the bow at one point, and how a winch and an eye at the bottom of the stem helps lift the boat in line with where it should come to rest. The next article in this series will discuss the modifications. Meanwhile, if you order the plans, they are already corrected.
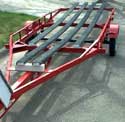
You’ll want stake pockets for your side bunks. I started making these by welding together scraps of angle iron. It was taking too long, so I bought some flat stock and bent regular stake pockets. I think they work about equally well for simple side bunks, but this is a good example of where scrap steel doesn’t pay. I paid maybe $4 for new steel strap and saved easily two hours. A good deal. Make sure you leave about 1/4” of play so you can get your stakes in and out reasonably easily.
1/4” might seem like a lot, but remember that wood can swell. I keep these bunks from popping out with no more than a galvanized deck screw in the wood below the stake pocket. I leave it protruding just far enough that it runs into the metal if the wood tries to jump out. So far it looks like only one of the screws has touched the metal at all.
You’ll also need fender brackets. These are easy to forget. I made mine from angle iron. I blocked my fenders up to hold them in the right place and marked where the brackets would meet the fender when laying flat across the top of the frame. Then I lay them spine-up on the concrete floor and pounded them with a 3# hammer to flatten to about 45 degrees. Take note than I welded these to the frame before welding the trusses. Where truss webs go is flexible. Fender brackets can only go in one place, so do them before you put something else in the way.
Now is also a good time to dry fit the bunks so you can be priming, painting and carpeting them while the trailer paint dries. I won’t go into that here since Jim Michalak has a good article on the topic.
One thing I will mention, though, is how to attach the carpet to the bunks. Little is ever said about this. I discovered from cartopping experience that staples do not work for long, rust, pull loose, and cut your hands. I thought a long wooden batten that traps the carpet would be good, but it tends to trap water too. Stainless screws and washers would work but are expensive. Finally I figured it out. Galvanized roofing nails. $4 for 4 pounds. Nail ‘em into the sides of the bunks so the heads don’t ever scrape the bottom of the boat.
One disadvantage of these carpeted bunks is that they are hard to get cleaned of marine organisms. This can be a big deal if you take your boat to different bodies of water. I have a feeling rollers would be better for this, and they should also make it easier to load and unload with less of the trailer in the water. But that would take more design work, welding and money.
Sandblasting
Just when you thought it was over…the worst is yet to come. Just like on a boat, there are many levels of finish. You could insist on sandblasting to bare metal and powder coating. I wouldn’t. You could also just slap any old paint on it and call it done. Again, I wouldn’t. If you don’t own a sandblaster, rent one. They’re cheap to rent. Be sure to have coveralls, a real respirator, earplugs, safety goggles, a bandana for your hair, AND a full face shield with several replacement shields. You’ll also need to rent a BIG air compressor. This process takes lots of air. Even more air if the tip is worn, so have extra tips on hand. If all that scares you a little, it should. See my remarks above about my skin reaction to the paint dust. If you don’t want to do it yourself, tow the thing to a full-service metal shop and have them do it for you. Having done this indoors, I’d recommend you do it outside. It was no fun at all having all that dust confined. Even with the overhead door wide open. Now that I’ve tried sandblasting, I’d sooner pay to have it done that than rent the equipment and suffer the process. In fairness, it might have been better if I’d thrown my sand away halfway through and started with fresh. But only a little better. However, in favor of the process, I must say that it’s a miracle to pull the trigger and watch rust and paint just disappear!
Note – keep your suspension away from all this, and disassemble your coupler and keep the parts somewhere protected. You don’t want that sand and dust getting in the works any more than is necessary. Similarly, keep your power tools far away. I spent more time than I’d care to admit removing that paint dust from power tool motors.
How about getting around sandblasting entirely? If you wire wheeled all of the paint and rust off your scrap before starting, welding flux would still be a problem. You might be able to remove much of this with phosphoric acid, but I doubt this process would be any nicer or safer than sandblasting. I haven’t tried it, though. If the original paint is solid, you could paint over it, but you’d have to be very sure to get all traces of flux off, and phosphoric acid might well damage that original paint. In fact I did leave some of the original paint on, but still sandblasted the top layer off to make sure of good adhesion.
I think the biggest reason you really need sandblasting is that it reveals welding problems. Sometimes a weld looks good, but once blasted you see that there’s a big seam of flux in the middle where it didn’t really fuse at all! Unless you’re a really good welder, I think it is worth sandblasting for this benefit alone.
Painting
So now we have bare metal, or as bare as it’s going to get. We still can’t count on it being clean. There might have been oil in the sand, and there was certainly paint and rust dust. I wash it with Spic-n-Span and a stiff brush. It’s cheap, does a good job of removing oils, and won’t usually mess up the paint too bad if you don’t get quite all of it off. And you probably have some in the house already. Then rinse with hot water and the same brush. As it dries, it will start to rust. You could be neurotic and clean in sections, dry with alcohol and a heat gun, and prime as you go. I certainly didn’t do that. The rust that forms in drying is light surface rust, and Rustoleum bare metal primer is supposed to be able to handle that. We’ll see.
It is fortunate that winter is when we want to work on these projects, because winter is the best time to paint. The air is generally dry and if you build a painting tent you can control the amount of heat. I was thus able to paint at 50 degrees in 20 percent humidity. Just about ideal. Just like with painting a boat, you’ll want a good brush. But not too good, because dabbing at those bumpy welds and getting in the corners will ruin it. A chip brush won’t spread paint right. I know because I tried to use them for primer. I went through 4 or 5 and got a crappy looking primer job. On the final coat I spent the same amount on a $2 brush that gave a nice coating, and used one chip brush for deep corners. Both were shot by the time I was done, which was fine with me because I hate cleaning brushes used for oil-based coatings. I barely tolerate this process for varnish, and there’s no way I will for paint.
Notice I didn’t mention spray paint of any kind. I don’t think it’s worth it. It costs much more in cans and takes much more equipment when not in cans. You can get a finish acceptable for a trailer with brushes for a better price and less effort. If you feel you need a mirror finish on your trailer, by all means explore the intricacies of automotive paint. And consider psychiatric help. Otherwise get a brush, get it done, and go boating.
Let there be light
 You’ll notice I didn’t mention trailer lights. This is because I think it’s a bad idea to mount them on a boat trailer. Mount them on a 2x6 and strap it to the boat. That way your electric stuff never gets immersed. Pictured below is my deluxe version with a back-up light wired to the tow vehicle’s back-up light circuit. Most don’t bother with this but this is a very long trailer to back in at night! Jim Michalak ties his light bar down to the boat with the rear tie-down. My rear tie-down needs to be further forward to be effective, and I want the lights fully astern. So I added a pair of oarlock sockets way aft, and mounted ½” steel pins on the light bar, with holes for hitch pins to keep it in place. Very slick. Still, Jim’s system is fewer steps if you can make it work. You’ll notice I didn’t mention trailer lights. This is because I think it’s a bad idea to mount them on a boat trailer. Mount them on a 2x6 and strap it to the boat. That way your electric stuff never gets immersed. Pictured below is my deluxe version with a back-up light wired to the tow vehicle’s back-up light circuit. Most don’t bother with this but this is a very long trailer to back in at night! Jim Michalak ties his light bar down to the boat with the rear tie-down. My rear tie-down needs to be further forward to be effective, and I want the lights fully astern. So I added a pair of oarlock sockets way aft, and mounted ½” steel pins on the light bar, with holes for hitch pins to keep it in place. Very slick. Still, Jim’s system is fewer steps if you can make it work.
 The odd shape is so my tarp can tie down to the hooks and have the thing shed water outside the hull, yet still pass ventilation air to dry the boat out while driving down the road. That feature took some serious mental effort to work out. The odd shape is so my tarp can tie down to the hooks and have the thing shed water outside the hull, yet still pass ventilation air to dry the boat out while driving down the road. That feature took some serious mental effort to work out.
Suspension and Hardware
Putting the suspension on is not rocket science, but do remember to grease the hell out of every part of it. Include the hangers, leaf springs, shackle bolts. The more that is greased, the more the water can’t get to. It’s much easier to grease it now. Yes, it’s messy, but you’ll thank yourself the first time you need to change a tire and the lug nuts actually come off
Reassemble your coupler and attach your safety chains. You did remember to bore a hole for the safety chain bolt, didn’t you? I got lucky and there already was one in just the right place on my scrap metal. You probably won’t be so lucky. Be sure to wash, prime and paint any new holes you make.
At this point I’d take it for a road test and make sure everything works before bolting the bunks on.
All good? Then bolt on the bunks on. Goop up all the fasteners and holes with PL400 to keep the water out. For fasteners I used regular 1/4-20 bolts and nylon insert nuts. In fact I like nylon insert nuts for nearly everything, since they don’t vibrate off.
You’re done! Invite friends to help load your boat. Pass out beers. Stand around and look at it. Exciting, isn’t it?
…And while your friends are there, have them help you load the boat! It took my dad and me ten minutes with this relatively light hull.
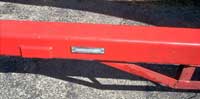
Last but not least is pleasing the government. It took me about 4 months to get this little plate with a VIN number. In Wisconsin you don’t need plates on trailers under 2000 lbs, but you do need a VIN number. You’ll want one too, in case someone ever steals your trailer. I couldn’t figure out if it was legal to take my trailer out of state without plates, though, so I got some Wisconsin plates even though it’s not required. I’ll just let ‘em expire and figure I’m not likely to get stopped for not having plates if there’s at least some kind of plate there.
Next time we’ll look at fixing my ill-advised bow post.
On to Part III
Rob Rohde-Szudy
Madison, WI
robrohdeszudy@yahoo.com
|


 click for bio