The 9.5 Laura Bay - Part 4
|
|
|
design by Warren D. Messer - Seattle, Washington - USA |
Part
1 - Part
2 - Part
3
- Part 4 - Part
5 - Part
6
One of the things I like to do is check
on the comments that are posted at the end of each
story. It gives me some good feed back as to how you,
the readers, are following along and keeping me aware
of what I say and do. After checking in several different
books, and my 6th edition copy of ROYCE'S
Sailing
Illustrated, I did a find and replace
in StarOffice for all references to centerboard and
changed them to daggerboard. Thank you for the hint,
I like to be correct. I also enclosed the "daggerboard"
trunk for added strength and to keep my legs from
getting whacked when the seat is in the forward position.
I just wish I had filled the voids with foam before
I enclosed it all. There are several things I would
do differently if I was just making a pure sailing
boat and will talk about them in the last story. If
it seems that the weather here changes a lot from
what I 'm wearing in the photos, yes it's the Pacific
Northwest where a 20+ degree change can happen from
day to day. And now for something completely different.
PBS has been re-airing a lot of Monty Python lately.
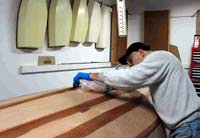
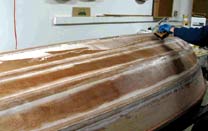
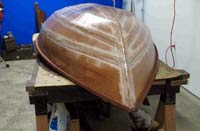
Now that the inside construction is completed, its
time to flip the hull over and finish the outside.
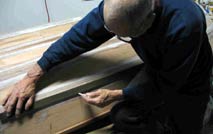
The first thing is to get on top and cut out the rest
of the "daggerboard" opening. Trim it so
it's flush on the sides, but don't cut into the fiberglass
lining the trunk. I left the forward and aft ends
of the opening slightly rounded in the corners for
appearance. The fiberglass tape and cloth roll into
them better too. You will see that there is a small
gap between the hull and the bottom inside edge of
the trunk that will need to be filled with fillet
material. Fill that and the small shelves made by
rounding the corners. This helps make for a water
tight fit. Make sure to pre-coat all the edges with
epoxy before applying the fillet material.
Check all the bottom seam edges for fit and alignment.
With all the bolts and nuts holding the seam edges
in alignment during construction, there were no problems.
The only areas needing a touch up, were at the bow
where several panels converge, and at the stern, where
there were a couple of small gaps in the fit. Pre-coat
all edges with epoxy and fill/square up any areas
that need it. On the stern edges, leave a slight radius
for the glass tape and cloth to roll over. Fiberglass
hates a square edge. Make sure to pre-coat all the
panel seams and fill any gaps with fillet material.
Smooth down all the seams and give the hull a light
sanding with 100 grit. Don't grind down the seam edges
and change the shape of the curves or create flat
spots. Keep it fair.
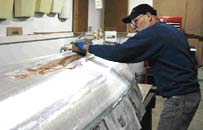
I've gotten good enough laying down tape, that I
don't pre-coat the area first anymore. I learned on
this hull that if I give the very start of the tape
a good wetting to hold it in place, I can guide the
tape and wet it out at the same time. Before I learned
this, I started the first seam tape at the stern and
worked forward. When I got to the bow, I had to put
in a couple of darts to get the tape to lay flat.
So I thought what would happen it I started at the
bow and shaped the tape along the curve as I worked
aft. Some times out of the mouths of babes, etc. So
I moved my tape holder to the back of the hull and
learned something in the process.
I started with the side seam tapes first and finished
with the keel seam tape. This covered all the ends
at the bow and made for a smoother finish. I didn't
need any extra strength, so I trimmed (tapered) the
side seam tapes to just meet up with the keel seam
tape. The bottom cloth would cover everything anyway.
I also stopped just short of the stern seam tape for
the same reason. Let the epoxy cure overnight and
trim off the selvage and fair the edges. I like to
use a plain old hacksaw blade (22 teeth/inch), bent
and lightly dragged along the edge. It takes off the
selvage and doesn't harm the tape or hull. Then mix
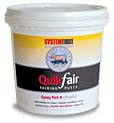
up some Quickfair,
bag it and squeeze out along the seams. Fair in with
a squeegee and let cure. The last time I'll have to
do that.
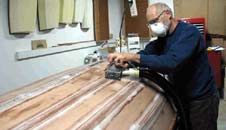
I've found an easier way, with less mess to fair
out taped edges as we will see. Once the fairing compound
has cured, its time to give the seams a light sanding
with some 150 grit to smooth out the fairing and hull.
Don't over sand into the glass fibers.
One trick I learned a few years back from System
Threes great booklet on working with epoxy, is using
masking tape under the final edge of a glass clothed
surface. Place the edge of the masking tape along
your final finished edge of glass. Then overlay the
glass cloth beyond the width of the tape. While wetting
out the cloth, stop halfway down the width of the
masking tape. After the epoxy/resin has gone "green",
take a razor knife and trim the wet glass along the
edge of the masking tape. Then lift the tape and excess
glass cloth off the hull. Press down any spots along
the finished edge that try to lift, and let the epoxy
cure.
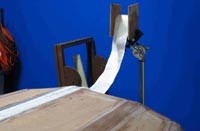
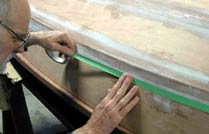
Mark where you want the final edge to be and place
an edge of the masking tape along this line. I had
to move the tape after I took these photos, as I discovered
later that my 50" cloth needed to be 52".
I raised the tape to just below the seam edge. Normally
I always make sure that each succeeding layer of cloth
extends beyond the one below it. I can live with it
as the tape under is tight to the hull. The materials
list has been updated to 60" cloth.
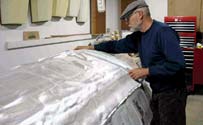
Now its time to unfold the glass cloth, align it
to the hull, and smooth out the wrinkles. I like to
let the cloth rest for a couple of days before I wet
it out. I also found from lightly smoothing it with
my hands a couple of times a day, that I could shape
the warp and weave of the cloth to take on the curves
and shape of the hull. I thought that I was going
to have to put a seam down the centerline from the
daggerboard to the bow, but I found with my daily
smoothing that the glass cloth was conforming to the
hull. Just take a ridge or "poof" of cloth
and just chase it to the ends or edges with a light
smoothing action with your hands. When I was finished
laying on the hands, the cloth fit like a glove. Hallelujah,
no seams!
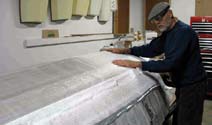
The next step is to wet out the cloth. You can now
mix up some bigger batches of epoxy, but I still limit
myself to 3oz mixes. I don't have any bigger cups;
but then I like mixing epoxy. What ever size you mix
up, get it out of the container and out on the cloth
quickly so the bigger batches don't kick on you. Remember,
bigger, quicker, hot, damn.
Spread the mix out on the cloth in big "S's"
and use your squeegee to spread it around and wet
out the cloth. Another great place for the rubber
edged squeegee. Start along the centerline by the
daggerboard trunk and work out, fore, and aft. Work
both sides at once so the cloth doesn't get pulled
from your perfectly smoothed position. First wet out
one side of the daggerboard trunk then the opposite
side. Then aft and forward on both sides. Work both
sides and keep it even and you won't displace the
cloth.
Wet out the cloth that covers the daggerboard opening
and let it turn "green". Take a razor knife
and slice down the middle to about one inch from the
ends. Then cut in 45's to each of the corners; press
the ends and sides down to the inside of the trunk
opening and paint on some more epoxy to hold it down.
Check on it a couple of times to make sure it stays
down.
After the cloth has been wetted out and set long
enough to turn "green", its time to trim
the edges like we have talked about. Take a razor
knife and cut along the edge of the masking tape and
pull the excess cloth away from the hull. Press down
any areas along the edge that lift and mix up some
epoxy and wet out again any areas that could use a
little more help or look dry.
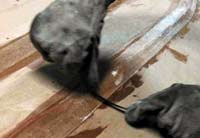
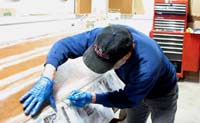
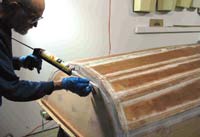
This edge needs to be faired as well and its time
to break out the big guns. I always like to try out
new ideas and this looked like a winner. Getting fairing
compound out of it's container in the proper amounts,
mixed, and in place without a lot of mess and waste
was always a challenge. The tube comes with a two
nozzle fitting that goes on the end that will spit
out a 2:1 mix for hand stirring, or attach the extra
mixing nozzle and point and shoot. I wouldn't waste
a mixing nozzle for a small job, but for fairing in
the edges of several taped seams, its money well spent
and time saved. Plus oh so easy and clean. Just squeeze
out a bead and fair in with a putty knife. I laid
out 2-3 seam edges and faired them in, and continued
on with the next set. Remember that it's called Quickfair,
so don't doddle around and let it go hard in the mixing
chamber. It takes a while for the expelled bead to
harden up, so you can spend more time laying down
the beads. If you have two people to do the job, great;
but it can be done alone and still not be rushed.
With the SilverTip
epoxy you can wait a couple of days between
applications and not have to sand. Some builders may
have gone on and filled the weave of the cloth after
the wetting out went green. I like to let the wetting
out cure, fair all edges and let cure and sand; then
fill the weave and overlap the faired edges as I go.
It gives me a smoother transition, or so I think.
YMMV. So its usually 48 hours before I fill the weave,
and I can wait up to 72 before I really have to sand.
But I can't sand everything without cutting up the
glass cloth at the tops of the weave, so what's the
point anyway?
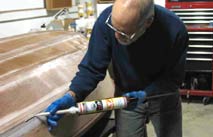
I've tried filling the weave with straight epoxy
and that just makes the boat heavier and uses up too
much epoxy. I've used just straight Quickfair
to fill the weave and that works, but it goes on stiff
and doesn't like to be spread thinly over large areas.
Or it doesn't like me to spread it thinly over large
areas. So now I mix the two and create a thick soup
that fills and spreads easily. Usually two coats is
all that's needed. I mix up 2oz of Quickfair
with 1oz of SilverTip.
I give each a quick stir before I mix the two and
give this new mix a one minute stir. Pour it on and
spread it out with the rubber squeegee, over the bottom
and over the glass cloth seam onto the side panel.
This mix dries fairly clear, so I cover some of the
side panel as well. It's going to get painted anyway.
That's it for this segment. The next story will
be on the sailing rig, rudder, and daggerboard. I've
got my sail and everything is rigged up. The new beta
test yacht paint has arrived and the first coat of
the interior is done and when I finish writing this
story, I will give it a second coat.
Thank you again for reading my stories and the comments
you post.
Warren Messer and Laura Bay

|