|
Building a Paradox by a Beginner |

|
| by Derek Clark
- Wolverhampton, England |
At the outset you, dear reader, need to know that
if you want a slavish account of building an exact
replica of Matt Layden’s original Paradox you
should read no further. My view is that this boat
is heavily over engineered and modern epoxy techniques
mean that much can be safely changed. That is not
to say that it must, or should, be changed. Just that
it is my amateur’s opinion that it will not
be any lesser a boat if it is. It is also my opinion,
validated by experience, that the following information
will be a great help to the tyro builder, but to this
information you must add self belief. You can build
a Paradox. I have, nearly :0)
Books
I like books; used along with the internet you can
find most answers to almost any question. For everything
that you need to know about epoxy resin look at the
manufacturers leaflets and web pages. The West System
leaflet is excellent but the product made me vomit.
I switched to UK Epoxies in Manchester which has no
apparent ill effects on me and is cheaper. There is
another advantage that Rob Hewitt, the MD, is only
a phone call away and cheerfully answers questions.
That is worth something considering that epoxy is
expensive and a Paradox needs a lot of it.
 |
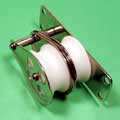
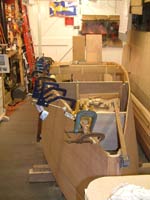
Amended
track strop - my first silver soldering
job in 45 years.
(click
images to enlarge) |
|
For modern boat building techniques I found the following
books very useful: Backyard Boatbuilder by John Welsford,
A Manual of Modern Small Plywood Boat Construction
Techniques by Paul Fisher of Selway Fisher Design,
Ultralight Boatbuilding by Thomas J Hill, Instant
Boats by Harold Payson and last (I wish I’d
had this one early on) Boatbuilding
for Beginners and Beyond by Jim Michalak.
Much of what is in these books is repeated in the
others but they are all written in clear English with
good illustrations. They are good reads as well. If
you can only afford one, buy the Michalak book. You
do not need a specific Paradox manual.
Finally, use the pictures of Paradoxes that available
in the
group and on various web pages such as
Al Law’s, Bill Sergeants and Dave and Mindy
Bolduc’s and email the owners. An unfailingly
helpful bunch. Thank you, thank you and thanks again.
Tools
This was my first boat build and I regard myself
as a mediocre to moderate woodworker. I’d much
rather use a dowel joint than cut a mortise and tenon,
and I haven’t cut a dovetail since I made my
toolbox 20 years ago. Biscuits and glue do just as
good a job.
I do have a good selection of tools because buying
tools and cleaning up old ones appeals to me.
Many of my clamps are rescued wrecks from car boot
sales that have responded to heat and hammering to
put them back into shape. You can’t have enough
clamps and if you google you will find ways to make
your own.
I prefer plastic handled chisels because you can
use just about anything as a mallet. I often see them
at car boots and look out for the Stanley and Marples
makes with blue handles. It doesn’t matter if
the blade is short or has been used as a paint can
opener and stirrer. They clean up easily and sharpen
very well. The steel is good quality. You could make
this boat with just an half inch chisel.
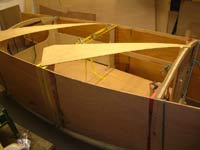
| Fitting bulkheads
to sides |
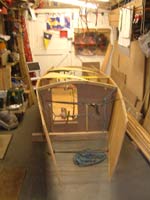
|
|
For striking chisels (wood, plastic or rubber mallet
preferred) and bronze ring nails a good carpenter’s
claw hammer is needed. Any other woodworking hammer
is too light for driving the ring nails.
A drill and selection of bits for predrilling nail
and screw holes.
My most recent saw is a Japanese style pull saw from
B&Q. Plastic handle, about £9 and works
wonderfully. No effort at all on fine cutting.
I use hardpoint panel and cross cut saws because
saw sharpening is tedious. I do sharpen saws occasionally,
but only as a way of setting myself a task that stops
me strangling the kids. I like the Stanley Jet Cut
in the short blade lengths and use a fine tooth (11
TPI) for across the grain and a coarse tooth (6 TPI)
for down the grain. When the blade is getting blunt
I relegate the saw to rough cutting like plasterboard
and ash blocks. After that I throw them away. It takes
eons to blunt them on plywood.
Having said all that I cut with a power saw where
possible. I find jigsaws useless because they wander
and tear wood. The best blade for ply cutting has
proved to be the one meant for cutting metal.
I also have a table saw (not essential), a small,
very old bandsaw (useful but not essential), and a
portable circular saw (couldn’t work without
it). The latter I use with 8’ or 4’ long
guides (made from instructions in an old copy of Fine
Woodworking) that I clamp to a plysheet and cut the
sheet down to size across at least three sawhorses,
but it will also cut freehand quite close to gradual
curves. When cutting ply with a circular saw I usually
do two cuts: the first only part way into the sheet
and the second just through it. This method stops
tearing of the surface veneer.
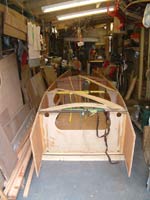
 |
Fitting
bulkheads to sides - overhead view.
|
|
I’m using Stanley Junior plastic sawhorses
nowadays. They come in pairs, often less than a tenner,
and fold up out of the way. They are also reasonably
tall so reduce back ache from stooping. I have six
but two of them form an almost permanent support for
a table top which helps keep my Black and Decker Workmate
clear.
I bought the Workmate over 30 years ago and it cost
more than a weeks wages at the time. I promised the
wife countless shelves and cupboards but really bought
because I hadn’t got anything to overhall my
Honda 500/4 on. She eventually got the shelves and
cupboards when Ikea opened. The Workmate is still
a dependable tool.
I bought a Machine Mart special to work alongside
it. It cost £20, isn’t as heavy as the
B&D but does the job fine. It won’t last
30 years but then neither will I.
I have a carpenters bench but always use the two
portable benches. I take them to the work, and the
carpenters bench is always covered in stuff anyway.
I used a No. 5 plane for most general work, a No.
4 for final smoothing, a small block plane for end
grain smoothing, and a cheap power plane as often
as possible.
| Fitting bulkheads
to sides - rear view |
|
|
For marking out: pencil stubs (Ikea have hundreds
of thousands of them) and coloured biros. I have a
method for accurate marking out. First draw the line
in pencil. If it’s wrong rub out and do it again.
Still wrong? Do it in blue Biro. Wrong again? Do it
in red Biro. Still wrong?? Plane off and start again
in pencil.
A sliding bevel, a square (I’ve cut the blade
on a cheap multi one down to 6” but a small
metalworkers square works well), 5 metre metric tape,
and a metre rule or straight edge are all very useful.
A router. Definitely not essential, but I love my
little Bosch POF 500 and can always find something
for it to do. Rounding over spar edges and deck edges
comes to mind. It could be a good tool for scarfing
with a jig. I also have an ELU set up in a table as
a baby spindle moulder but rarely use it.
A belt sander takes a lot of the tedium out of sanding
but you will end up finishing by hand. When buying
sandpaper go to a painter and decorator trade counter.
Wear old clothes. Buy the grades you need by the metre
off the roll. When they tot it up and give you the
price look shocked and in a querulous voice say, “Is
that trade?” You may be surprised how much cheaper
it can be. Pay cash and get a receipt to maintain
the illusion. If they want proof of trade status (I’ve
only been asked once) go home and knock up a letter
head in Word. I once found a machine that did 50 business
cards on the spot and I became a toy box manufacturer.
Good for timber, decorating and metal working supply
discounts!
A backing plate and sanding discs to fit an angle
grinder is a powerful remover of epoxy drips, timber,
clothing and flesh.
 |
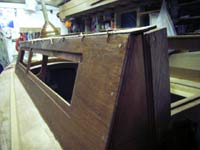
Those
d%$#ed chine logs!
|
|
Epoxying Tools. All are available from UK Epoxies.
The broad spatula is very useful as is the tool cleaning
solvent. I didn’t find white vinegar very useful.
I did come up with a super tool for filleting –
the back of a spoon. A serving spoon for big fillets,
a dessert spoon for medium fillets and a teaspoon
for small fillets. They cost a few pence from the
charity shops. Used with spittle they make lovely
smooth fillets. If your spittle doesn’t work
I can sell you mine, but it doesn’t come cheap.
Don’t bother with the pumps. My hardener pump
got crystals in and I had to completely strip the
bottom and redo it. It was like removing fudge, took
nearly a week to get it all off and it cost me an
extra £150. The bottom is where the dearest
fibre mat goes. I was so fed up that I took a break
for a few weeks. Read what Jim Michalak has to say
on epoxying; it’ll save you a few bob on filling
powders and a lot of aggro.
A gas heater. The smallest one from Machine Mart
heats an enormous area very quickly. It is mainly
useful when epoxying. There is a minimum temperature
below which the epoxy won’t set. I wish that
I’d had the heater at the first Christmas rather
than the second. Best used in conjunction with a Carbon
Monoxide monitor.
The Build
I have learnt as I went along, and I have made a
lot of mistakes but they have all been easily corrected.
We are dealing with wood and epoxy here and most of
it will be at reasonably low levels of stress. Nothing
that I have come across on the boat has to be close
tolerance, cabinet maker standard. Have faith; you
too can build a Paradox.
If I were doing it all again I would start with the
mast, yard, boom, yuloh, rudder and the bits that
go with them such as bottom pintle, tack strop and
boom axle. These bits are all going to fit onto the
finished hull and I have found it very frustrating
having a finished hull sitting in the workshop while
I make these.
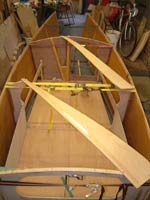
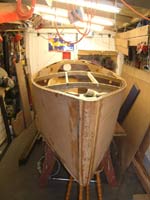
| Floors and
bin sides in place to keep it square. |
|
|
All of them were easy excepting the mast which I
couldn’t interpret from the plan. Don Elliott
provided an exploded drawing which coupled with advice
from Al Law made it all clear. I think that I could
redraw it to make it clear. Once I understood the
plan the build was easy. I have since seen a diagram
of mast building as clear as Don’s and not dissimilar.
As soon as I remember where I saw it I’ll put
it here.
There are two photos here:
They show a mast in construction by Matt Layden. Gives
a clearer idea of what the plan is trying to show.
Next make the deck beams followed by the bulkheads
and build the vent box onto bulkhead 2 while it is
on the bench. Al Law told me to do this and I didn’t.
It is a right bugger trying to work on it in the confines
of the hull. I made bulkhead 2 from one piece of ply
and I made the hole in that bulkhead as big as possible
to be able to get a Porta Potti through. It’ll
save making a seat for a bucket or having a red ring
around your bum.
I would glass in a bucket top and its lid on bulkhead
1 to give me a cheap, airtight seal but still allow
access for when the eyebolt in the stem leaks.
Having now got a pile of bits stored around the house
and workshop make the hull sides. The shape can be
cut with a mixture of hand saw and portable circular
saw. You might think here whether you require scarf
joints. Personally, I now think that one of the butt
joints to be found in the books already mentioned
would do, and they are much easier to make.
A good idea is to now follow the instructions on
drawing 6 of the plans. The construction sequence
for the hull is given in some detail and works well.
I had trouble with working out the bevels and eventually
gave up on them. Thickened epoxy fills gaps, and big
gaps can have wooden infills inserted along with the
thickened epoxy. Panels cut undersize, or at the wrong
angle, can be built back up with fresh wood. Panels
cut oversize can be trimmed to fit and reduce the
swearing that goes with cutting them undersize.
 |
Near to
decking
|
|
I made the stem to fit the panels while doing the
dry fit. I tried making it first but the panels only
touched it occasionally as I pulled them in. I obviously
have a problem with angles. Maybe I’m an anglexic
or an anglephile.
Nail scrap between the 4 by 4 parallel sleepers to
ensure that they stay parallel. While my hull sides
were bonding to the bulkheads my wife fell over a
sleeper end. It was quite amusing until I found that
it had moved and the hull sides ended up slightly
out of true. Trimming with a plane fixed it.
At this stage it helps to make a trolley to move
the hull around on. The 4 by 4’s can be used
for this. Al Law bravely used a skateboard.
The Chine logs and sheerclamps are a swine to fit.
I halved the width of my sheerclamps to make them
more manageable, but how necessary are they? Next
time I would leave them out and rely on stitch and
glue for joining the bottom and deck to the sides
and only nail along the line of the bulkheads. Also,
the deck and sides, and the bottom to sides joints
are further strengthened by turning the fibre glass
sheathing over the joints.
The chine runners could be thought of as an external,
shaped chine log. I made mine from blocks glued into
place and finally shaped in situ.
On drawing 1 Matt has written that fastenings are
intended as a permanent back up to glue bonds. From
my reading, I don’t think that is necessary
with modern epoxies but bronze nails are awfully boaty,
aren’t they? Even under fibreglass and paint.
| My version
of the cabin |
|
|
The 18mm ply for the bottom I found very difficult
to get into shape. With Spanish windlasses and 4 by
2 props it looked like a Roman siege engine. I had
visions of it springing apart and killing me. Thoughts
of the wife enjoying the life insurance kept me just
on the side of safety. There was enough tension about
that one slip could have demolished much of our road
with flying timber. Next time I would use two sheets
of 9mm and stagger the joints, or I might just go
to 12mm thick. There is high quality fibreglass and
thickened epoxy going on the bottom as well.
The rear deck went on fine but the front didn’t.
I cut it along the line of bulkhead 2 and did it in
two parts. Much easier.
I should mention that before the decks go on is the
best time to fit the flotation. It needs to be two
inches thick and goes under the decks and down the
sides. There is a lot written about what to use and
what to avoid but in the end I chose standard 2”
thick wall insulation sheets bought from Wickes (a
mini version of Home Depot). I think that it is polystyrene.
I’m told that it absorbs water but you can see
it on beaches anywhere rubbed spherical and smooth
by wave action, and still floating.
My worst case scenario is that I am coastal cruising
3 miles out to avoid some hazard, the weather changes
and the boat fills with water. What do I want to happen?
Firstly, I want my auto inflating life jacket to
inflate and I want to be wearing it. I want my spare
life jacket to inflate and remain in the forward area
where I will store it. I want the emergency services
to hear my mayday on my waterproof handheld VHF radio
and I want my pump to work, but if it is overwhelmed
I want my boat to float with the decks level with
the water at its lowest.
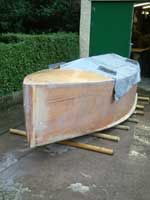 |
Completed
hull - front view
|
|
I will then sit in the boat clutching my bright
orange waterproof grab bag containing those items
dearest to me: picture of my dogs, energy bars, bottle
of water, spare insulin, money and car keys. I would
chuck out heavy stuff, excluding myself, and sit tight.
I would fully expect to be rescued within an hour,
or two. If the boat floats that long I’ll be
happy.
I have held my polystyrene in place with deck clips
and cord so that I can remove it to check the inner
sides of the hull and the undersides of the decks.
In the area between stem and bulkhead 1 I have added
empty two litre soft drink bottles, secured in threes
by duct tape, for extra flotation. Between bulkheads
2 and 4 I have put 6mm camping mat against the sides
for insulation. I felt that the 2” foam took
too much out of the capacity of the sidebins.
I think that it maybe possible to inflate a couple
of tractor inner tubes inside the boat using the gas
cylinders that paintball guns are fitted with. This
is something that I intend to experiment with.
The hull is now pretty heavy but four people can
turn it over using levers. My son can turn it from
its side to its bottom all by himself. Of course he
did it before I was ready to catch it on a second
lever and it hit the concrete with an unpleasant bang.
If it leaks when I launch in a couple of weeks it
is down to him. On the other hand, if he makes it
as a rock star, and supports me in the manner to which
I’d like to be accustomed I will forgive him.
This is a good time to fit the seat, panels, floor
and other internal bits. Electrics and instrument
positioning is also good done now. There is a fair
bit of room without the cabin on. If you didn’t
fit the vent box when bulkhead 2 was on the bench
join me and struggle.
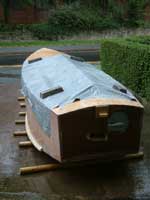
| Completed
hull - rear view |
|
|
I have abandoned the cabin plans. I had plenty of
12mm ply so I made the cabin sides and front from
that. I wanted smaller windows so I routed out the
shapes and have used 3mm Polycarbonate for the side
windows and 6mm for the front. Polycarbonate cuts
with an ordinary saw and shapes with sandpaper. I
have polished the edges of the windows smooth with
sandpaper on the assumption that a rough edge could
give a starting point for a split. I don’t know
how well founded that idea is.
I have a lift out rear window made from a piece of
6mm Polycarb.
Quelle Horrors, but I have mounted an outboard. David
Beards gave me the measurements to fit the outboard
bracket free and gratis from his own transom. No copyright
there, thanks David.
The idea of yulohing the Thames is enough to make
me want to slit my wrists. Have you seen the video
of Matt sculling? It is the mating dance of the crane
done to Techno. I am, however, making a yuloh because
Al says it is great for docking. I think that it lengthens
your reach and you snag a bit of dock with it. I am
using a piece of cheap pine planking found in a skip
and a length of 2 by 2 shaped to a picture found on
David Deedes web site. If it doesn’t work it’ll
make a nice fire.
That is where I am now. I’m toying with idea
of a convertible type top instead of the sliding roof.
Lorry trailer curtain material is very hard wearing
and waterproof and I like the idea of rolling the
hood closed.
I hope that this helps somebody. If any of the builders
would like to add to this let me know and maybe I
will.
|