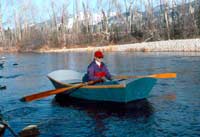
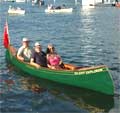
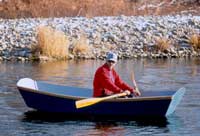
This little nine
foot pram was among our first project boats published
after we moved from the coast to Montana. We had been
doing regular boat projects for Outdoor Life magazine
and my editors labeled it because they liked the Montana
connection. The pram published in Outdoor Life in
1991 and has continued to sell year after year. Its
been built in school shop classes, garages, living
rooms, carports and back yards--by amateurs and first-timers,
single mothers and families. Hundreds have been built
and its still one of our most popular boats.
The long line of prototypes of this boat had lived
mostly on the foredeck and cabin top of our sailboats
when not tethered alongside in the water or dockside.
When at anchor the prams served as shore dinghy, supply
vehicle, taxi, work platform and extra storage space.
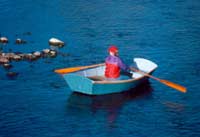
The prams also had to be lightweight enough to lift
on deck, where they became our hard shell lifeboat.
Some versions were car-topped to lakes and streams
all over the northwest, up into BC and Alaska.
 |
|
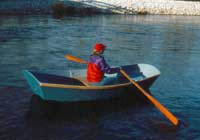
The tough utilitarian design worked well enough for
fishing and recreational use, as a car-topper dinghy
and even for beach landings in most weather. The sides
are a bit higher than I prefer for looks but the extra
freeboard came in handy more than once, and of course
the sheer line can always be cut down to suit esthetics.
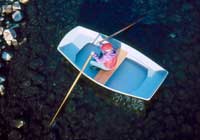
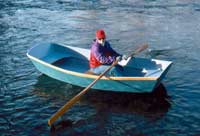
If you ever tried to get a big excited dog out of
a dinghy and onto the deck of a pitching sailboat,
then back off the deck and into the dinghy again,
you’ll understand the need for capacity and
stability, and this pram is really just the no-frills
mid-section of a dory, with the transom and pointed
bow cut off. We used oars from six to eight feet long
that stowed inside the hull. The shorter oars, tethered
to the oarlocks,
always seem to work better in rougher water and beach
landings and launchings, and the longer oars are better
for open water rowing.
FORWARD…… OR AFT??? This pram was an
extension of our “simple” boat designs
for amateur builders, and is another of my symmetrical
hull designs: the hull is the same on both ends from
mid-section outboard. With small hulls like this pram,
and also with some slightly larger rowing boats I’ve
not been able to tell much difference in performance.
All factors considered it’s a real advantage
and makes the boat so much easier to pattern and assemble.
Seating can still be arranged to suit loading and
the frames and transoms are identical, inwale and
outwale are consistent front to back and fore and
aft is pretty much a personal decision depending on
which way you want to go. Attaching multiple oarlock
sets to the gunnel will allow a variety of rowing
and seating arrangements.
CONSTRUCTION The pram assembles quickly and without
complicated procedures, and makes an ideal first woodworking
project. The transoms and a temporary center section
are used as a building base to provide support and
a convenient building form during construction. Ply
panels are joined using simple epoxy
glued butt-blocks, so no exacting scarfing or woodwork
is required, and the entire boat can be built of standard
eight foot panels. The large interior butt-blocks,
structural seats and stringers compensate for the
lack of traditional ribs and keep the interior simple
and clean. Inwale, outwale, and trim wood can be softwood
from your local lumberyard or hardwoods like mahogany.
An extra seat or adjustable seats can be installed
as required and made removable along with extra oarlock
positions to allow proper trim for one, two, or three
people. The pram can also be equipped with fold-down
swivel backrest types or folding canoe seats. Build
the seats removable and two or more prams will also
"nest" together for storage or transport.
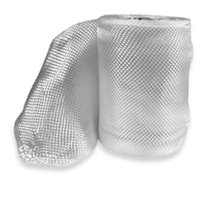
To minimize damage to the pram and any other boat
we laid against we experimented with a variety of
cushions and bumpers until we settled on lengths of
used and softened firehose which we split lengthwise
and attached to the hull with stainless screws and
screwcaps. If the anchorage isn’t too rough,
you can tie the pram up tight against the hull—otherwise
it’ll keep you awake all night banging on the
hull. (see “hull
cushioning” article in builder
resources) But this is really a concern only if you’re
using the boat as a dinghy, otherwise a couple of
small bumpers will usually do the job for dock ties.
MOTORS My standard reply to builders inquiries about
motors was that if the builder wanted to go really
fast on the water they should look at other designs.
In my experience, when it comes to motors if a builder
thinks a little is good, a lot more is better, and
I didn’t want to encourage big motors on this
small lightweight boat. We did finally add a note
about electric trolling motors, but that didn’t
prevent many builders over the years from installing
small gas motors. The boat apparently performs well
enough with a small motor but I still tell builders
to use common sense when it comes to motors. It’s
a small lightweight boat.
If I were planning to transom mount a small gas motor
I’d beef up that end with a half inch or three-quarter
inch thick plywood transom plus a timber molding across
the top, and I’d also glass
tape the perimeter of the transom and
install a large epoxy
fillet or a big cleat inside. Knees fitted on centerline
and port and starboard would absorb some of the added
vibration of a gas motor. I’d also add an almost
full-length shallow keel for directional stability
and hull protection and arrange comfortable seating
for the operator so the motor could be operated with
safety. One builder installed shallow twin keels located
out near the chine of the hull on his motor version,
which seemed a good idea to keep it going straight
and keep the hull from banging the bottom too hard.
MODIFICATIONS Hundreds of different versions of the
pram have been built, from basic bulletproof to ultra-lights,
and its been fun reading letters and emails from builders.
They’ve been equipped as camp-cruisers to float
small streams and even for moderate whitewater, partially
decked over and painted with camo for duck hunting,
as complex hi-tech fishing platforms or rigged as
simple backyard pond drifters for the grandkids. One
avid fly-fisherman installed knee braces and a single
swivel seat with backrest, and uses a number of 20
pound sandbags for extra stability when fishing. And
small beanbags make undeniably the most comfortable
seating for passengers while keeping weight low in
the boat.
 |
|
We know of one builder who equipped the pram with
a single wheel and two wheelbarrow handles so he could
roll the boat the quarter mile down to the lakeshore
near his cabin. Another was equipped with drain plugs
and used as a bath tub on the deck of a commercial
tug, where it could be filled from a hose with hot
circulated engine water. Yet another version of the
pram had two midship bulkheads installed and was hinged
to fold perfectly in half--like a clamshell—a
somewhat serendipitious benefit of the hull design.
(see “2-part
boat” article in builder resources)
When underway the hull was used to securely stow fenders
and dock lines, folded shut and strapped securely
down on chocks on the foredeck of a small power cruiser.
One clever adaptation of the pram on a cruising sailboat
involved inverting the pram on the foredeck atop the
forepeak hatch, and scribing the sheer and transoms
of the pram to fit the camber of the sailboat deck.
The completed pram hull was elevated 2 inches off
the deck on chocks and strapped securely in place
atop the open forepeak hatch, which allowed vital
ventilation to the forepeak below along with some
light and with excellent weather protection. The slight
reverse curve in the sheer and transoms must have
looked a bit odd when right side up, but worked well
either way.
SECOND THOUGHTS With a few years to think about everything
plus feedback from all the builders, theres bound
to be some second thoughts. Mostly I would emphasize
the use of quality hardwood ply and epoxy
throughout. We used mostly traditional wood boat-building
techniques for the prototypes, as this design was
almost pre-epoxy and we didn’t yet understand
how much we could improve the boat by using some of
the advantages and “tricks” which epoxy
made possible. Lightweight ply/epoxy versions of the
boat can be made to weigh less than 50 pounds, which
makes it an easy car-topper that can be launched and
retrieved by one person.
For very light hulls I would go with a 6 mil bottom
and 4 mil topsides, all using quality BS 6566 or BS1088
grade hardwood ply, sealed on both sides with a minimum
of three coatings of epoxy.
I’d use okoume ply for ultra-lightweight and
mahogany for looks and varnish over the epoxy for
final finish. The minimal layup would involve 2”
wide glass
tape over exterior seams and an epoxy
fillet on the interior. I would also install compartments
fore and aft for seating, storage and flotation. All
vertical bulkheads would be 4 mil and decks would
be 6 mil. I’d also graphite the bottom and strike
a waterline about three or four inches up on the hull.
The graphite
and epoxy mix applied to the bottoms of these small
lightweight boats has been one of the most successful
features, and allows dragging the boat over launch
ramps, gravel and beaches. At the end of the season
we use scrapers
to clean the bottom and apply additional coatings
of the graphite mix.
So while many prams are still built using traditional
boatbuilding methods and various grades of even construction
grade ply, the ply/epoxy
technique produces a near state-of-the-art hull and
eliminates all those little stringers and cleats and
fastenings. Aside from the screws holding oarlocks
there are also no metal fastenings in most epoxy prams.
Build it with quality materials, maintain it with
common sense, and you can give this boat to your grandkids
in about as good shape as when it was new.
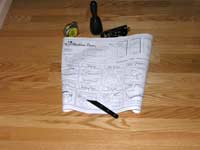
PLANS Building plans include blueprints and a 30
page illustrated step-by-step construction manual.
The plans encourage modification to suit specific
needs. Details include finishing and fitting out ideas,
builders tips, material sources and lots of options
for customizing. A minimum number of tools are required
and the pram can be built with a jigsaw, block plane,
scraper and a few clamps, but the usual complement
of tools will come in handy.
Plans for this and many other
boats available at:
https://www.butlerprojects.com/
________________________
Paul Butler has designed and built small wood
boats professionally for over 25 years. He was a
contributing editor to the late Small Boat Journal,
and with Marya Butler has published 3 books and
over 200 magazine articles. Detailed building plans
for their most popular small boat designs and other
projects can be purchased from the website at: butlerprojects.com
Illustrations are by Marya Butler and she can be
contacted at: fins_n_feathers@hotmail.com
for custom illustration quotes.

More articles by Paul Butler:
|