| I decided I needed some more exercise to go along
with visits to the gym! Some time ago Id looked at the
South Haven Dory and thought how sweet she was so...
I have built many boats and canoes and kayaks and
do like to build the quick and dirty method particularly
if it’s a ‘first timer’.
3 sheets of cheap Water and Boil proof ply £30
($50) a gallon of Polyester resin and some 3”
fibreglass tape £20 ($35) and away we go.
Friday
living room cleared for the marking out – about
an hour. Then outside on my driveway and sabre saw
the panels out – less than an hour. Now to butt
joint the panels using polyester and glass. –
about 30 mins. Now time for bed!
Saturday
Trim up the panels with the power plane and belt sander
– 30 mins. I had decided to put in a solid wood
stem as in the original design. Sawed this out of
a bit of 2x6 I had lying around, planed up the angle
etc. – 40 mins - Cut out the transom and trimmed
it – 30 mins - Now to put the boat together.
Out on the back garden as a gale had sprung up and
I was getting blown away. Screw the stem and transom
in and drill holes in ‘bottom edge of side panels
– about an hour. Now with my battery drill and
a handful of cable ties go round and attach the bottom
– 30 mins.
 |
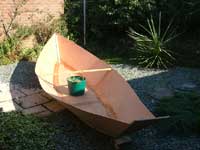
Turn the boat
over get two bricks and a dead plant!!
(click images
to enlarge) |
| Here you can see
I used a spreader to keep the boat in the right
shape and I have glassed the seams - about an
hour |
|
Now we went back to the driveway and glassed the outside
– I should say that all of this was done with
just one pair of hands
Outside trimmed up and glassed - about an hour and
a half
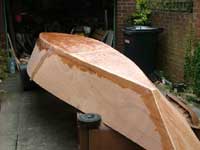 |
Bottom panel
fully glassed too |
Sunday
No building duties call at church
Monday
Trimming the glass and getting ready for
the whales. These really were cheap! I used rough
sawn roofing battens (Used in UK for slate or tile
roofs) These are treated, straight and around 18’
long and approx 1-¼ x ¾ - perfect. These
were attached with glue and a generous supply of temporary
screws. – about an hour. (outside only)
Now I made up the seat ribs etc. and glassed them
in. – 2 hours
Tuesday
Glued up the thickening blocks on transom
and made the two blocks for the oarlocks. These were
simply pieces of 2x4 shaped and glued on. –
an hour
Now the inwhales which were purely cosmetic being
roof batten split in two. Glued and screwed –
an hour.
Various bits of trimming and finishing a few hours
spent.
Wednesday
Skeg cut out trimmed and glassed on –
fiddly and I bet it took nearly 2 hours!
So now the hard graft – Painting – This
is the bit I really hate! 2 coats of outdoor undercoat
and 1 of gloss and she was about ready except I also
had oars to make.
I decided to use thole pins and used a couple of
coach bolts with round heads as I intended to use
Bolger's method of rope strops to row against not
the actual pin. So by the Friday I had a boat to row
although it took me another day or two to finish the
oars having had my belt sander break down too.
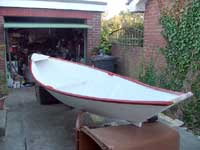
| By the Friday I
had a boat to row |
|
 |
Take my advice
and don’t get too precious, it's only
a tool |
Good luck to anyone deciding to have a go –
take my advice and don’t get too precious, it's
only a tool and you don’t get so worried about
beaching it or the rocks and at approx. £60
($100) plus paint £30 ($50) who cares just get
out on the water and enjoy!!
Jay Blackburn

Dory designs
Other Articles about dorys
|