| The Building of
my Harmonica "Gypsy"
Part 1
- Part 2
- Part 3
- Part 4
- Part 5
- Part
6 - Part
7
 |
Construction
in progress |
SOME GENERAL THOUGHTS ON WHY I DID WHAT I
DID!
I didn't start out with any intent to build Jim Michalak's
designed Harmonica,
a small 5-foot by 13-foot shanty style houseboat.
To be honest, I'd never even heard about the Harmonica.
What I wanted to build was an even smaller 4-foot
by 12-foot shanty style houseboat named the Ugly Duck.
In the June 15, 2006 issue of Messing about in Boats,
the builder, John Ulmer, wrote about Ugly Duck's 100-mile
maiden-cruise down the Ohio River.
| The Ugly Duck starting
down the Ohio River. Photo by John Ulmer |

|
However, the simple design of the Ugly Duck calls
for the two hull sides to be made from 2-inch by 12-inch
by 12-foot boards. While I was searching high and
low for good serviceable boards of the size, and having
no luck at all, someone suggested that I take a look
at the Jim Michatak designed Harmonica in the Duckworks
Magazine.
I did, and I found the Harmonica had the most of
the features that I was searching for in a small family
size boat. The Harmonica's design was basically a
simple plywood box that did not require hard to find
lumber. The Harmonica could be built with off-the-shelf
size lumber, which, based upon a person's budget,
may be either fairly inexpensive external plywood,
or the more expensive marine plywood.
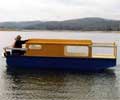
In addition, the design of the forward deck of the
Harmonica makes entering and exiting the Harmonica
very easy. It is one of the few boats of its size
where crewmembers can board the boat from a beach
without getting their feet wet, as you can see by
the photo of Chris Crandall's Harmonica "Occam".
 |
Chris Crandall's
Harmonica |
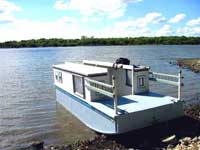
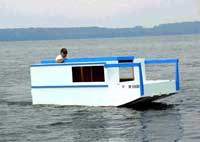
Another feature that makes the Harmonica great for
family use is the open "bird-watching" top
that allows children, as well as adults, to safely
stand in the center of the boat while underway. The
boat's design also makes it easy for a builder to
select window placement, and the actual number of
windows desired.
The roomy 5-foot by 6 1/2-foot cabin has two 6 1/2-foot
bunks/seats that allows four adults to sit in comfort
while heading out for a picnic, or a day of lake cruising.
The 3-foot rear compartment area of the boat contains
room for a seat for the boat operator, and even a
second seat for a small child. Room for 5 or 6 adults
in a boat of this size is quite amazing!
Two adults could easily spend several days, or longer,
cruising sheltered waterways in comfort. Now, keep
in mind that I'm not speaking about comfort that you
would receive in a suite on the Queen Mary, but, never
the less, a place that you could sleep, cook, and
in general have a great time!
What finally convinced me to build a Harmonica was
the information contained in the Internet Websites
of three Harmonica owners and builders, Chris
Crandall, who built the Harmonica prototype,
Robb Allen, and Jon
Rieley-Goddard. The Harmonica's build
by these three gentlemen show great craftsmanship,
and show the various window placements, and color
designs that are possible with the Harmonica.
| Photo by Robb Allen |
|
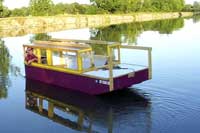 |
Photo by Jon
Rieley-Goffard |
PRIOR TO CONSTRUCTION INFORMATION:
I learned the hard way, many years ago; that the
best investment I could make in building a boat was
to order the boat plans. It's easy for a person to
be lured into thinking that a boat looks so simple
that detailed plans are not really necessary. However,
without the boat plans, a person can easily end up
using an excessive amount of expensive building materials.
The Harmonica's plywood layout drawing, showing how
to cut the plywood panels with the least waste of
material, alone could save you the price of the plans.
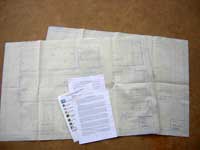
So, having decided that the Harmonica would be a
great boat to build, I ordered the plans from Duckworks
Magazine. In a very few days the plans arrived from
Jim Michalak. The Harmonica plans package consisted
of two 24-inch by 36-inch size sheets of construction
drawings, measurements, and a plywood sheet layout
drawing. In addition the package contained two pages
of detailed building instructions, and four pages
of excellence comments and suggestions from Jim Michalak
on boat building materials and tools. In addition,
there was a single page listing the various boatbuilding
supplies available from Duckworks Boat Builders Supply.
| Harmonica Plans
Package |
|
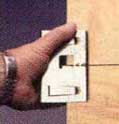
The only problem I had studying the documents was
Jim Michalak's use of actual wood sizes. Having spent
a lifetime buying wood stock by measurements that
are not correct, such as a 2" x 4", it was
somewhat confusing to read the correct dimensions
as 1-1/2" x 3-1/2"! However, it was a simple
task to make a material list of wood I would need.
After making a list of materials needed, I went to
the two big home improvement stores in my area, Lowe's
and Home Depot. There I bought ten sheets of plywood
and the lumber that I would need to start building
the Harmonica. Using the Internet I also ordered a
1-gallon epoxy kit that contained the hardener, and
a pound each of 3/4-inch and 1-inch bronze ring nails.
A complete list of materials used in my construction
efforts will be listed later.
LET THE CONSTRUCTION BEGIN!
Since the major components of the Harmonica are build
from plywood panels that are cut from 4' x 8' sheets
of 1/4-inch and 3/8-inch plywood, I knew that I would
be spending a lot of time on my knees on a hard concrete
floor, unless I made a worktable large enough to hold
a full 4' x 8' sheet of plywood.
I also wanted the boat, at some stage of construction,
to be on a dolly of some sort so that it could be
rolled from one side of my work area to the other.
To accomplish both tasks I built a very simple dolly
out of five 2" x 4" x 8' lumber and 3-inch
deck screws. I then mounted six swiveling casters
under the dolly.
When I set the dolly on a sawhorse and a small table
it became my new worktable. With this worktable I
could cut out the boat's panels without any fear of
damaging a good saw blade by hitting a hard surface.
Also, with a flat 4' by 8' work surface it would be
easy to lay out the bulkhead's plywood and lumber
stock to insure a square bulkhead. Which, in my opinion,
is kind of important when you are building a square
boat!
 |
Photo of dolly
being used as a worktable |
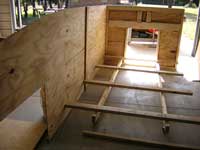
My overall construction plan was to first build the
boat's four bulkheads, butt joint together the two
1/2-inch plywood panels that make each side, and then
attach the bulkheads one by one to the side panels.
Prior to attaching the bulkheads and sides together,
I would attach the center log and top log to each
side. Once the four bulkheads were attached to the
sides, the bottom chine logs would be added to the
sides. The boat would be built bottom side up, and
turned over only after the bottom was completely finished
and painted.
As I looking closely at the plan's plywood layout
drawing it dawned on me that it would be best if the
plywood for the boat's bottom were first cut from
all four sheets of 3/8" plywood. The remaining
3/8" plywood stock would then used for the boat's
four bulkheads. I determined the maximum amount of
material I would need for the bulkhead pieces, and
cut the four 3/8-inch plywood sheets across, leaving
63-inches by 48-inches panels for the bottom sheeting.
By measuring carefully, and following the plywood
lay out drawings, I was then able to cut all the bulkhead
plywood panels and lumber stock to form the bulkheads.
I set these "bulkhead kits" aside to wait
for the delivery of the epoxy and nails that I had
ordered.
| A Bulkhead Kit |
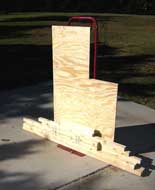
|
Since two of the 1/4-inch plywood sheets would not
be used until later in the construction, I attached
both plywood sheets to the top of my worktable with
1-inch deck screws to form my worktable top.
About this time the epoxy and bronze ring nails arrived,
so I started epoxing and nailing the four bulkhead
together, allowing about 24-hours for the epoxy to
cure.
I'm afraid I'm one of those boat builders that boat
designers hate! I always want to change some part
of a boat's design to fit some preconceived idea that
I have to "improve" the boat. With the Harmonica
I thought the boat could be improved (at least for
my use) by extending the bunk/seat area into the storage
space at the bow of the boat. With the bunk so extended,
it would be possible to use the freed up space in
the center of the boat for a Porta-potty and a cooking
area. Towards this goal I modified bulkhead #2 by
cutting two side openings in the bulkhead in place
of the one large center opening called for by the
plans. Before you start yelling at me…be advised
that I discussed this modification with Jim Michalak
prior to making a single cut!
The other modification I made to the bulkheads was
to reinforce the stern bulkhead to carry a 57-pound
4 HP Nissan outboard motor. The bulkhead as designed
is very strong, but in the back of my mind was the
thought that someday I might attach a Garelick fixed-motor
mount, that I had on hand, to the transom. Thereby
moving the outboard motor further away from the cabin
area. Hopefully, this would reduce noise and fumes
in the cabin area, but the remote motor mount would
most likely increase the stresses on the transom.
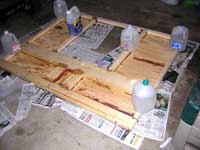 |
Modified Stern
Bulkhead with epoxy curing |
On
to PART TWO

|