| So with the second
summer getting under way and Serendipity (a catamaran
named Roonio designed by Jeff Gilbert) in need of
repairs, a yuloh, and a bridge deck tent I swung into
high gear. I would suggest reading the first few articles
about this project as I’m writing this one on
the assumption you already have.
The first repair I
tackled was taping the fore and aft bridge deck seams
with fiberglass tape. Simple, easy, and it allowed
me to go over the whole boat inspecting for unknown
damage or potential improvements. The original design
goals had stated that the boat would be sailed mainly
in wide rivers and or protected waters, but I see
great potential in this little boat to do some coastal
camping.
 |
So with the
second summer getting under way and Roonio in
need of repairs, a yuloh, and a bridge deck
tent I swung into high gear. |
While out in waves, the boat worked more then expected
and the Gorilla Glue I used started letting cracks
form and a slight bit of water was coming in. I can’t
have this happening out away from home.
The sanding led to finding a gudgeon being a little
whacked. I certainly don’t remember this happening.
Maybe it was on the last day of sailing last year
when I flew her down before the wind flying wing and
wing surfing down the waves. I think we were peaking
over 15 knots for a few exhilarating seconds.
 |
The sanding
led to finding a gudgeon being a little whacked. |
So another quick repair. Sean shaped some ¼”
ply and we epoxied and then glassed it onto the stern.
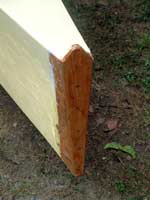 |
Sean shaped
some ¼” ply and we epoxied and
then glassed it onto the stern. |
Sean built a proto-type design called Slam
Dink by Jim Michalak years earlier and
actually instigated me into getting Jeff to allow
me to build this proto-type. And one final repair
I will mention before moving onto the bridge deck
tent is the outriggers. These were not designed by
Jeff but rather conceived by my father and executed
by myself. Here is our first attempt.
 |
The outriggers
were not designed by Jeff but rather conceived
by my father and executed by myself. |
Although strong enough in appearance, there where
two problems with the red cross supports. The first
is that they where not strong enough to take oarlocks.
With one person sitting in each well facing backwards
and stroking in time Serendipity can really move nicely.
A secondary form of movement is definitely needed
for the Everglades Challenge for many self-explanatory
reasons. Secondly my father said he thought his “bottom”
might have a little too much bottom to it for them.
So here is my solution.
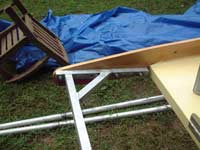 |
They where not
strong enough to take oarlocks, so here is my
solution. |
It took about two hours of wielding and cutting but
it came out sturdy, rust free, and very light (less
the 4 pounds each but maple beams are more likely
to give way than the aluminum.) In the background
you can kind of make out the masts, also made of aluminum
and rosette wielded.
Now onto the Bridge Deck Tent.
First off let me say that I started this project
by looking for a nice 3/2 season tent that would fit
the 4x8 bridge deck and sleep two. After much searching
I found one that was slightly too big and costing
well into the $300 range. That is when I decided that
I had all the skills for tent making. Well time will
tell.
I purchased five tent
replacement poles, some flexi-clear,
and some canvas
hold downs from the shop here at Duckworks.
Off of ebay I got some red breathable nylon ripstop
for next to nothing. The year before I purchased a
9’x9’ all purpose rain fly from Guide
Gear that I highly recommend and in my case will be
stretched over the finished tent to give protection
against rain. Then I had some figuring and fussing
to do.
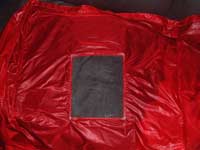
I stitched five pockets into the ripstop and two
windows, one on each side.
 |
I decided that
I had all the skills for tent making. Well time
will tell. |
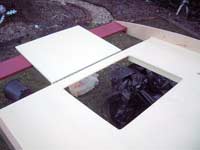
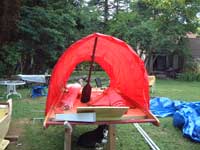
I had to figure out the length of the poles and then
the finished height of the tent. Here is a early mock
up.
 |
I had to figure
out the length of the poles and then the finished
height of the tent. Here is a early mock up. |
In all it will end up being just over 4’ in
height, enough to sit in and certainly enough to sleep
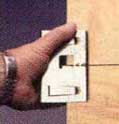
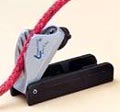
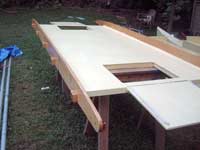
in. I also had to come up with a nice way to mount
the tent poles and fasten the edges of the tent down.
I used scrap ash I had left over from booms to make
some blocks, which I epoxied on and then inserted
maple dowels through and into the bridge deck.
 |
I also had to
come up with a nice way to mount the tent poles
and fasten the edges of the tent down. |
We went camping a couple of times and the tent proved
its worth. here is a picture of the first night we
used it with my father, Bill, fishing. I am working
on further inprovements this summer and plan on doing
two long camping trips with my father. This is all
in preporation for our try at EC 08.
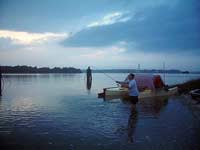 |
My father, Bill,
fishing. |
More to come...
Paul Moffitt

Other Articles
about Roonio:
|