I have good intentions, Hell notwithstanding, of making a new sail rig for my Teal this summer, most likely a balanced lug. It will be polytarp because I have some on hand, specifically the side curtains for a pipe-framed car canopy. The material seems a tad thicker than the polytarp I used for my original sprit sail. However, this time I'll sew in the bolt ropes properly, rather than just taping them. Since I'm planning to do it the old-fashioned way, by hand, that means I need a sailmaker's palm.
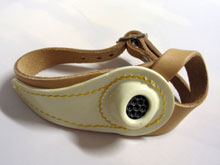
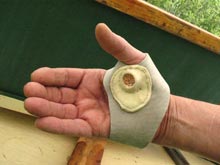
I already have one, made and given to me by a friend, an old salt who has since set sail for his last journey towards the setting sun. While I appreciate his kindness and craftsmanship, it's a keepsake. It really doesn't fit my hand right and it puts the thimble where I don't want it.
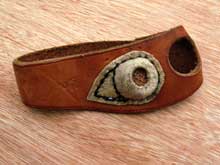 |
I already have a palm, made and given to me by a friend, an old salt who has since set sail for his last journey towards the setting sun.
(click images for larger views) |
His would be easy to reproduce. The leather is two inches at the widest, so an old belt could provide the materials. However, I wanted to see what else was available.
I cast about on the web looking for an article on how to make a palm but found nothing. This surprised me, because I can usually find articles on how to make anything, including a sextant from a CD disk.
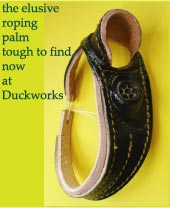
My search eventually brought me to Duckworks Boat Builders Supply and they have what appears to be an excellent palm at a fair price.
Another day, I was simply browsing through the archives of Duckworks and discovered the fine articles by Alvan Eames, Odds and Ends on Sail. One installment, More Miscellaneous Bits had a picture of what must be the simplest of all palms and his comments on why he prefers it.
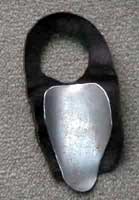 |
Alvan Eames picture of what must be the simplest of all palms |
Also found was an on-line publication of a book called The Times and Tools of A.P. Lord.
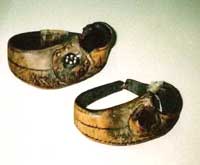
Amos Perkins Lord was a 19th century Maine sailmaker and the book had a picture of two of his palms. It's an interesting read and there are lots of pictures.
| Amos Perkins Lord was a 19th century Maine sailmaker - here is a picture of two of his palms. |
 |
Still no how-to-do articles, but enough pictures to satisfy my curiosity. I should have been satisfied with the solution proposed by Mr. Eames. But the heart wants what the heart wants, and I wanted a fancy palm like Duckworks is selling. I should have bought one of those. But more than that, I wanted to be real salty and make one myself. As an historical re-enactor, I like to make my own tools and gear the hard way, just like they did in the good old days. All I had to do was study the picture and make it look like that.
It took a little fiddling to come up with a pattern that works. Some palms, as you can see, simply have a hole cut for the thumb. Others wrap around the thumb in a more ergonomic manner. That's what I wanted. I took some paper and a pair of scissors and doodled around free-style until I came up with a pattern that looks like a "y".
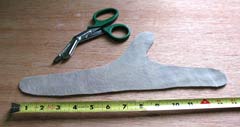 |
I took some paper and a pair of scissors and doodled around free-style until I came up with a pattern that looks like a "y". |
The thumb goes into the notch of the "y" and the two tabs wrap around it. The tail of the "y" wraps around the hand and joins the other two tabs in the back.
| The thumb goes into the notch of the "y" and the two tabs wrap around it. |
 |
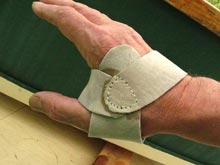 |
The tail of the "y" wraps around the hand and joins the other two tabs in the back. |
As you can see, the finished product fits. But let's back up a bit to how I got there.
The materials list included a penny, a wine cork, some rawhide, some leather, some waxed linen sewing thread, and a sewing awl. The leather I used was chrome-tanned horsehide that I just happened to have on hand, very tough stuff but very flexible. Leather is one of those things you either scrounge for or you go to an on-line supplier and buy a skin from half a cow. Consider looking for old purses or boots in your thrift shop that could be recycled. As an afterthought, I suspect you could take an old leather work glove (or even a new one), cut the fingers off, and use that for the hand piece. That could save a lot of time and you could make a second one for a left-handed friend.
Rawhide is easy to find. Go to your local pet supply store and buy one of those big rawhide chewy bones. They're hard as a rock. Soak it in warm water overnight and the next day it will be soft and flexible, almost rubbery. Take it apart and you can cut it to size with scissors.
A local craft store should have waxed linen sewing thread and the sewing awl. If not, find some decent linen or cotton thread/string and draw it across a candlestick or lump of beeswax.
The wine cork was left over from a night of debauchery, and the penny I found on a sidewalk, figured it was good luck.
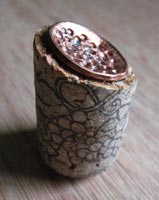
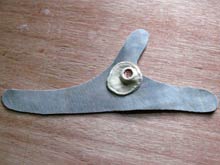
Now to build the thimble. Starting with the penny, lay it on an anvil and take up a center punch and hammer. Starting in the center, lightly pound some dimples into the face of the penny, working your way out towards the edge. It will take on a slight dished shape. This is the heart of the thimble, the piece that will hold the back end of that nasty sailmaker's needle and keep it from penetrating your tender flesh.
The thimble has to sit on the ball of your thumb, just below the second joint. It needs to be angled forward, towards your first and second finger. To get that angle, slice off the end of the wine cork at an angle. With the tip of your knife, slightly hollow out that cut end so the penny nests in there neatly. Fix it in place with your favorite superglue. When it's dry, cut a wedge shaped piece off the cork.
| With the tip of your knife, slightly hollow out that cut end so the penny nests in there neatly. Fix it in place with your favorite superglue.... |
 |
 |
... When it's dry, cut a wedge shaped piece off the cork. |
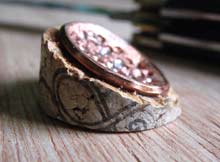
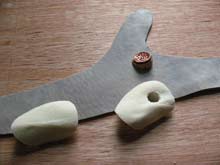
While the rawhide is wet and rubbery, cut out two matching pieces a little larger than a silver dollar. Cut a hole in one about the size of a dime. This will be the opening to the dimpled penny. Lay the two pieces on your pattern and figure out the best position.
| While the rawhide is wet and rubbery, cut out two matching pieces a little larger than a silver dollar. Cut a hole in one about the size of a dime. |
 |
Then start sewing. You'll have to sew the rawhide while it is wet. If it starts to dry out, run it under the faucet.
I clamped a piece of pine board to the edge of a table to use as a backer while I poked holes through the two pieces of rawhide and leather and sewed them. You can use a leather awl, an ice pick, or even a 1/16" drill bit to make the holes.
To reiterate, place the rawhide with the hole on top of the solid piece of rawhide and sew them to the hand piece. As you get about three-quarters of the way around, you want to slide in the penny mounted on the cork between the two pieces of rawhide. Hold it in place and finish sewing. You may have to put in a second line of stitches to keep it in place. While the rawhide is still wet, mold it with your fingers around the cork and penny making sure to push the lips of the opening into the dimpled dish. It sounds more tedious to read about than it is to actually do it.
After the rawhide dries overnight, it will be as hard as plastic. At that point, you can trim off any rough spots with a sharp blade.
 |
After the rawhide dries overnight, it will be as hard as plastic. At that point, you can trim off any rough spots with a sharp blade. |
Next, I wrapped the "y" pattern around my hand; the two short tabs around my thumb, the long tab around the back of my hand to meet them. When I decided the fit was right, I glued them in place with contact cement. I know, they didn't have contact cement in the good old days, but if they did they would have used it. It makes it so much easier to hold things in place while doing the final fastening. I sewed mine, as you can see in the earlier pictures, but you could also use copper rivets from the hardware store or simple lacings. I made the fit fairly snug, figuring the leather will stretch over time. I also made the leather of the "y" piece rather wider than it needs to be, but I just like it that way.
That’s the way I made it, others may have better ideas and I’d like to hear them. For me, it was an exercise in seeing how a piece of gear can be made by hand. I was lucky to have all the materials available.
Except for the overnight drying, this is an afternoon's project. Now comes the longer project of sewing a sail.
Don Craig
Saranac, NY
dcraig@westelcom.com |