Winter. Snow. Alaska. And we’re building a boat. Slow learners, or what? It’s the usual story –
long, complex and dull -- which boils down to ‘Scat happens.’
To back up, Anke and I sold LUNA (our Advanced Sharpie) to a fine and like-minded couple.
Then, toward the end of the coldest, wettest summer on record, got to work on our new home,
SLACKTIDE. As of this writing, she’s launched and we’re working on the interior and waiting
on spring weather for rigging. For simplicity’s sake, I’ll write as if she’s finished.
Design Tour
SLACKTIDE is a sailing barge in the Triloboat line. At 26 x 7 feet she draws 10 inches for
6720 lbs displacement. She can be loaded to 13 inches before dragging transom when heeled.
The hull is AC plywood, the cabin is insulated with composite ply/foam/ply walls and the bottom
is copper-clad.
We’re rigging her as a junk ketch. Bearing plate off-centerboards, on travelers mounted below
the windows, can be hauled fore and aft to adjust Center of Lateral Resistance (CLR) or clear the
windows. A kick-up rudder with a fair amount of balance gives good control, while allowing
shoal sailing, easy maintenance, and complete kick-up for clearing the water at anchor.
Two-mast rigs aren’t as efficient as one, but are versatile and each is easier to handle. The
combined Center of Effort (CE) can be adjusted radically. If the foresail is close-hauled and the
mizzen trimmed broad, we can sail a twisted course or in flukey conditions without a flurry of
line handling. Off the wind, we reach or run under mizzen (blanketed foresail), and on the wind
we beat or close-reach under foresail. For a little extra power, we can grab the slack mizzen
sheets from the cockpit and bring the boom inboard without actually adjusting the sheets. These
techniques ease tension when sailing in tight quarters – in harbor, say, or among the rocks.
 |
We’re rigging her as a junk ketch. Bearing plate off-centerboards, on travelers mounted below
the windows, can be hauled fore and aft to adjust Center of Lateral Resistance (CLR) or clear the
windows. |
Auxiliary power is a yuloh (chinese sculling oar) for quick grab-and-go. For longer hauls (in
calms) we’ll mount a SeaCycle pedal drive unit off the stern (straddling the boomkin to sit). We
hope that it will push us along at a blistering 3 knots. Whether or not, it’ll ease the joint strain
that can build up after several, consecutive days yulohing.
The Cabin encloses a 12 x 7 space under 4'9" headroom along the mid-line. Large windows to
port, s’brd and forward afford light, great views, and a spacious feel. Generous ‘eaves’ keep the
side windows clear of rain for good visibility.
The forward 2' is taken up by a thwartships strip-galley with woodstove to s’brd. The walls,
above the 16" counter-top, will be lined with dry goods in mason jars, spices, pots’n’pans,
utensils, mugs, etc.. Two drawers and a woodbox round up galley stowage.
Aft, in an alcove under the deck (not counted in the 12' cabin length), is a full-width chest-ofdrawers.
It contains our personal items (books and clothes, mostly), footwear, nav station and the
heart of the electrical system. Its drawers are lidded, so they are weather-resistant and can serve
as seats and light-duty tables.
These furnishings leave a contiguous, 10 x 7 foot ‘flexi-space’ (the aft 2ft of carpet is allweather,
and serves as a mud-room). We’ll sit, kneel, lounge and sleep in this space, with the
option of folding chairs if we’re in the mood. Standing headroom is available in the scuttle (that
curvy structure on the aft mid-deck). A fold-up table along the s’brd wall affords a writing /
project surface.
We’ll have the option of steering from inside, via linkups to the tiller, either seated with a view
out the side and forward windows, or standing with a view through the scuttle windows.
All shallow (easy-access) storage will be in drawers within the cabin. Deeper storage is in the
two, large holds, fore and aft of the cabin (these are walled off by water-tight bulkheads). Our
gear and supplies are organized by water-resistant totes or drybags.
The idea is that containerized heaps can be moved around and left outside in marginal weather
when cleaning or painting. Managing this had been a real challenge on LUNA, whose contents
were loose within fixed compartments. Lacking shoreside storage or shelter, we ended up failing
in our attempts to clean from stem to stern, or, if we managed, it took a big chunk out of the best
cruising weather.
At each end, we’ve got large lazarette/anchor wells. Self-bailing, these hold utility and spare
lines, chafe gear and what some would call a paranoid heap of anchors and rode.
 M-I-C, K-E-Y, M-O-U-S-E! M-I-C, K-E-Y, M-O-U-S-E!
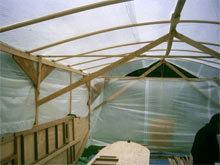
You can see the under-built shed members. The yellow blur past the end w all is a 55+gallon barrel tied to the piece-ofsphagetti ridgepole.
Later, we added several lines, trucker’s-hitched between the upper wall... um... ‘sheers?’, to keep the sides from blowing
out.
Snow had to be bounced off by broom after about 4". If it was clear and freezing, we had to wipe condensation from the inside before it thawed and dripped onto paint or epoxy. |
Building the Hull
15 August 2008: Our first step was to build a shelter (no longer quite as dumb as we look). I’ve
always wanted to build an arched-girder shed. Alas, the longest 1x4s available were only 16 feet,
which didn’t quite cut it. We settled for an arc-roof shed. It doesn’t need to be very stout, since
this is a two month project, right? RIIIIIIIGHT. The poor thing was to last through four-and-ahalf
months, weeks of snow and several 50 to 70 knot blows. Tie-downs from the ridge-beam to
SLACKTIDE, and two, water-filled 55 gallon barrels kept us earthbound. The reed that bends
does not break...
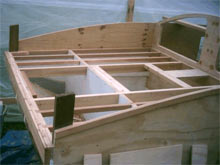
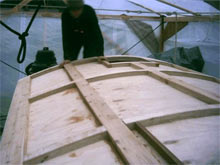
Our first job was to loft the bow and stern sections, one on each side of a plywood sheet. This is
were we make end-curve decisions and finalize bulkhead locations. The result lets us take exact
bulkhead height measurements and top and bottom bevels (sides are rectilinear). Using this info,
we cut and frame the bulkheads with 2x red cedar, glued and fastened with bronze, ring-shank
nails.
Bulkheads adjacent to the cabin have 1 ½" blueboard foam bonded between frames, and a layer
of 1/8" mahogony ply (not shown) encapsulating the foam. We used a latex cove glue with
Liquid polyurethane glue (LPU... we used Gorilla Glue) around the edges.
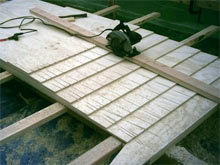 |
The circular saw is fastened to a 2x4, which bridges the staggered
plywood edges. Depth is set to ½" (or thickness of ply). Cuts every
several inches define the bevel angle. Plane to depth-of-cut AND
parallel veneer lines fo r a reasonably smooth, jig-less bevel.
Note that bottom waste piece is staggered, same as ply... it protects
the last, delicate feather edge. |
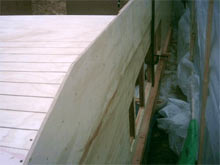
We joined the sides with 12:1, or 6":½" feather scarfs, angled aft. Staggering the panels, we
crudely scored to depth at right angles to the veneer lines, planed and belt-sanded flat.
Restaggered for the back scarf and repeated. LPU gap-filled any imperfections. Once joined, we
transferred the loft lines to the sides and trimmed them to shape.
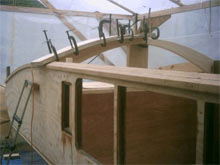
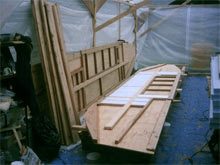 Sides seen framed, before and after foaming. Framing
anticipates structural joins (bulkheads, decks, etc.),
internal window framing and hardpoints for attaching
cabinetry. Sides seen framed, before and after foaming. Framing
anticipates structural joins (bulkheads, decks, etc.),
internal window framing and hardpoints for attaching
cabinetry.
Note the saw n, 2x10 ‘nailers’ along the fore and aft
curves. These provide beef for fastening the bottom more
easily than bending 2x2s to the short arcs. Tack’n’tape
would be an alternative, here.
The vertical rectangles, port and aft, are bulkheads..
Only the cabin forward blkhd is full-height. W e split it
into two sections to ease rolling the hull. |
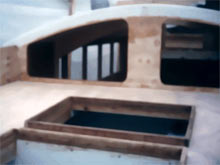
Next, we framed, insulated and mahoganied the sides. This worked well against the hull, but the
mahogony warped every time the sun came out and we had some separation. With a little help
from extra nails and epoxy fillets around the seams (planned anyway for wipe-down cleaning), I
hope we got it well sealed. Windows were cut out with a 4" holesaw at the corners, then a flush
trim router around their perimeters.
The next phase was to hang the sides on a minimal jig (it would be used, later to turn the hull)
and insert the lower bulkheads (those not protruding over the sheer). Then we planked the bottom
in two courses; kerfing the first (inboard) 3/4" layer along the curves and bending the second
(outboard) ½" layer kerfless.
 First, 3/4" course of bottom, showing kerfing.
We kerfed every 3" and 1/4" deep (leaving ½"). First, 3/4" course of bottom, showing kerfing.
We kerfed every 3" and 1/4" deep (leaving ½").
Bend slowly into place. Some crack(l)ing
sounds are alarming, but seem harmless. I
think that a few fibers give at the bottom of the
kerfs. It seems solid as a rock when complete.
Use a gap-filling glue (e.g., LPU or thickened
resin) between sheets at the curves to ensure
voidless adhesion.
Note the doubling plates on the sides, which
double the ½" hull sides to a full inch. 18" is a
convenient height; we get three per sheet of
48" ply and they extend 6" proud of the max
waterline.
Grabber screws provided clamping pressure, through both layers and into 2x framing or scrap, as necessary.
Get creative to get yo ur panels to lie close together, but plan it out beforehand! Mark guidelines on new layers
that cover your old landmarks. |
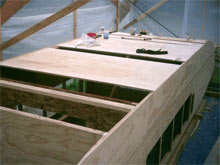 Planking the dead-flat is piece-of-cake. Planking the dead-flat is piece-of-cake.
We staggered the seams by two feet and
resin/taped the exposed seem inboard the hull.
Copper sheets overlap the outboard seams,
acting as butt-blocks. Nice, stiff result.
Note: Our ply was 4' wide vs. 3' copper. To
avoid seams lining up every so often, we offset
the initial copper edge from a ply seam by 6".
That guarantees that the nearest any two seams
can get is half a foot. |
 |
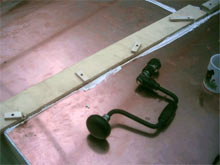
The PU glues got a good ‘grab’ on the copper. It only needed help at the
ends of the curved pieces. |
| Shown here is the upper end, the lower end we
clamped a 2x4 athwartships. |
 |
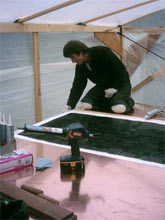
Copper plates came next (1/16" in 3x8 plates, wiped with acetone and roughed up, on the glue
side, with a palm sander), glued with 3M5200 (white, expensive and high-psi) and Sikaflex 291
(black, cheap and lower-psi). Our theory is that the edges, being more vulnerable to peel, could
use high psi glue. The color coding helped us see where the two glues bounded. The cordless
caulking gun, at which I first scoffed, probably saved us from a bad case of repetitive stress
syndrome. We needed temporary hold-downs at the inboard end of the curves, the holes of which
we later filled with bronze ring-shanks (heads removed).
Ditto for coppering the side-plates, plus some fasteners to hold them to the hull.
Note: This is a place where I would not use epoxy. Copper and wood have differing rates and
extent of thermal expansion. The more elasticity in the glue, the merrier. This whole ‘gluing of
plate copper to plywood under the waterline’ is experimental. You’ll get a postcard from your
humble but intrepid guinea pigs in a year or two.
The polyurethanes cleaned up pretty easily by smearing them off the copper after drying. We got
a good test of the overall adhesion when we rolled the hull upright (that kind of simple task that
still manages to pare a year or two off your life). The only injury (due to a teensy miscalculation)
was a bit of copper peel where an edge hung up on a downside skid plank. Despite the full
weight of the boat and a 10 ton come-along, the peel stayed limited, and was easily reglued.
Later, 1/4" bronze angle (shaped for the curves by a local machine shop) was screwed and glued
along the chines to protect and pinion the bottom and side plates.
 |
Fairly robust framing... probably
could’ve used less and lighter. |
| Hatch coamings are dead simple...
never had one fail, but if they did,
they’re easy and cheap to rebuild. |
 |
Fore and aft decks came next. They’re flat and sloped outboard to drain. The aft deck hatch
coamings are built on a sub-deck to bring their lids flush with the aft deck level. This will keep
us from stubbing toes and allow us to ‘camp out’ comfortably in the cockpit.
 We’d clamp these arcs up a few a day. They were used as
butt-blocks between cabin deck sheets and at the ends where
foam would otherwise be exposed. We’d clamp these arcs up a few a day. They were used as
butt-blocks between cabin deck sheets and at the ends where
foam would otherwise be exposed.
Arcs were later chopped to fit between longitudinal
framing. Wider arcs were used for the stovepipe exit and aft
for solid cleat mounting.
Note that the rubrail provides extra landing along the sheer
bevel. |
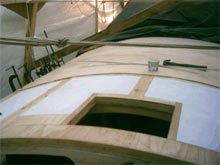
Next trick-in-a-row was the mid-deck. This called for a number of curved, thwartships blocking
pieces of 2x thickness. We glued them up from 3/4" ply strips (offcuts from cross-plank and
bulkheads), using the forward cabin bulkhead as a jig, and shims at their mid-points to over-bend
them a bit. Plastic resin glue, used for framing earlier, was now taking days to set in the lateautumn
cold and damp, so we were buying up all the LPU in town.
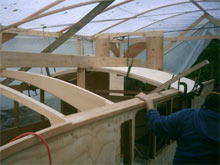 Crowned decks are the hardest part of Crowned decks are the hardest part of
Triloboat construction. The simple,
section-of-cylinder design means all arcs
are at least alike, and allow this
strongback method.
Brace the first layer into position and
leave in place until the composite deck is
(glue) set. Minor irregularities are no
problem, so don’t stress.
8' arcs were temporarily used to bring
sheet edges into line, then removed,
chopped and installed after the
longitudinal framing was in (don’t cover
up temporary grabber screw-heads!). |
Getting the ½" ply to take the high crown was surprisingly hard (good time for at least six hands).
We started aft to guarantee a tight fit on the proud aft cabin bulkhead (the forward end could run
free, if necessary), and screwed its mid-line up into a longitudinal strongback. We kept that in
place until the longitudinal framing had been installed and braced to keep a straight run (wants to
go swayback). Next came the thwartships blocking, foam and top layer of 1/4" ply. From this
point on, the composite deck was quite rigid.
 |
First layer plus framing, then foam and second layer. Note that seams of both layers align on thwartship, solid
arcs. The eaves come in handy for clamping, with a few, temporary grabber screws for good luck. |
| We used
LPU for most framing and surfaces... would prefer thickened epoxy. |
 |
We sheathed all decks in Dynel, set in epoxy, then tack’n’taped the scuttle walls in place. This is a
forgiving-to-build, easy-to-clean option. We used 3/4" as a landing for window screws.
To thicken epoxy, we used white, bleached flour to thicken our epoxy (cheap, and zero failures in
a light, tack’n’tape dory we’ve been thrashing for three years, now).
At a friend’s suggestion, we measured flour into a gallon-sized ziploc (draped over a coffee can),
then epoxy hardener (being the more viscous), then resin. Start the clock and mush it up until
consistent, snip a corner off the bag, and apply like frosting. Much neater than transferring the
glop, and the time saving goes toward longer available working time.
What followed (in fact, we were deep in it, by now) was a frigid blur of paint and detail work
(opening port hardware, companionway trim and drop-boards, hatches, caprails, etc.).
Hypothermic hours wasted in reptilian slow-mo. Windows were installed in there, somewhere,
bedded in a latex compound that dursn’t get wet until thoroughly dry.
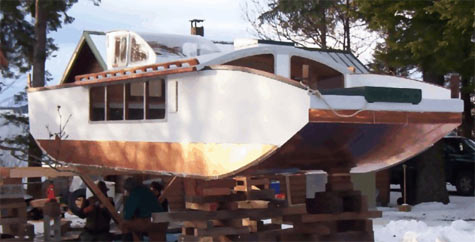
But all’s well that ends well. On 30 December a commercial, wish-bone trailer and
But all’s well that ends well. On 30 December a commercial, wish-bone trailer and a bunch of
friends helped us launch. Exhausted, we’ve spent the rest of the winter months recuperating and
cherry-picking interior projects.
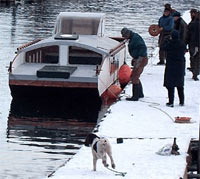 |
But all’s well that ends well. On 30 December a commercial, wish-bone trailer and a bunch of
friends helped us launch. |
Retro- and Prospectives
In some ways the project was out-of-control. It took twice our ‘probable case scenario’, and went
a month and a half past our ‘worst case’. A late start in an extreme year slowed us and all our
glues, beddings and paints.
We had a pox of material irregularities from suppliers with whom we’d been perfectly happy.
Curved copper plates had to be trimmed straight. Our otherwise beautiful plywood came a tad
over-size – resulting in some 3/16" cumulative errors before we twigged. Lousy framing stock –
what’re we gonna do, send it back by barge? – what we couldn’t fudge, we had to mill from local
boat-wright stock. Worse, because of the lumber upgrade, a certain yachtiness crept into the
program, and that takes time (purple heart is just too pretty to paint). Upgrades and maintenance
of the shed took a toll. But our landlords were both merciful and gracious. We can’t complain.
In other ways, it went very well. The ultra-simple Triloboat construction held no surprises. We
were able to build relatively cheaply, robustly and quickly (in comparison to other hull
alternatives), despite adversities. The space translated satisfactorily from paper to life size, with
all ergonomics as good or better than we’d hoped.
The project cost roundly $10K (Sitka, AK dollars... things generally cost 10 to 25% more, here, or
to get them here) in materials and space rental ($1200 for rent, $500 for tent materials). About
half of that went to the copper, bronze and aluminum, which we appear to have purchased near
peak (copper plate was $5.35 / lb). We probably have $500 to go in sailcloth and miscellaneous
expenses, plus another $2K (yeeesh!) for the electrical systems.
A standing consideration in building a (relatively) inexpensive boat is that investments in
infrastructure add up to a whopping percentage of total costs (enclosed, heatable shop space in
Sitka starts around $1500/month and lies far from the harbor). It’s possible that our tenure would
have been cut in half, but commute and transportation costs would have chipped in. Discomfort is
cheap. Shed, table and blocking parts (down to most of the grabber screws) were reused locally.
Next time, we’ll consider building the hull upright, from bottom up (as we did Andy Stoner’s
T32x12). Our concern was bending ply and gluing the copper ‘upward’ at the ends. In hindsight,
we could have jacked and braced with considerably more power and area than our body weight
provided (a real, structural overhead to brace against would have helped). Rolling the hull (jacked
up to balance point, then dropped onto stacks of tires) only took a day, but with preparations and
nervous exhaustion, it might have been a week!
Once we’re outfitted and rigged, we plan continue cruising the islands of S.E. Alaska.
SLACKTIDE will be our mobile home, subsistence platform and a cozy corner of warmth in long
stretches between settled towns.
We’ll watch for your sails!
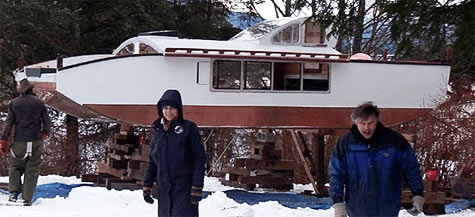
Thats my back, Photo-artist Mim McConnell, center. Dan Casey,
right, and his wife, Arlene, are building a
Wharram catamaran.
For more on SLACKTIDE and other designs, please visit us at
https://www.triloboats.com
***** |