 |
The Stasha,
the world’s lightest nesting dinghy weighs as much as
a baby bird (wandering albatross chick). |
There’s a saying that I like. ‘If you get in a car
and don’t know where you’re going, you’ll never
get there’. Designing a boat is a bit like this as you need
to know a few things before you can begin. Knowing where to start
is easier said than done. So many things can influence the design.
I have found that a good place to start is to first think about
what you don’t want. For example, I didn’t want a
heavy dinghy. Nothing spoils the dinghy experience more than a
weighty tender that is hard to move about and stow. This was my
starting point. No matter what shape or size of dinghy I came
up with it wouldn’t be a heavy one!
For years, I’d been intrigued by boats I’d seen
in America that were made using materials from light aircraft.
Constructed from a framework of wood and covered in cloth, they
looked fragile but were obviously quite tough and since I was
determined to keep the weight down I would also have to employ
a similar system. So deciding what I didn’t want from my
dinghy led me to the construction technique I was going to use.
However, there’s no point having a light dinghy if you
have no where to put it. My yacht is just 24 feet long and the
only place I could think of to stow a dinghy where it wouldn’t
be in the way, look ugly or be unseaworthy was on the tiny foredeck.
I got my tape measure out and discovered that it was about 4 feet
wide at the aft end where the cabin begins and was a bit more
than 4 feet from there to the bows. So it would have to be a nesting
dinghy. In theory it could be about 7 feet long when assembled
and that was a good size for a small yacht. And so was born the
idea of making a super lightweight nesting dinghy.
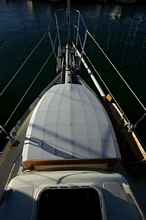 |
Stasha dinghy, nested and stowed on the deck
of a Pacific Seacraft Dana 24. |
There’s not much point worrying about aesthetics when
you are designing a dinghy, the most important thing in my opinion
is stability. There is nothing worse than a tippy dinghy, except
perhaps a heavy tippy dinghy. Light boats are less stable than
heavy boats so I would be relying mainly on the shape of the boat
to provide stability. This meant that it had to be as square as
possible. I now had enough information to design the boat’s
shape.
The rest of it would be guesswork based on experience. What would
happen if I cut a boat in half to make it nest? Would it be strong
enough? What kind of forces would the join be under? How would
the stringers attach to the end panels? These and many more questions
filled my brain. As far as I could tell, no one had ever built
a dinghy like this and I wondered why. Have people tried it but
drowned during testing or has no one ever tried? Maybe it was
a stupid idea that would never work but one of the great beauties
of a lightweight boat is that they are cheap to build. Less materials
means less cost. I could afford to simply make a boat and see
if it worked.
Normally nesting dinghies are made so that the front section
comes off and fits inside the rear section but this does not seem
logical to me for many reasons. The shape of the front section
always needs to be quite pointed but this reduces stability too
much. It also means that the interior volume of the dinghy is
much reduced so you might have an eight foot nesting dinghy but
it will feel much smaller. Then there’s the rowing position.
It’s perfectly logical to put a thwart on or above the join
but it leads to a bows down attitude when rowing which makes the
dinghy hard to row and just looks wrong. Rowing is easier when
the bows are slightly up.
The whole concept seemed flawed to me so I tried a bit of lateral
thinking and did some sketches with the rear section fitting into
the front section and suddenly everything started to make more
sense. The most obvious problem with doing it this way around
was that the rear section would be slightly narrower than the
front which would mean a step where they join. In fact this is
not a problem as the bottom of the dinghy remains flush, it’s
just the sides that have a small step. I doubted if it would make
an appreciable difference to the finished boat’s performance.
 |
Sunlight glows through the translucent skin
of the Stasha. Note the small step at the join. |
This one compromise seemed a small price to pay for the host
of advantages that it brought the design. I could have a fairly
fine bow, a good interior volume, great stability and a perfect
rowing position. Another bonus with this set up is that the rowing
position doesn’t have to change when you take a passenger.
Not only this but if the passenger sits in the front section back
to back with the rower, the combined weight is centred in the
boat increasing stability still further and each occupant has
a clear, unobstructed view of their surroundings. This is much
more pleasant for everyone. Yet another advantage was the fact
that the pintles for the rudder are stowed inside the nested boat
so ropes can’t get caught on them.
To simplify the building process, I decided to do away with any
hint of sheer and make the top of the boat completely straight.
Simplifying the wood requirements would also make the boat easier
and cheaper to build. Now I had all the information I needed to
start to design the boat. I made a few sketches just to see how
it would look. Although it was boxy it still had a nice boat like
shape which was pleasing.
Next I made a 1 -10 scale cardboard model 220mm long. I wanted
a near flat bottom for maximum stability and ease of build but
I suspected that the fine framework allied with the pressure of
the water on the hull would flex inwards so I incorporated a slight
V into the bottom. This would also add more strength to the structure.
The sides are almost upright, with only a slight angle outwards.
Again, this increases interior volume and stability.
The simplest way to build a boat like this is to make a jig.
Panels are cut out and screwed to the jig and then the stringers
and ribs are attached to it to create the framework. Happy with
my cardboard model I divided it up into 5 sections and used these
measurements to make the stations that would dictate it’s
shape. I scaled up the measurements by simply adding a zero. Then
these measurements were converted into instructions using the
simple ‘join the dots’ principal that all Woodenwidget
dinghies are built with.
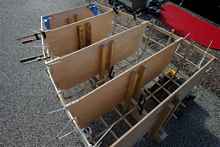 |
This photo shows the jig for the front section
with all panels, stringers and ribs in place. |
Deciding how many stringers and ribs to use was decided by guesswork
based on experience and finally what ‘looks right’
while trying to minimise weight and keep the build simple. Obviously
the more ribs you have the more work there is to make and fit
them. Since lack of weight was everything I did err on the light
side.
The end panels on the jig stay as part of the boat while the
inner stations are only temporary. The end panels have slots cut
in them to accommodate the stringers which are then glued in with
epoxy resin. The stringers are held in place on the inner stations
with cable ties. The following day the ribs are made and glued
in place. The ribs are glued everywhere they touch a stringer.
This gives over 60 glue joins which makes for a surprisingly strong
structure.
The making of the ribs caused me some concern. On the one hand
I wanted the dinghy to be easy to build but it had to be light
too. I considered a system that had no bent ribs but it meant
making nearly 40 mortises which would take a long time and require
a certain skill. It would also add weight and complication. So
I decided to take a fresh look at bending ribs with heat.
At some point most boat builders will have a go at steaming
wood. It’s a lot of fun and it’s amazing what you
can put a piece of wood through before it breaks. If you want
to really understand wood this is a great way to do it. You will
walk away with a new respect for it as a material.
Some woods bend easier than others so I chose ash because it
is strong and light as well as easy to bend. The straightness
and orientation of the grain plays a big part in how far you can
bend wood as does the amount of moisture content. Thin wood bends
easier than thick wood but in any case you’ll need heat.
Most boat builders will construct a steam box to do this but since
there are only 9 ribs to be bent in the Stasha I needed to find
a simpler way.
Pre soaking the wood for a couple of days is essential. Once
the wood is completely saturated, they are fitted to the jig.
The centre is clamped to the keel and each side of the rib is
pushed down while applying heat from a hot air gun. The ribs are
pushed down in gradual stages until they touch at all the stringers.
This is a little time consuming and it helps to have patience
but still easier than any other system I could devise. It’s
also the lightest way and gives the dinghy a nice rounded boat
shape. This also makes it easier to fit the cloth later.
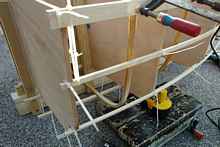 |
This shot shows one of the ribs being gradually
persuaded into place with heat from a hot air gun. |
The ribs are then glued where they touch at all the stringers.
A day later the structure can be removed from the jig. It’s
still quite floppy but gets much stronger at every stage. (To
save wood, the stations are cut down to make the jig for the rear
section of the dinghy). Inner gunwales and reinforcing knees are
added for strength and that’s basically all there is to
the wooden structure. Not one screw in it. It’s thanks to
the amazing bonding strength of epoxy that a construction so light
is even possible.
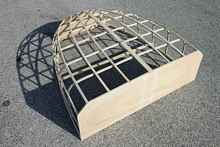 |
Here’s the framework for the front section
complete, just awaiting the kevlar twine and the cloth. |
Now all the hard and messy work is done. All that remains is
to cover the framework with a special heat shrink Dacron cloth.
It’s attached with a product called Heat’n'Bond which
is glue on a roll. It is melted with a humble domestic iron. This
is cheap, light and very easy to use. It also sticks very well
to the cloth and has excellent sheer force qualities. This Heat’n'Bond
tape is applied to the keel, gunwales and end panels.
Now Kevlar twine is laid diagonally across the boat and glued
to the gunwales. This helps to reduce twist in the structure and
also to give more for the cloth to lay against than just the stringers.
The cloth is laid on the structure and glued to the gunwales and
end panels, then the iron is run over the cloth and all the wrinkles
and baggy bits simply disappear leaving a drum tight smooth finish.
This is very satisfying to do. The edges of the cloth are protected
by small battens of wood and finally coated with a water based
varnish but this is just one way to waterproof the fabric.
 |
Here the Dacron cloth has been glued in place.
The remaining creases magically disappear when the iron is
run over it. |
Having made the two halves it was time to work out a way to join
them. There’s no point having a nesting dinghy if it can’t
be easily assembled either on land or on the water. Initially
I thought about a very minimal bulkhead for the join along with
some kind of waterproofing but that hardly seemed easy. Far better
to sacrifice a little weight and have fuller, higher bulkheads.
This means that each section is a boat in it’s own right
so there is no need to waterproof the join at all. Two simple
keyhole slots are all that is needed at the bottom of the join
and two bolts at the top. Assembly takes less than a minute.
 |
Here the keyhole slot for joining the two sections
can be seen. |
What we have here is a basic 7 foot nesting rowing boat which
is probably fine for most people especially as it rows so well
but I also wanted it to sail. Because the rear section nests in
the front section, centreboards and the like are out of the question
and in any case fitting something like that would add weight and
the potential for leaks. It would also be demanding to do and
this doesn’t fit in with the easy build ethos.
Rowing Stasha |
 |
The keel is bolted to the side of the boat and can swing up if
you run aground. Here the slab sides are a bonus as it gives somewhere
to attach the keel lower down. The mast support is made from two
thwarts, the upper one bolts to the top of the gunwales and the
lower one rests between the ribs below it. Diagonals of string
must be added to help spread the load from the mast. Simple, effective
and light. The mast and rudder from an Optimist is used with a
slightly cut down sail.
If you want an outboard then you’ll have to reinforce and
thicken the transom. This adds about half a kilo to the weight
of the boat. This option has also been designed to be retro fitted
at any time.
I am delighted with how well the boat has turned out. It is pretty,
very light, easy to assemble, stows beautifully and fairly unobtrusively
on the foredeck. The rowing position is excellent and very comfy.
It goes fine with up to a 3.3hp outboard and sails surprisingly
well with it’s modified Optimist rig.
 |
The Stasha under sail using it’s cut down
Optimist rig. |
To be honest, I have been surprised at how well this boat works.
I had no idea if it could take the stresses from a mast and keel
or an engine but it has passed all these tests with flying colours
and I’m still here to talk about it. Someone said it seems
to ‘Dance on the water’ and it really does. It also
slips along and carries it’s way amazingly well for such
a light dinghy. Any doubts I might have had about the step in
the hull are long forgotten, it seems to make no difference whatsoever.
This can be confirmed by watching the water through the translucent
hull as it passes the step. The boat hardly leaves a mark of it’s
passing as it cuts through the water.
So this proves that if you follow sound basic small boat principals
and keep faith with your original wants and don’t wants,
you end up with a splendid little boat that is easy and fun to
build in the smallest of places. It’s cheap to make and
surprisingly tough. It stows away in a minute almost anywhere,
including the back of an estate car. It rows well, sails well,
takes and engine, two people with shopping and it does all this
while weighing the same as a Wandering Albatross chick! (about
10 kilos! Very heavy for a baby bird perhaps but extremely light
for a 7 foot dinghy).
 |
The Stasha nested. It can be stowed upright
if needed. Note the kevlar twine reinforcements. |
To learn more and see some videos of the Stasha in action, please
visit https://woodenwidget.com/
Plans for Stasha are available now through Duckworks.
*****

|