|
In the fall of 2004 I was vacationing in the Visayas region of the Philippines
when I met my wife Myla. She planned on coming to the U.S. but
due to the sudden death of her only brother and visa problems,
I decided to retire early and move here.
|
Eventually we purchased a sea side lot and began
planning our future home. I have a private pilot’s certificate
and I’ve always wanted to build an airplane, but after
extensive research I realized it was just too expensive to
import the building materials. After recovering from my disappointment
I thought, since I am going to be living next to the sea why
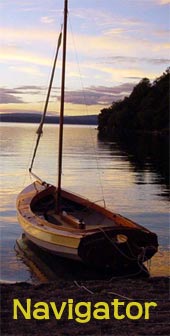
not build a sail boat. I did a web search and eventually decided
to build John Welsford's’s Navigator
because it looked like a very safe boat, one that a beginner
could handle and there was an ample amount of support available. |
A little over three years ago I received my plans from Duckworks
and after a minimum of 3000 hours labor the boat was launched
this past June.
 |
Due to the lack of any credible boat building
materials in the Philippines, it was a big challenge to construct,
but challenges lead to innovation and I was forced to innovate
in several areas; at some point during the experience I continued
to innovate after it was no longer necessary. The first obstacle
was plywood. All local hardware stores sell marine plywood
but it is actually a cheap grade of exterior plywood and it
is full of voids and delaminates as soon as it gets wet. |
After a few false starts I found marine plywood that was labeled
“BS1088”, but it was only available in 5 mm and the
plans called for 6 mm and 9 mm, it passed the boil test and was
perfect on both sides but it still had a few voids and lacked
the required number of plies. I decided to use it with caution
because I realized it was the best I would ever find. The plans
specified the bottom panel thickness to be 9 mm so I used epoxy
to glue two 5 mm panels together. Except for a few of the smaller
bulkheads the rest of the boat was built with a single layer of
the 5 mm plywood and almost all the planking was sandwiched between
two layers of fiberglass. I also used epoxy to seal the plywood
edges and most of the exposed plywood surfaces to avoid any potential
rot and delaminating problems.
I lacked many power tools and had no stationary ones so I relied
heavily on my router, most parts felt the bit of the router. Besides
rounding off the corners of stringers and other sharp edges, I
used it with appropriate home made jigs to cut perfectly circular
holes for the deck plates, wooden hatch covers and the mast openings.
I made a bulkhead for one side and then used it as a template
for cutting the other side with a trim bit. There is no such thing
as dimensional lumber in this area, trees are sawn down in the
mountains and cut into large planks using a chain saw leaving
a very rough surface.
 |
I needed the timber more refined so I took it
to a small mill where they used a home made band saw with
no guides to resaw it into thinner planks leaving a very uneven
surface with deep saw marks. This problem forced me to build
a jig to plane the hardwood using a one inch straight bit;
I also used the same method to taper the bow sprit and boomkin. |
One of the most enjoyable uses of the router was for the deck.
I haphazardly cut the deck plywood to shape and then glued and
screwed the pieces in place. After the epoxy was dry I used a
bottom mounted bearing trim bit and cut along the outside and
inside of the hull using the stringers as a guide, the boat was
then ready to fit the gunwales and coaming.
 |
 |
Since I know absolutely nothing about boat design, I built the
hull as close to the plan specifications as I reasonably could,
but when I finished the interior I decided it was safe to deviate.
I felt there was no way I could make the forward hatch water tight
as it was depicted in the plan, so I made two self sealing hatches.
I first made a mock up to test the feasibility of my locking mechanism
design and to be sure the hatch cover would be water tight. The
three bars on each cover are used for turning it into locking
position and the center knob is then screwed in to tighten the
cover fitted with a rubber gasket against the bulkhead. To remove
the cover the procedure is just reversed. The actual opening in
each hole is an unobstructed 8.5 inches which I have found to
be large enough to get my gear though.
 |
Several builders of Navigators have reported
a problem with water splashing into the boat though the opening
in the center case where the center board is hauled up. My
solution was to decrease the opening to a minimum by slightly
increasing the height of the center case and covering the
entire top with narra hardwood. |
 |
Narra is a very beautiful hardwood with a rich
golden red color; it is highly figured and is called the Philippine
national treasure. I was also concerned with the haul-up line
and block chaffing against the bottom of the center case opening
so I designed what my friends call a “shark’s
fin”. It has eliminated any chaffing while greatly increasing
center board haul-up lift leverage and in addition I now use
it to anchor the main sail down- haul. |
Construction of the center board presented two problems. First,
I couldn’t find any lead to make the center board heavy
enough to sink. Local fishermen don’t use it and if I tried
to get it from an arms store they might think I was a terrorist
since foreigners aren’t allowed to possess weapons. There
was plenty of steel re-enforcing rod (rebar) available for concrete
construction and it is also the universal choice when Filipinos
need to make anything from steel. I once bought a wheelbarrow
where the hub of the wheel was a short piece of water pipe and
the axle and spokes were made from rebar. I cut up 7 kg of 3/4
inch rebar in about one foot lengths and embedded them in epoxy
in the middle of the center board. It’s not only encased
in epoxy it is also covered with a few layers of plywood because
I made the centerboard out of built up panels of 5 mm plywood
and after I shaped it, I covered it with fiberglass so I thought
the rebar should be free from corroding. The second problem was
more serious. When I looked at the swing pivot detail for the
center board, I realized there was no way I could ever find the
specified S.S. tube, bolt and Neoprene “O-ring”. I
had a little luck because I did have a 5/8” brass rod. First,
I lined the hole though the center board and center case with
epoxy followed by separate 5/8” I.D. PVC tubes for each
hole.
 |
I cut the brass rod just a little short of the
center case width and drilled and tapped both ends for 1/4”
S.S. bolts fitted with thick rubber washers to seal the hole.
It worked so well I used a similar method for the rudder pivot.
I didn’t worry too much about galvanic corrosion because
everything corrodes in the tropics and it’s easy to
replace most metal parts on a sail boat. |
I wanted a leaner look for my boat so I extending the interior
forward of the main mast. By doing this the coamings radius of
curvature was dramatically decreased and I was able to use 15
mm solid hardwood instead of plywood for the coaming. Only three
pieces of hardwood were used for the coaming. To accomplish this,
I had to make a plywood pattern for each piece because the fit
was extremely precise. When I had the plywood pattern shaped to
my satisfaction, I used it as a template to finish cut the roughly
sawn coaming with a router fitted with a top mounted bearing trim
bit. I used a hardwood known locally as tanguile for the coaming,
much of the trim and all the spars. It was used to make aircraft
propellers during WW1, so I reasoned, “if it is strong enough
for propellers, it is strong enough for my spars”. It is
a species of mahogany that is very fibrous with only small tight
knots. Several sources on the inter-net report tanguile swells
and contracts more than other species of mahogany when exposed
to humidity. Before using it I let it dry for almost two years
and haven’t had any problems. To finish the interior I squared
off the seats and used 15 mm Narra for trim.
 |
 |
I tried to paint the boat with a brush but I was not skilled
enough to eliminate the unevenness and brush marks, so I resorted
to spraying. I purchased a cheap compressor and spray gun for
about $120, with a little practice my helper Dodung did a very
good job. Dodung worked with me for nine months and did most of
fiberglass work and sanding. He said I was very strict and I was
building furniture instead of a boat, ironically he now builds
furniture. In this area there is no such thing as marine paint
and I knew many boat builders used house paint, but I thought
why not try two part epoxy automobile primer and paint. I reasoned
since the entire hull was covered with either fiberglass or had
been painted with epoxy, there should be no problem with the epoxy
paint adhering to the surface and because cars are exposed the
sun the paint should also have a long life. It went on easily
with very little orange peel, no sagging and has held up well.
It’s been on the boat for a year and a half without any
problems. When people look at the boat they ask if it is made
of fiberglass.
 |
 |
All of my research for boat construction was done on the web
– I probably would have saved a lot of time if I had purchased
a book. During my research I was unable to find a technique to
turn the spars which I thought wasn’t beyond my skill level,
so I used my wood working experience to design my own method.
I didn’t have to invent anything new because wood workers
use a simple jig to turn table legs and dowels, I just enlarged
it. Please excuse the photo of the jig; since it was built I have
shortened it to eight feet and it shows a couple years of abuse.
My jig was constructed from ¾ plywood, was about 16 feet
long (long enough for the longest spar) and approximately 8 inches
wide and 8 inches deep. At one end there is a pointed bolt with
two nuts and washers, the other end is solid. There is another
piece of plywood fitted with an identical bolt inside the jig
that is moveable to properly position any length of spar. After
the moveable piece of plywood is in position it is clamped to
the sides of the jig. The bolt holes in the plywood are elongated
a couple of inches so the bolts can be adjusted vertically to
accommodate the thickness of the blank and also to make an adjustment
for the spars taper. What I ended up with was a hand powered lathe
where a router is used to remove stock instead of a chisel. The
most important consideration for this jig was the top of the open
box, it had to be perfectly flat and level; otherwise it would
be reflected in the straightness of the spars. I used a one inch
straight bit and left the router table base plate on the router.
It served to guide the router along the jig .To use the jig the
spar blank is positioned between the two pointed bolts. My preferred
method of operation was to remove stock by running the router
down the length of the jig, then turn the stock slightly and repeat
the procedure. I discovered the longer spars bent slightly due
to their own weight so I just shimmed up the center of the spar
with the necessary thicknesses of scrap wood and sheet metal.
The spars were turned exactly to the specified taper, but the
main advantages were quality and speed; the main mast only took
a few hours to turn and was perfectly round. To sand the spars
I left them in the jig and used a finish sander locked in the
on position and ran it up and down the spar while turning it slowly.
I got a little carried away when I built the rudder. I liked
John Welsford's artistic rudder design and wanted to do it justice,
so I tried to clean it up by hiding most of the hardware. I believe
the only novel piece I added was the locking pin for the tiller
onto the rudder. It is just a brass ring holding a heavy brass
pin inside of a hole drilled towards the aft end of the tiller
which drops down automatically after the tiller reaches the end
of the tiller slot in the rudder.
The weight of the pin is enough to hold the tiller in place.
To remove the tiller I just push up on the pin and slide the tiller
out. I could have drilled a hole though the rudder and tiller
using a wooden pin and lanyard to hold them in place but it was
fun to make and it works. I realize it’s kind of a silly
thing but I would have used it to lock the boomkin to the mounting
block if I had thought of it earlier.
Besides knowing nothing about boat construction, I knew even
less about rigging. Thanks to Duckworks much of that problem was
solved. I purchased my sails, line and all the hardware I didn’t
make from them. I also got some good useable advice from Chuck
and Sandra was extremely helpful in delivering the materials.
To ship by Fed Ex was too expensive and there was a high risk
of theft if we shipped by snail mail, so she sent everything to
my friend in San Francisco who was coming here for a visit. I
built all the wooden blocks, cleats, fairleads and much of the
hardware from stainless steel purchased locally. Making these
small parts was probably the most enjoyable part of the project.
I do things in an unorthodox manner and I continued that practice
to the end of the project. I stropped all the blocks with polyester
double braid by only using variations of an eye splice. I had
no usable three strand rope and no experience with splicing so
I was forced to do it my way – so far it seems to be working.
 |
 |
 |
While I was building the boat my engineer was
constructing our sea side house. The property has a six foot
high sea wall and putting in a boat ramp would have made the
sea wall ineffective so I built a man powered, wooden roller
equipped boat trailer from steel water pipe. To launch the
boat we get about six neighbors and they pull/push it about
fifty meters to a nearby launching point. I give them about
$4 for their labor so they can buy some tuba (coconut wine)
and Pepsi for mix. |
In the Philippines Coke is for drinking and Pepsi is only for
mixing with tuba. When I get back they help me retrieve the boat
if they are still in reasonable condition. I’ve had the
boat out about ten times without any serious problems, just tuning
the rigging. It’s a lonely boat; I believe it’s the
only sail boat on the island of Leyte so it gets a lot of attention.
|
I ‘m not a talented sign painter and have
not gotten around to searching for a person with that skill,
so the name of the boat hasn’t been painted on the transom.
I named it after our lovely and precocious daughter Miccha
Ella, it’s called the Mic-Mic. |
*****

|