|
To Part Two
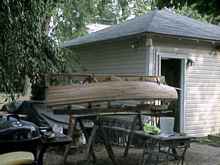
The journey that lead to launching my 16-year-old son’s
boat started before he was born, even before I was married. I
wanted a simple boat to sail, but I wanted a nice, salty looking
traditional boat, not a Sunfish-type “board.” I love
the look of a Beetle Cat, but didn’t have the money. While
browsing a library book (whose title I have long forgotten) of
small hulls, I came across a silhouette of Philip Bolger’s
Bobcat, AKA Tiny Cat, and H.H. Payson’s address.
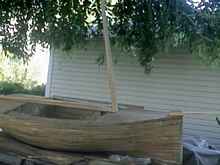
Over the next two summers I built my own catboat, the TOMBOY,
in the backyard maple grove in New Jersey. The boat moved to Connecticut
where I sail it when I can. My siblings have Sunfish-type boats
that are easier to drag on and off the beach. My TOMBOY weighs
about 250 pounds and needs a few volunteers to launch and retrieve,
which happens way too infrequently.
In time I was married, had a son and a daughter (whose boat
is a different story) and my son learned to sail. But he, too,
found the TOMBOY’s lack of readily available beach crew
a limiting factor. I started looking around for a smaller catboat and re-found Bolger’s
7-foot Queen Mab. Then I found an on-line link from Queen Mab
to Christer Bystrom’s “GRACE O’MALLEY”
and “STELLA.”
The story I heard is that Christer was discouraged from attempting
to build a Queen Mab as a first project, so he designed his own
tiny yacht from scratch. Eventually, I e-mailed him and told him
that I wanted to build a boat for my son and his designs looked
the right size and the right salty-ness. We corresponded a bit
and he said he had digitized some drawings. In fact, he had even
developed a slightly enlarged (not too much; just over 8 feet)
version of the STELLA for another gentleman in the US. Christer
e-mailed me the drawings of the stretched version. Did I forget to mention that Christer is in Sweden, where inches
are quaint, but real people measure in meters and draw their boat
plans in millimeters?
I dug out a metric tape measure, started marking the frames
and keel on some spare 3/8” plywood I had, and started cutting.
Notice I said “some spare plywood.” This is not
a pretty story. Women, children and weak-stomached men should
stop reading now.
Almost exclusively I used materials I had on hand, partly because
I have Scottish ancestry, and partly because I wanted to demonstrate
that a boat can be built from what you already have. Not having
access to the finest Tibetan mahogany, Brazilian spruce or Sitka
teak is not an excuse for not building a boat! Measure out the
drawings, cut the wood, and start putting it together! Do it now!
For a strongback, I used a 10-foot long 4x4 fencepost that was
removed when we switched from septic to sewer. That’s another
story, too. The post was balanced on sawhorses with scarfed, …
no … cobbled legs. I told you this is not a pretty story.
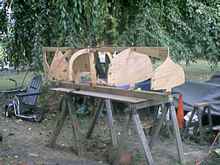 |
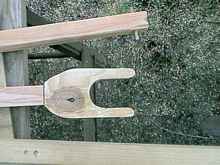
The frames clamped to the cleats screwed to
the strongback. |
I screwed bits of wood to the strongback where the frames would
fall. I clamped the frames, upside-down, to these cleats while
I lined things up. Temporarily, I also tacked a six-inch wide
strip of plywood across the top (the keel/backbone) of the frames
to keep things even more in line. You can call it a wide batten
if that makes you feel more nautical, I just wanted a little insurance
for those flimsy cleats on the fencepost.
One bit of customization here. Christer’s boat is designed
as a sloop. My son and I like catboats. Christer told me his boat
sails poorly without a jib, so I added a second mast position
farther forward for potentially rigging the boat as a catboat.
That would bring the single sail’s center of effort forward
in relationship to the centerboard’s center of resistance.
Hopefully, it’d be about where the center of effort of the
sloop’s combined main and jib is. Sounds like I know what
I’m talking about, doesn’t it?
I found a 1x12 plank in the garage about 10 feet long that I
sliced into thin strips. I set the fence on my hand-held powersaw
to ¼ “ and sliced off the long edge of the plank,
like slicing a deli salami lengthwise. I tacked a piece of scrap
wood to the top of my second set of sawhorses so that I could
rest the plank securely, not hanging over the edge, and not worry
about damaging the sawhorses.
These thin strips were the planking that got tacked to the frames.
I needed a second 1X12 plank to get enough thin strips. That was
the only wood I had to purchase for the boat!
My catboat hull is plywood panels. I had never done this strip
planking before, so I experimented with various means of attachment.
I tried drilling holes through the frames and the planks, wiring
them on in the best stitch-n-glue fashion. WAY too much work!
Only three strips are attached that way.
Nailing/tacking them in place wasn’t good for me. There
was too much flex and bounce. I heard of people using hot glue,
which wasn’t too bad, but I found the glue sometimes un-stuck
and I had to go back with a heat gun to reattach them. I eventually
settled on hot glue and brads, which seemed to work OK for me.
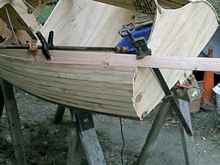 |
All boatbuilders become experts with clamps
of all kinds & sizes. |
By the way, an eight-foot boat uses pieces of wood about nine-feet
long to reach from stem to stern, curving around the gunwales,
but you probably already knew that.
Also, the planks are (should be) narrower at the ends than in
the middle. I didn’t think about this beforehand, but I’m
sure the NEXT boat will benefit from my increased wisdom. There
are simple ways to find out what the taper should be. Measure
along the outer edge (the part towards the exterior of the hull)
of each frame, from keel to sheer. Write these measurements down.
Call the longest one 100% and define the other lengths as smaller
percents. That is, the prow might be 60%, the next frame 75%,
etc. Don’t you wish you’d paid more attention in Fourth
Grade when you covered percents and fractions? NOW translate those
percents to actual inches. That is, if the planks are 1”
wide, the 100% station stays 1”, the 75% station is ¾”,
the 60% is about 5/8”, etc. Now don’t you wish the
US was metric?
 |
Good view of the hull taking shape and beginning
to look like a boat. |
Remember I said I didn’t think about this tapering? As
I got closer to the keel, the strips made contact at stem and
stern, but the middle still had a ways to go. I was splicing in
shorter strips, which weren’t laying fair, etc., etc., etc.
I also had problems with twisting the planks, especially near
the very beautiful wine-glassy stern. Steam bending them was out
of the question. I tried cold twisting, which was so-so. It worked
a little better if I could wet the planks. I also tried using
a heat gun, a really hot one built for paint stripping. That worked
better, especially if I could wet the wood first.
I warned you this wasn’t a pretty story. The hull did
not look as smooth as one would have hoped. I figured I would
cover the whole thing with fiberglass and resin anyway, and could
fill out any hollow spots then. Not the craftsman way of doing
things, but I have a lot more experience with ‘making do’
than with fine woodworking and completing the hull before winter
came on was a major priority because I was working outside!
|
Bow shot showing the planking. |
Eventually, I finished the hull, or at least reached a point
that it looked like a boat. I covered the outside of the hull
with fiberglass cloth and soaked on the resin. After it set, I
turned the hull over gingerly and applied the cloth, in pieces,
to the inside, again slobbering on the resin.
 |
Boat after fiberglassing, before coaming and
painting. |
I applied extra strips of wood along the sheer so that I had
a ¾ inch wide gunwale. I would rest the deck on this.
When the weather turned cold, I went indoors to build the mast
and the spars. The bowsprit was easy because it could be cut and
shaped from one piece of wood. The boom and gaff are basically
simple long pieces of the correct cross section, which is 25mm
by 30mm. There’s an internet website (www.metric-conversions.org)
with a millimeter to inches conversion utility that I used a lot.
The aft ends have a “V” notched into them and a dowel
driven through so as to project from the sides about an inch.
This arrangement makes a convenient spot to lash the outhaul. The boom is 1800mm and the gaff is 1650mm. I was working from
prototype plans with some parts missing, so I didn’t know
if those measurements included the gaff jaws. I just used my best
judgment, which I suspect most readers are now holding in ill
repute. I followed the general instructions I had from decades
ago about attaching the jaws. They are plywood, about ½
the thickness of the spar, sitting on a deep ledge cut onto the
ends of the boom and gaff, attached with resin and boat nails.
I see from Christer’s
on-line pictures that his jaws are nicely made and
finished and attached atop the spars. Unfortunately, I didn’t
look at those pictures closely until later, or I would have used
them as a pattern.
The mast is 2600mm long; the first 900mm are 45 x 50 mm, from
there to the top it is 40mm in diameter. Except for the long ¼”
square shims I needed to built the lower section out to a full
2”, I made the whole thing from one plank; the excess of
the plank I purchased for the hull. My lower section is 2”
x 1 ¾ “; I rounded the upper part with a power plane
and lots of sanding.
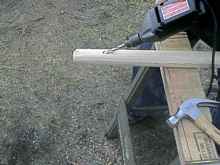 |
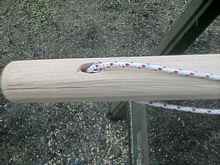
Sheave drilled |
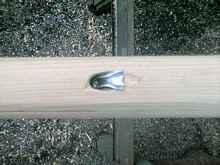 |
Sheave installed Close ups of spar ends and
making the dumb sheave. |
As built by Christer, pulleys were mounted to the side of the
mast trunk. I have no idea why the top of a mast should be called
a trunk. I decided to go with dumb sheaves as I did on my catboat.
That’s a curved slot drilled through the mast with a metal
lining on the bottom (bearing) surface so the rope/line/whatever
will slide through easily. Works as smoothly as any pulley or
sheave, but never rattles or squeaks. Hence, “dumb sheaves.”I drilled two of them, fore-and-aft, near the top of the mast;
one for the halyard, and one for the topping lift. There is one
cross-wise hole, without the sheave lining, for the lazyjack.
That’s a line looping under the boom, ½ or 2/3 of
the way out, to keep the sail from going overboard when you lower
it. In my “big” boat I have a line that lifts the
aft end of the boom, which has a name that escapes me at the moment,
but in this little boat, this lazyjack can also serve that purpose.
You all know that the halyard yanks up the front of the gaff,
which, in turn, raises the sail, and that the topping lift raises
the rear of the gaff until it makes sporty angle and smoothes
out the sail, so I won’t bother explaining that.
The gaff is raised with both lines, parallel to the boom, until
the sail lifts the boom to the height you want, then raise the
gaff the rest of the way. That was the best info I was given when
I was new to gaff rigs. I put a screw eye at the top front of the mast for the jib halyard
to run through. A screw eye at the front of the bowsprit will
hold the foot of the jib.
 |
Spar ends |
 |
Sheave roped |
I think 3/8” line will do fine, but at present the only
3/8” braided stuff the hardware store has is laced with
pink. My son doesn’t think that’s funny.
Nice weather returned before I could do the rudder and centerboard,
so I returned to the hull.
I was delighted, sort of, to find the spring rains were pooling
some three inches deep inside the boat. At least I knew I had
a watertight hull. I didn’t like the creaks and cracks when
I rolled the boat to drain the water because either the resin
was cracking or my joints are going.
I nailed some cleats along the bottoms of three frames to use
as rests for the floorboards.
 |
Floorboards after first coat of paint &
sanded. |
 |
Picture of the floorboards with fresh paint
and the Swedish nomeclature drilled in. |
I then cut floorboards to fit from ½” plywood.
I cut fingerholes in them to make them easier to handle. Christer
tells me the Swedish words for Port and Starboard are “Babord”
and “Styrbord.” I got exotic and drilled those words
into the floorboards. I sealed them with resin, and turned them
over to my son to paint.
The design did not call for flotation, but I’ve got it in
the catboat, and I’m more than a little worried that the
centerboard weight of this boat would carry the hull to the bottom
if it swamped. I’m probably exaggerating the weight, but
I worry. Always did, probably always will. My son does, too. Wonder
where he gets it from?
The forward-most bulkhead is a solid frame because I overlooked
that Christer’s plan called for cutting out the center,
like the other frames. I decided to fill this area with flotation,
and also to cover the bilge of the aft-most section with flotation.
That aft section under the deck is sealed off, except for an 8”
access port to allow it to be used for more-or-less dry storage.
Never being satisfied with doing things the conventional way,
I decided to use expanding foam, but also to embed ping-pong balls
in the foam. The balls are sealed and will never absorb water
like foam can (over decades! I told you I worried.), and the foam
will hold the balls together so in case of a collision at sea
the sinking wreckage will not be surrounded by an embarrassing
slick of ping-pong balls.
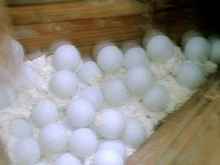 |
Odd flotation scheme documented. |
After I put in the flotation, I floored over the bilge of the
lazarette, and fiberglassed it to the sides of the hull. I wanted
a continuous surface so things put into storage could not gravitate
to inacessible areas.
I’m sort of glad the flotation chambers are sealed from
view. It’s not an invention I think I’ll patent. Besides
sounding silly, it’s not terribly cheap.
Even though I got two gross (that’s 288 if you’re
in metric mode) of balls at wholesale, I think the foam would
have been the same or cheaper on a dollar-per-space basis.

|