|
My search for a safe jig
I recently read the article by David Kagan at Duckworks about his scarf jig for a Miter Saw. In his article he said he was going to use the table saw but after doing research on the Internet and reading about people getting hurt he changed his mind. I couldn’t help but wonder if he had read some of my writings about what happened to me?
I design and build fuselage frame kayaks and use Western red cedar for the stingers. Where I live the only cedar I can find is usually full of knots. Clear boards are just about unheard of. A knot in the center of a thin stringer is just a break waiting to happen. Unless I wanted to scrap half of the wood I buy I am forced to do a lot of scarf joints.
In order to make use of the wood that was available I needed to be able to cut the knots out and scarf the it to length. This meant I needed to cut these boards in the center as well as on the ends.
Like many others when it came time to do a lot of scarf joints, I searched the Internet for ideas. I saw jigs for the miter saw and was thought about adapting the idea for use on my old DeWalt radial arm saw (RAS). It wouldn't be hard to do.
Then I realized since my saw sat against the way I could only cut the ends of the board. My first thought was to cross cut the boards at 90 degrees and then cut the scarf. But that meant I had to make three cuts for every scarf. It wasted wood and I had to set up and tear the jig on the RAS every time I need to make a scarf.
A sled for the table saw made more sense. No set ups, just pick up the sled and put it on saw. Two cuts to remove the knots and I am done.
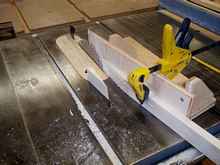
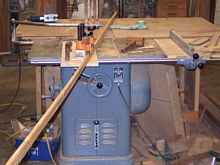
I quickly cobbled together this jig. There is a runner under the base that rode in the miter slot on the saw to keep it inline. I used a quick grip clamp to hold the part in place.
I used it to build my first boat but I soon discovered it was flawed and perhaps even dangerous. I couldn't get the clamp close to the cut and therefore the strip would vibrate when I started my cut. I tried some other clamps I had in the shop but it just was not a good setup. I needed something better.
Searching the Internet I keep reading about sleds and in a couple of forums I was told I should be using a sled and how I was making a big mistake letting the cutoff fall on the table.
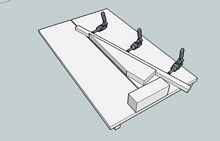
I love internet forums and I get a lot good advice there but this was not one of those times. I was sucked into this flawed thinking and I built a sled similar to this drawing.
This style of jig has a serious problem that I learned about the hard way. If you are cutting off just the end of the stringer as shown in the photo you have a very small cutoff that ends up lying on the sled. It can vibrate across the sled and in line with the spinning blade. If you pull the sled back the cutoff will hit the saw blade and most likely be launched at you at around 100 mph. Also with this type of sled most people tend to stand in line with the blade which puts you in the line of fire should there be kickback.
Anytime you use a sled like this you should shut off the saw and let the blade stop before you pull the sled back but sometimes you just forget or don't think. Even if you don't slide the sled back a cutoff it can still vibrate across the sled into the exposed blade. That is what happened to me.
I hade made a cut and the cutoff was well clear of the blade. I reached across the front of the saw and I felt something, it was as if something had bumped against my hand. When I looked down I was stunned to say the least. I looked at my thumb and didn't comprehend what I saw. I remember standing there stunned and trying to make sense of it all. Lets just say my thumb was badly mangled and I remember thinking this is going to hurt BAD any second now!
When I got back from the ER I checked and as I suspected the cutoff was not on the sled and I never did find it (or the missing part of my thumb).
I didn't see it but I had a really good idea of what had happened. The cutoff must have vibrated into the back of the spinning blade and was picked up and thrown at me. I moved my hand in front of the blade at the wrong time. A second slower and it would have missed me.
Most people would have never cut another scarf on the table saw after that. Frankly, I didn't want to but I there wasn't another other option. I looked at different methods, tried a few in the shop but was not happy with any of them.
Since my RAS is stationary against the wall. I couldn't cut in the center of a 12' stringer. I looked at using the miter saw but I didn't have the clearance I needed to cut in the center of the board.
The bandsaw appeared to be my best choice so I tried it. Problem was the blade would always 'walk' when it came in contact with the wood because of the steep angle. I would end up with the start of the cut being crooked and the faces would not mate properly. After several attempts I finally had to give in and admit I couldn't make it work.
I came to the conclusion that I really needed to come up with a safe method on the table saw.
I spent some time standing in front of the table saw with some scrap wood visualizing what happened. I was looking for ways to improve on my jig and the first and biggest improvement I made was flipping the jig so that it made me stand on the left side of the blade. With the old jig I was often standing in line of the blade. But when I flipped it, it forced me to stand well to the left of the blade out of the 'line of fire'.
I had a Tote and Knob I had started making for a hand plane that ended up not using. These were perfect for the jig. They gave me a good place to hold on to and as well as good control. Plus it removed any temptation to put my hands somewhere else on the sled that could lead to another accident.
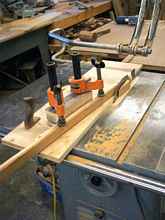
I built my first version out of scraps lying around the shop. I found some old pipe clamps to hold the part in place. Attached a runner to the bottom of the plywood to ride the miter slot. I ran it through the saw to trim the plywood base flush with the blade. This would make it harder for the cutoff to get behind the blade. One thing I do need to point out is that you must use a zero clearance insert around your blade. Otherwise the cutoff can still be caught by the blade and launched or it will wedge between the blade and then throat plate stall the motor or breaking something.
I was still very nervous using it but this jig worked pretty well. Cutoffs fell on the table with nothing to drag them into the blade. The base being right up against the saw blade made it hard for one to get launched and I was standing well to the side if it did.
However the clamps were not a good choice. They always required a little fiddling with to make sure the part was against the stop and straight up and down. Plus they could be placed in the path of the blade very easy so you had to pay attention.
Even with its drawbacks the jig did work and it was great for sawing knots out of the center of long board. The basic idea was sound but it needed a better clamping system. This was to slow and cumbersome.
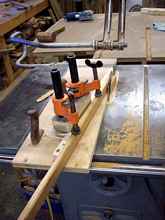
After thinking on it a while I came up with Version 3. I moved the stringer to the left side of the fence. I glued and screwed the fence to the base so that I could push against it without it deforming. I added a couple of push clamps to hold the stringer in place. The rubber tips on the ends grip the wood very well and do not leave marks like the pipe clamps did. You can insert and remove the wood strips really quickly and not have to worry about them moving when clamped.
The changes proved to be a huge improvement over the other versions of this jig. The only thing I don't like is the stock sticks out past the fence unsupported. You have to start the cut slowly but once cut is started you can cut normally. This is really more of an annoyance than a problem. Other than that minor issue I am extremely happy with this version and feel it is much safer than any of the other I have built.
Of course as with any power tool there are still risks, but I really think this minimizes the risk and for me it helps me us a lot wood that otherwise would have been scrap.
|