To recap, this is the video I did on Tying the Death Grip Hitch.
This is the story I wrote on Tying the Death Grip Loop.
The Death Grip Belt Hitch
This variation of the Death Grip Hitch (aka DGH) was the result of having too much spare time on my hands ( I know I'm behind on my www.youtube.com/redbarnboats videos) and sitting around looking at the Death Grip Hitch and it's offshoot, the Death Grip Loop. I wondered what else could be done with the basic knot, so I tried tying it back on itself in the middle of the long line I was playing with. After a couple of misses, I got the hit I was looking for, and I had the basic Death Grip Hitch in the middle of a large diameter circle.
So I wondered what this version of the Death Grip Hitch could be used for, and I thought of my best friends above ground swimming pool. It had a web belt in the middle that was breaking down, and needed some support to keep the pool from becoming an incident from AFV. So we threaded some 1/2" Polly line around the vertical straps used to hold the web belt in place. Added a Death Grip Belt Hitch, and the problem was solved. You could also use the Belt Hitch with small line to make a series of small belts to hold wood strips together while you glued up a mast, or anything that needed support to hold things together. Knowing the Belt Hitch might help out in the wilds if you or someone needs to have a splint made to keep an arm or leg in place until you can get to a doctor. You could even use it to hold up your pants if you forgot and left it behind somewhere. ;)
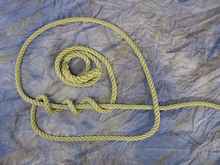
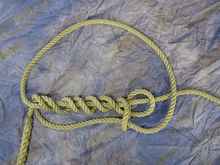
So lets get into how to make the Death Grip Belt Hitch. Like the Death Grip Hitch and the DG Loop, it doesn't mater if you are left or right handed, it ties the same way. Give yourself a good length of rope for the knot part the first time you do it; three feet if using 1/2" line, and enough to make the belt part too. Make a big circle in the line on either your left or right, and make three or four coils over the standing part of the line like a normal Death Grip Hitch.
On the next coil, the working part goes around the "hitch part" of the loop and the standing part too. It then goes down between the two parts, under the bottom of the last coil, and up between them like in the DGH; which is the real secret to the hitch.
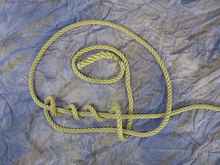
It then starts the normal DGH reverse coiling back to the starting point. The working end goes under the "first coil" you started with. To make a clean finish of the tail end, go around the working part two more times.
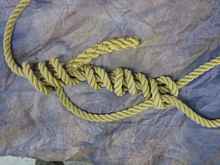
Then the line goes under these last two coils, and the "first coil" you made. The tension on the first coil will choke off the tail, and make a clean and secure finish to the knot. If you are using big or stiff line, you will probably have to "twist the looseness" out of all the coils in the knot. There you have it, now see if you can get it to slip.
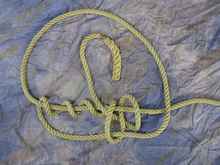
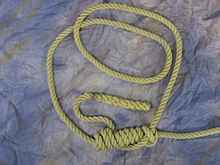
DOne thing nice about the Death Grip Belt Hitch, is that once the tension is off, you can make the belt bigger or smaller, and once the tension is back on, it will not move. If you've had the belt under "a lot" of tension, you may need to put a marlin spike/fid/screwdriver under the part of the loop that crosses over the coils. Once you do this, the knot can be moved or removed. Here is the finished knot with the "extra line" coiled up.
I had been calling it the Barrel Hitch, but Belt seems a better match. The Belt (with small line) can be used at intervals to hold sections of a mast together while the epoxy cures, or for other uses where you need to use a line to act as a belt to hold stuff together. Thanks again for reading my stories.
Warren Messer
Red Barn Boats
Stitch and Glue and Stylish Too