And Use It to Secure a Mast when Trailering a Hobie Bravo
Here is a way to tie a ratcheting trucker's hitch. I’ve only done limited research, but as far as I can tell, a truly ratcheting version of the trucker’s hitch has not been known. By ratcheting, I mean that you can pull the line in one direction to tighten up the knot over the cargo, and then when you release the tension on the pulling side, the tension stays put. The big advantage is that you can secure the line tighter over your cargo. The ratcheting part of the knot also has a quick release capability.
Below, I’ll show how to tie this version of the trucker’s hitch in the context of securing a mast on a trailered Hobie Bravo. NOTE: Although I used this ratcheting hitch to secure my mast to the hull, I still use 4 ratchet straps through scupper holes to hold the boat on the trailer securely. Why? Ratchet straps are so much stronger than all but the thickest line.
For securing the mast, I’ve road tested this new ratcheting version three times to secure a mast on a Hobie Bravo while trailering to a lake about 20 miles from my home (40 miles round trip, or a total of 120 miles on the road for all three trips). The journey is mostly two lane and interstate. No rough roads. In all three outings, the hitch held snug to the destination and back home again.
I use two lines (fore and aft), and hence two independent ratcheting truckers hitches to hold my mast securely on the boat. It might take a little time to set up the two lines the first time. But after that I leave the lines in place on the trailer, releasing only the ratcheting side to put the boat in the water. This means, after the lines are set up the first time, thereafter using this hitch to secure the mast on the trailer is fast. And I don’t have any ratchet buckles or other hardware to mar my hull. The system also is gentle to my mast and sail.
The conventional trucker’s hitch is a great knot to know and has a long, proven history. The knot is not a single knot but rather is a combination of several knots integrated into a single line. The composite is useful for securing cargo on trailers. The conventional trucker’s hitch is a composite of three knots. First, you need a good hitch to anchor the line to one side of your trailer. You lead the line over your cargo to the other side of the trailer. On the other side, you use a second knot to create a loop that will act like a pulley for mechanical advantage to snug things up. Then, you take that working end and feed it from the loop down to the trailer, back up to the loop, through the loop so the loop acts like a pulley, then back down to the trailer where the line is secured with another suitable hitch. Add more loops and you get more pulleys. The trucker’s hitch has good pulley action, but no true ratcheting action.
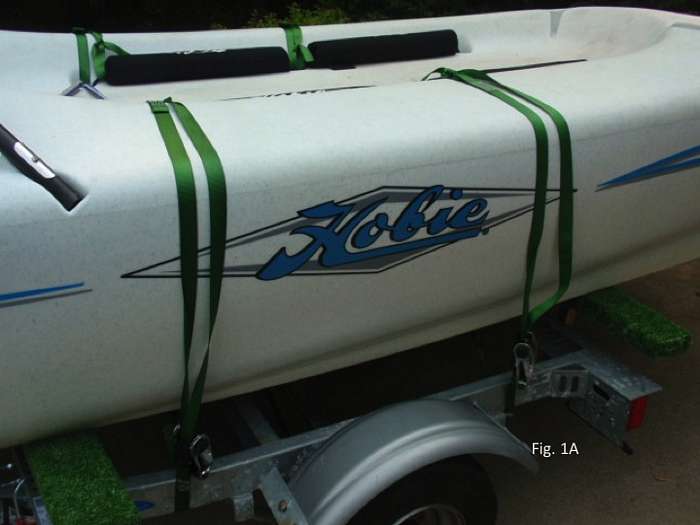
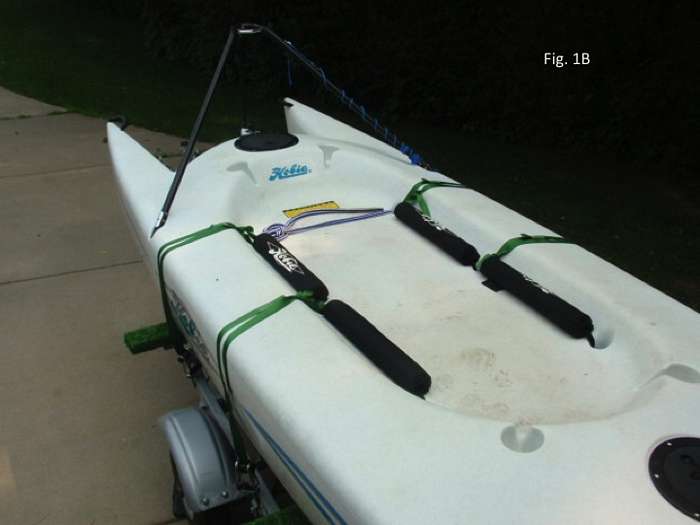
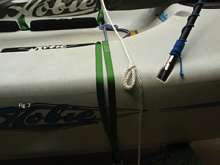
This new knot modifies the regular truckers hitch in a few ways to get both pulley and ratchet action. In Figs. 1A, 1B, and 1C, the Hobie Bravo is on its trailer, ready for the sail bag including mast and sail to be secured to the hull. Four green ratchet straps are used to hold the Hobie Bravo on its trailer. Each strap is looped around a hull through a scupper hole in the cockpit.
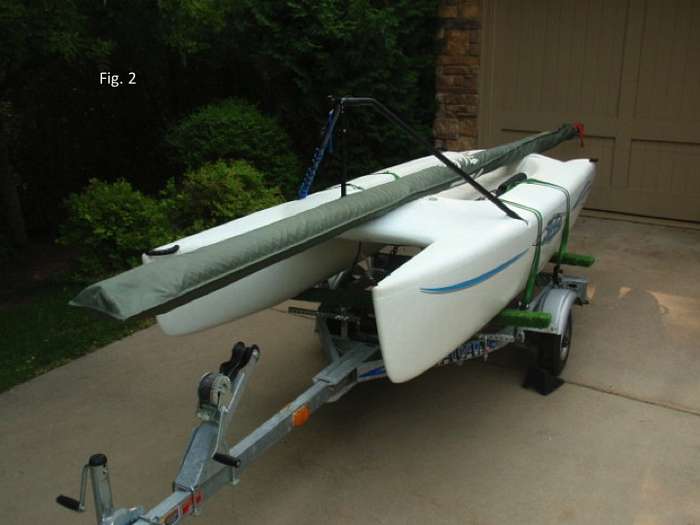
In Fig. 2, the sailbag including mast and rolled up sail is placed on the hull. In this picture, the mast is just sitting on the hull and has not been secured yet. Using the ratcheting truckers hitch, a pair of fore and aft lines will be used to secure the mast on the hull.
For initial set up, the line and tools shown in Fig. 3 are used. The line is 3/8 polyester with 280 lbs break strength. With knots, the line break strength likely is half that. I am not sure if this polyester line will be ultraviolet stable in the sun yet. So far so good. Also shown is duct tape and shears. The duct tape is wrapped around the line where the line will be cut to length. This is a fast and long lasting way to keep the line from unraveling after it is cut.
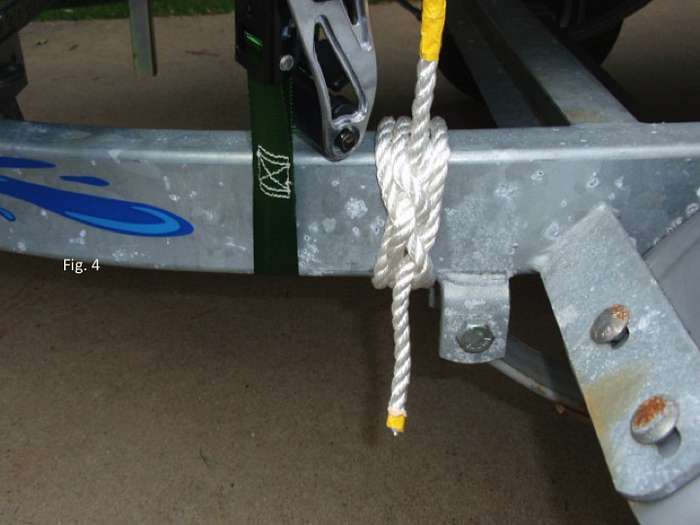
First step as shown in Fig. 4 is to “anchor” the line to the port side of the trailer. A boom hitch is used to “anchor” the first line to the port side of the trailer. The boom hitch is the Cadillac of hitches and is very secure. Although the boom hitch is more complex to tie than many other hitches, I only have to tie this hitch once, because I will leave this boom hitch in place when the boat is off the trailer.
It’s worth the effort. See how to make the boom hitch. The line heading up from the boom hitch is the working end. The line hanging down is the port side tail. The yellow tape on the bottom of the tail protects the short tail from unraveling, which is now trimmed to 3 inches long. The yellow tape just above the boom hitch is on for reference. If I ever take the hitch off the trailer, the yellow reference tape shows me where to position the line so this end is long enough to make the same hitch again. IMPORTANT: The tail should not be more than 4 inches long and must not be able to reach moving parts of the trailer. If longer, the tail needs to be cut shorter or securely tied off somewhere not near any moving parts.
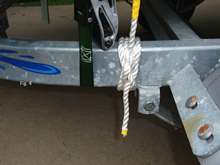 |
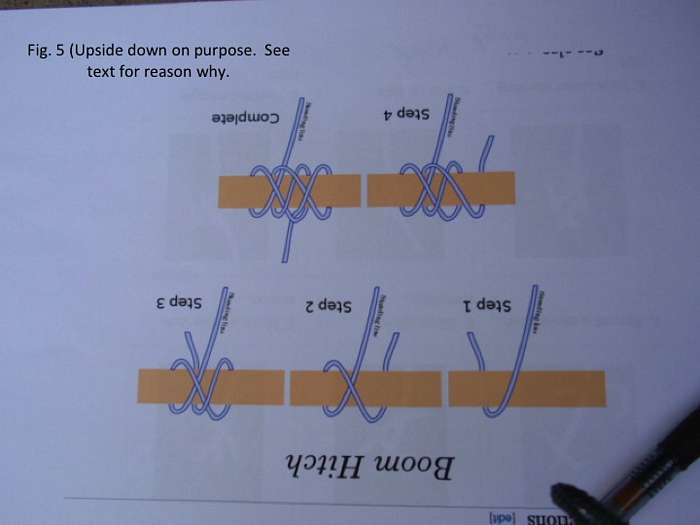
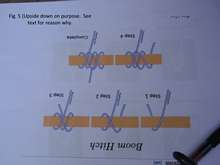
Fig. 5. I used the step by step instruction sheet in Fig. 5 to help me tie the boom hitch. Fig. 5 is upside down, but that’s how I want it. I flipped the instruction sheet upside down so that the hitch shown in the guide is in the same orientation as the way the line runs on my boat.
 |
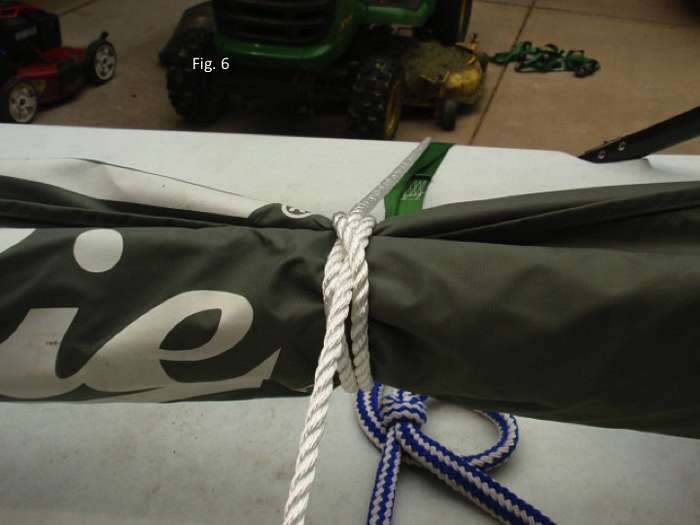
After forming the boom hitch, I now feed the line from the port side of the trailer over the top of the cargo over to the starboard side so I can secure the sail bag. As shown in Fig. 6, on the way from the port side of the trailer over to the starboard side, a clove hitch is formed around the sail bag. This is an important part of the system to hold the sailbag where I want it. The clove hitch around the sail bag is snugly tightened at this stage, but otherwise the line portions leading to the clove hitch and away from the clove hitch are not tension yet. I position the clove hitch so the sailbag is about 16 inches over from the port gunwale. This is off-center. I can’t center the mast on this boat due to mast support hardware in the center. Everything will snug up further when the whole system is tensioned. To tie a clove hitch.
The clove hitch is unsuitable on its own in many applications, but really is quite suitable here for helping to secure the sail bag as the line traverses from port to starboard. Later, when removing the sailbag, the clove hitch releases easily by pulling the line heading into the clove hitch up to the sky once the tension on the line leading away from the clove hitch is eased.
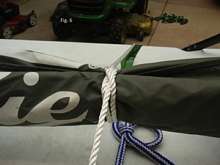 |
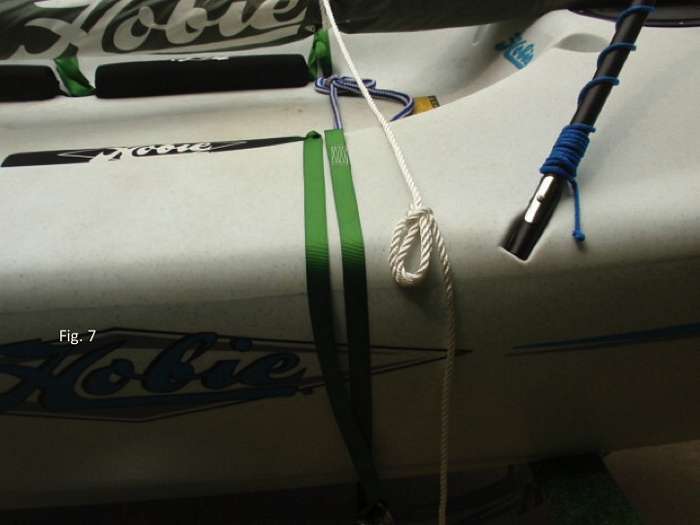
Fig. 7 shows the double-loop bowline knot I form as the next part of the system. The two loops need to be as close in size as I can get them, as these are part of the ratcheting system. Note that after being formed, the bowline is positioned at the gunwale. This is where I want it. Form it too low down the hull side and I might not be able to draw the line tight enough. Too high, e.g., up on top of the hull, and it’s a little harder to draw the line tight like a drum. This knot only needs to be tied once during set up. When taking the mast off the trailer, I leave this knot in place so tying down the mast next time takes very little time.
 |
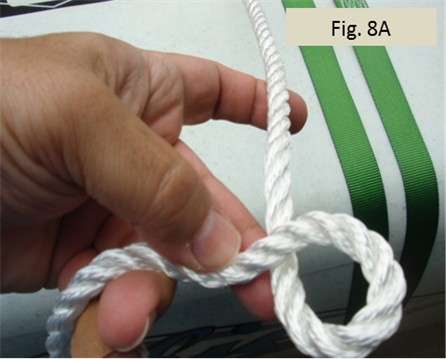
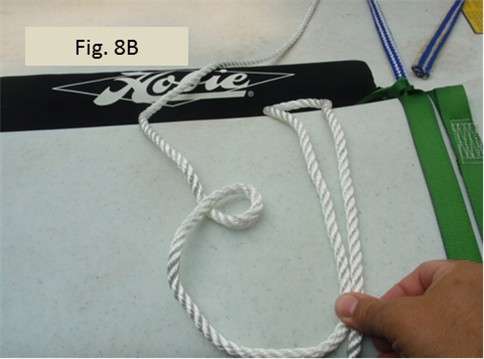
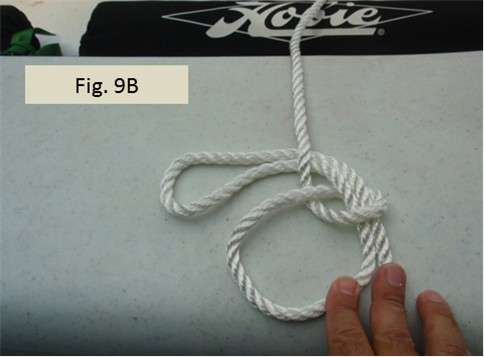
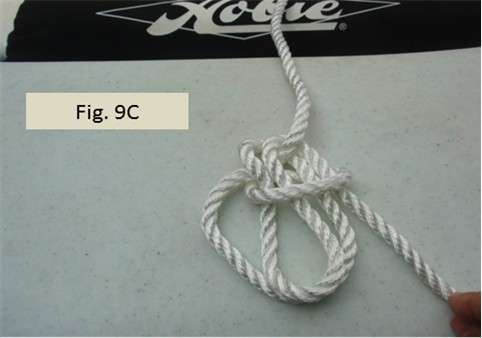
Figs. 8A, 8B, 9A, 9B, and 9C show how to make the bowline with two loops. Start by forming a little loop. In knot books, this little loop is sometimes called the rabbit hole. In 8A, the line running across my index finger is the line coming from the port side. The line going across my ring finger and bandaged pinkie is the pulling end that I will later pull to tighten things up and then tie off. Note the pulling end is on top of the little loop I am forming. As shown in 8B, I will also form a bight (open loop). In Figs. 9A, 9B, and 9C, I lead the bight loop up through the small loop (rabbit hole), then around the back of the line coming from the port side and back toward me, and then back down the little loop (rabbit hole). The two bowline loops I end up forming don’t need to be big, but they should be close in size. I make sure the bowline is good and tight. I should be able to pull on the loops, the line coming from the port side, and the pulling end (which is the free end) without the loops changing sizes.
This site teaches another way to tie this knot, but it’s a little easier to make a mistake using that technique to inadvertently end up tying an undesired slip knot instead of a bowline.
In the conventional trucker’s hitch, the pulling end (hanging down in Fig. 7 above) is fed around the trailer and back up through the loop, and then pulled back down and snugly tied off on the trailer. The loop in that case acts like a pulley. If more loops are used, these are used as additional pulleys to create more mechanical advantage. Here, I will feed the working line in a similar way, but I will use the two loops to create a not only pulleys but also a ratchet effect to help pull everything tight as a drum.
The strategy now is to use the two rope loops of the bowline to form a modified garda hitch (also known as the alpine clutch) in order to create a rope ratchet. This hitch is normally formed using two carabiners, not two rope loops. But we still get ratcheting action with the two rope loops. A big difference between using two rope loops to form the rope version of the garda hitch is that, no matter how tight you tension the knot, the “rope style” garda hitch can be easily released by pulling on one of the bowline loops and/or pushing the knot back up into the bowline loops. I prevent the quick release by snugly tying off the line on the trailer after ratcheting the line tight over the sailbag. Because the ratchet knot used here can be released quickly, don’t use this rope version as a substitute for the carabiner version if you were to ever want to use the garda hitch elsewhere. Even the carabiner version is criticized for its quick release characteristics for mountain climbing activities, the arena in which the garda hitch was created. Here we can prevent quick release by tying off the line to the trailer. Climbers on a mountain face can’t do that, so the garda hitch is not widely used for mountain climbing.
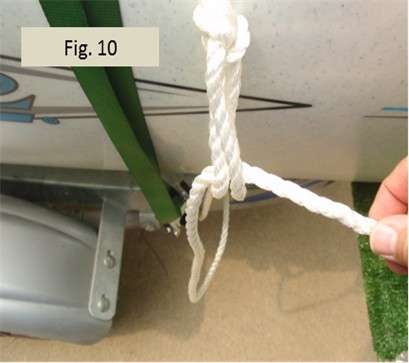
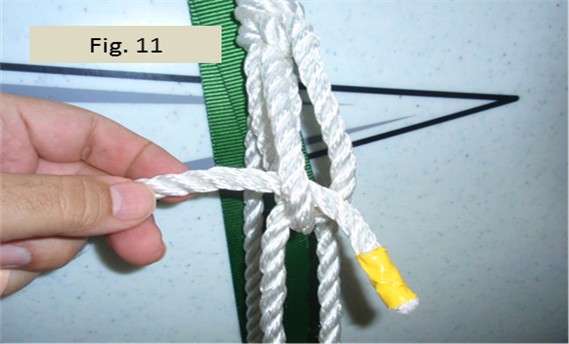
Fig. 10 shows the first stage of forming the modified garda hitch. The working end is led from the bowline knot down around the trailer and then back up to the bowline knot to be fed through both rope loops. Our plan to complete the garda htich is as follows. Before leading the working end back down to the trailer a second time to be tied off as occurs in a conventional truckers hitch, we’ll first feed and wrap the line through the bowline one more time. But instead of feeding through both loops as shown in Fig. 10, the second time we’ll bring the working end down between the two bowline loops as shown in Fig. 11.
 |
 |
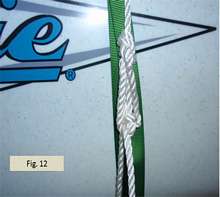
That’s all there is to creating the ratchet effect. Now the line I just fed between the two bowline loops (the pulling line) can be pulled to tighten the line over the cargo. The way the pulling line is fed around the trailer and through the loops gives me both pulley and ratchet action. I can let go, re-grip, and pull tighter as many times as I want. When I let go, the tension stays in the cargo line. I can even let go and go have coffee and come back later. The tension will be there when I get back. This is a big advantage over the regular trucker’s hitch, where tension is released if you let the pulling line slacken even a little.
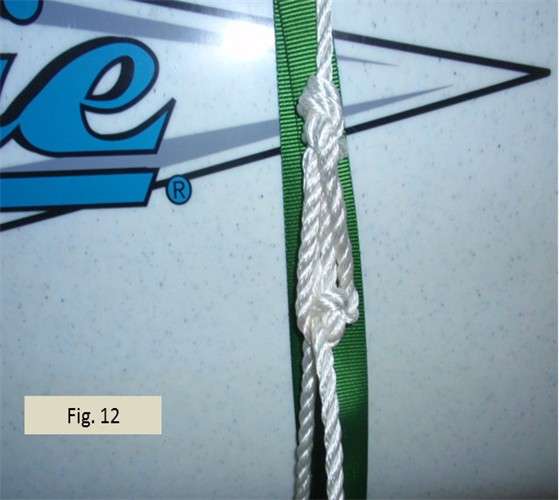
In Fig. 12 I’ve pulled the line over the cargo very tight using the ratchet and pulley action. I’m not holding the pulling line, but the ratchet effect holds everything over the cargo in tension. The tail of the pulling line coming out of the ratchet knot is still slack, though, because I have not yet tied it off. I now need to tie off the end of the pulling line tautly to the trailer so that the ratchet knot cannot release and the tension is secured. Note that the part of the line holding the cargo is already fully tensioned. We’re not making that part of the line tighter at this stage. We’re just securing and tightening the tail end of the pulling line so the ratchet can’t come undone and release the cargo tension.
 |
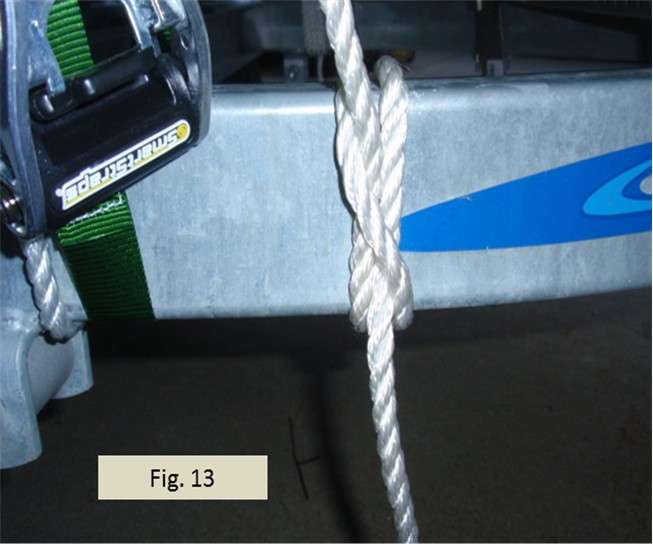
As shown in Fig. 13, I secure the end of the pulling line to the trailer using a clove hitch. The clove hitch can be pulled reasonably tight, but I can make it tighter using a trick from skin on frame boatbuilding where a lashing can be used to pull itself tighter such as in X or Y lashings. I call what I’ll make a “collar lashing.” Also, I will not only collar this clover hitch, I also will make it more secure. On a big rectangular trailer beam, the clove hitch on its own is not secure enough.
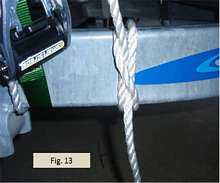 |
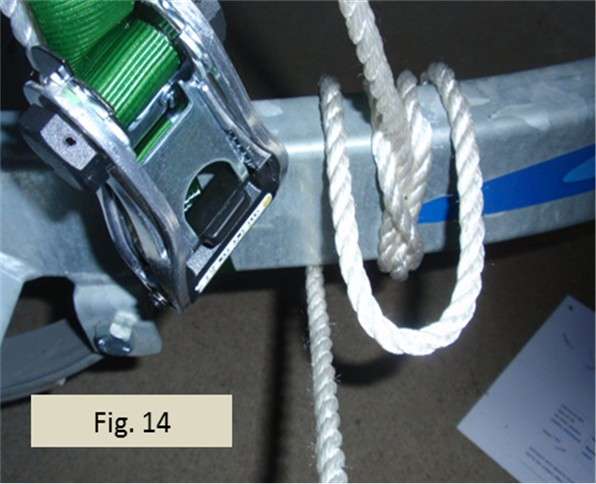
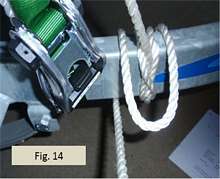
Fig. 14 shows the first step to make the clove hitch tighter and more secure. First, I take the tail coming out of the clove hitch (the tail is hanging down in Fig. 13) and feed it under the trailer beam and then back over the top toward me on the right side of the pulling line that comes down from the ratchet knot. Next, I take the end I am holding and feed it over the top of the trailer beam on the left side of the standing part. I let the tail drop behind the trailer beam so I can reach under and grab the line and pull it back toward me from under the trailer. In effect, I’m forming a rope collar around the standing part. This is a “collar lashing” that when pulled makes the line coming down from the ratchet knot much tighter.
 |
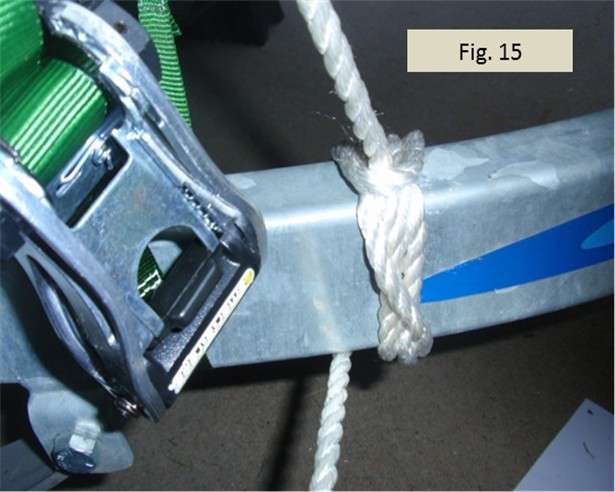
In Fig. 15, I pull on the tail of the rope coming toward me under the trailer beam to pull the collar and the pulling line even tighter. While maintaining the tension, the plan will now be to bring the tail up to form two half hitches on the neck of the pulling line just above the rope collar in order to secure everything. This website shows how to make two half hitches to secure the end of a line.
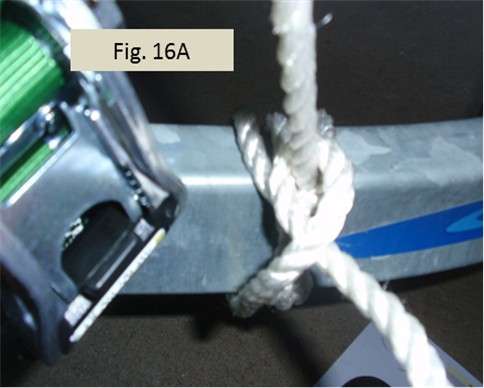
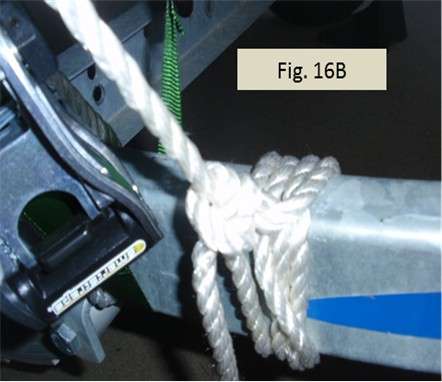
Fig. 16A and 16B show forming the two half hitches. My final tail was longer than 4 inches, so I added a third half hitch and that gave me a suitably short tail.
To re-cap, after pulling on the ratchet knot to tighten the line, we need to secure the loose tail of line coming out of the ratchet knot. We secured our line to the trailer with a clove hitch to start this off. Then we used a rope collar to pull the line leading to the clove hitch even tighter the same way X or Y lashings are used to pull lashings tight in SOF boat building. We then used half hitches to secure our tensioned clove hitch. I refer to the end result as a “collared clove hitch.”
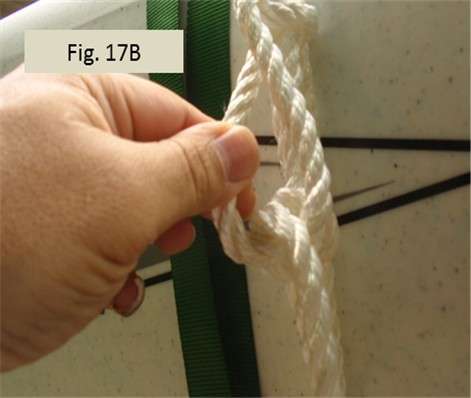
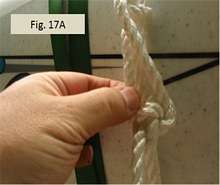
Releasing the ratchet knot is easy no matter how snug it is tightened. First, release the collared clove hitch on the starboard side so that the pulling end coming out of the ratchet knot is slack. The line over the cargo is still tensioned, but this next action will quickly release that tension. Quite simply, as shown in Figs. 17A and 17B, grab the bowline loop that is tight and pull it outward. The ratchet knot pops up into the bowline loops and releases. This is one reason that pulling line needs to be tied off tightly to the trailer to help prevent the ratchet from releasing. Sometimes, if pulling the loop outward does not release the ratchet, you can also push the ratchet knot up into the bowline loops to cause the ratchet to release.
 |
 |
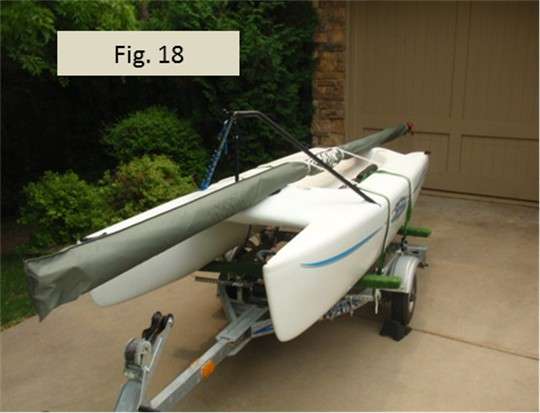
Fig. 18 shows the mast secured to the boat in a nice tidy package. Note I’ve used two lines, fore and aft, to secure the mast. Both lines are tied the same way using the ratcheting truckers hitch. Both lines are secured around the sail bag using a clove hitch. The two lines are drum tight. The sail cannot move side to side, up or down, or fore and aft. When I put the boat in the water, all I have to do is release the clove hitch on the starboard side of the trailer, release the ratchet knot, and remove the clove hitch from around the sail bag. I leave the bowline in place and leave the boom hitch tied to the port side of the trailer. Then, putting the mast back on the boat goes very fast.
|