
 Custom Search
|
| boat plans |
| canoe/kayak |
| electrical |
| epoxy/supplies |
| fasteners |
| gear |
| gift certificates |
| hardware |
| hatches/deckplates |
| media |
| paint/varnish |
| rope/line |
| rowing/sculling |
| sailmaking |
| sails |
| tools |
| join |
| home |
| indexes |
| classifieds |
| calendar |
| archives |
| about |
| links |
| Join Duckworks Get free newsletter CLICK HERE |
|
|
| The story of Ode II and a Vole |
by Kevin McNeill - Ladysmith, British Columbia - Canada |
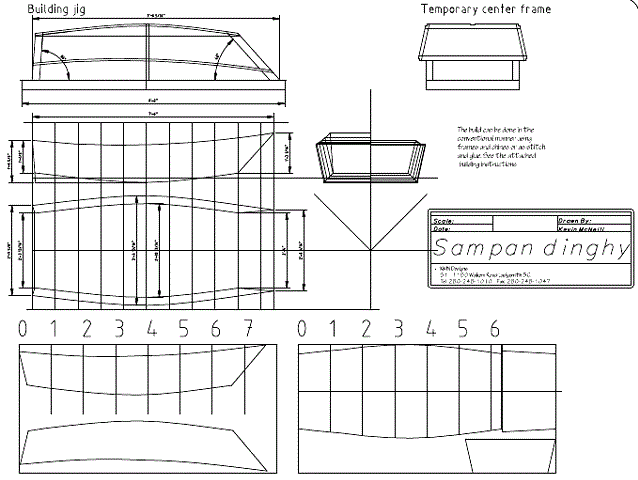
When I set out to build Kuai Le I realized that I didn't have a clue as to how to develop panels. I knew you could use Hulls and that program would develop the panels for you but I like to know how things are done so I set out to find out. I reasoned that you could find the length of a panel by establishing a waterline and measuring that between the station lines in plan and heights could be taken off the lines drawing for each of the stations and from that you could draw the panel. I tried that in a model and it worked rather well. But before committing myself to doing the panels full size for Kuai Le and hoping that it would all come together I decided to try a dinghy first. So I designed the sampam dinghy nicknamed the SamPram.
Pretty simple, two sheets of ¼" ply and some 1x4, lo and behold it worked full size. The boat was built but I didn't use epoxy or polyester because I thought I would never use it.
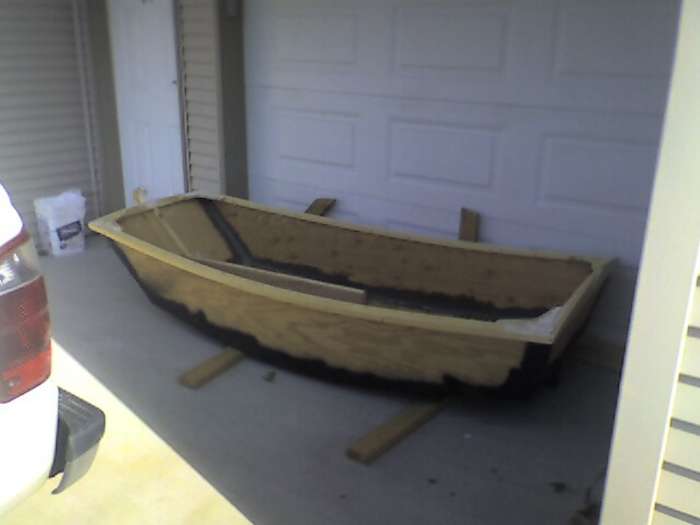
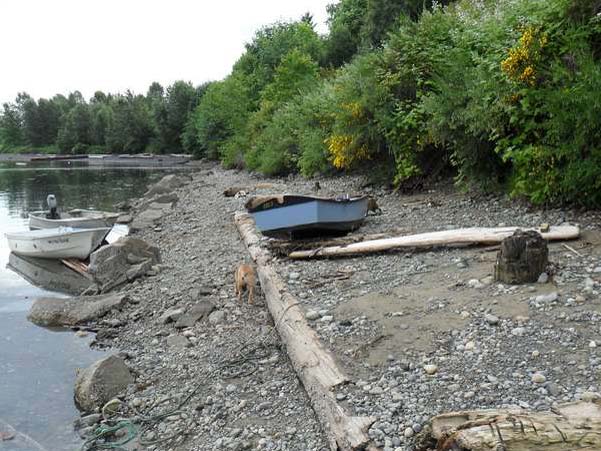
But then I realized that Kuai Le would be out on a mooring and how do you get back and forth? So I finished the little boat and named it Ode II. Why Ode II you might ask. I like puns and the little boat would be the tender to Kuai Le, Kuai Le, as you may recall, means joy in Mandarin, ode to joy. Plus the little boat owed its existence to me having to figure out how to develop plates for Kuai Le. Ode II was held together with white glue, fiberglass drywall tape and a cement filler mixed with white glue all covered with rocker panel paint which is waterproof. The bottom was protected by a sheet of polyester material, an old bed sheet, soaked in white glue and painted with the rocker panel paint. For the next three years the poor thing sat out in the weather under a drip edge of a twenty foot high eave. Once Kuai Le was done and launched, Ode II came into its own. Taking me back and forth to the moored Kuai Le. Between times Ode II sat on a rocky beach chained to a log.
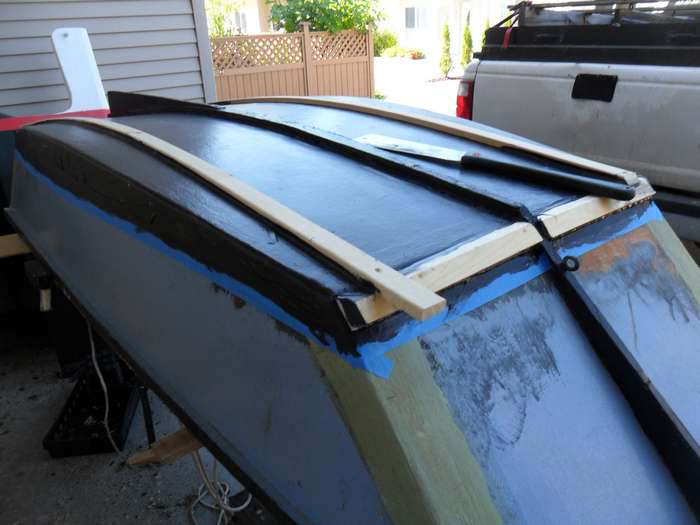
The tide here rises and falls 12 feet and at high tide Ode II is afloat, at low tide it's a long rocky drag to the water's edge. That trip over the space of a summer took its toll and Ode II began to leak significantly. So home to the workshop she came for a refit. In retrospect it probably would have been easier to build a new one but I had decided to build a bigger new one anyway as the little boat was a tad tender for a person of my age and girth and I had promised the little boat to my grandson. Now came the problem of repair. The combination of white glue, cement filler and rocker panel paint was pretty fearsome. Attempts to remove it gummed up many 40 grit sanding belts. In the end I had to use a grinder. The polyester sheet came off easily around the spots where it had been breached but the white glue held in many places and covered the entire bottom of the boat. I decided to just replace the polyester and use TiteBond III but I wasn't sure it would bond to the old glue. The Duckworks forum was a big help with that and the best advice I got was to try it. So I did. It doesn't bond but it does stick. I started to apply the TB3 and then looked at the cost of it. Why was I using this product? Because it's waterproof. But that only counts on the outside! Right! Glue the sheet down with white glue, soaked it well and when it cures apply a coat of TB3. When that cures, paint. Got it. Add a couple of rubbing strips and we're good to go.
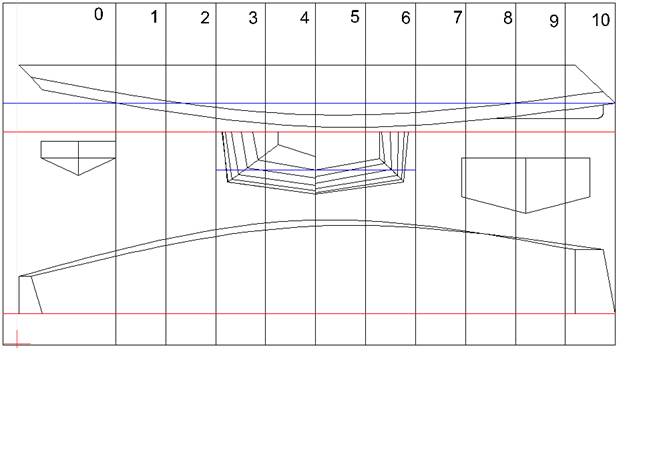
The seams were covered with three layers of fiberglass drywall tape, glue and a layer of the polyester, TB3 and finally paint. On to the inside, which had in many ways taken a bigger beating than the outside. The inside of the seams had been coated originally with three layers of drywall tape and then a mixture of white glue and cement, all covered with the rocker panel paint. This had held up rather well except where the paint had been worn off and water had got into the mixture. Those areas were cleaned out and a new mixture of white glue and flour applied over new drywall tape. Once that cured a painted layer of TB3 and paint. Now to protect the bottom from the rocks. Originally Ode II only had a single rubbing strip down the centre line. That of course contributed to the damage. So two more strips were added. The whole thing was given a fresh coat of paint and off it went to my grandson's. He was a happy little camper for a short while. He and his parents went camping at a little spot called Fairy Lake. Its a forestry campsite that we used to go to when my daughter was a little girl. They had the boat out one day and when they came to get it the next morning it was gone, stolen. So this year I decided to make him a new little boat and give it to him for his birthday. I thought a mouse boat would do the trick and then I thought why not design a boat like the mouse boat but with a bit more beam, some flare and a slantier bow. The project was on and the lucky lad's birthday was a month away. I don't know why I do these things to myself. A vole, according to Wikipedia, is a small rodent resembling a mouse but with a stouter body, a shorter, hairy tail, a slightly rounder head So the little boat would be a vole. Here are the lines:
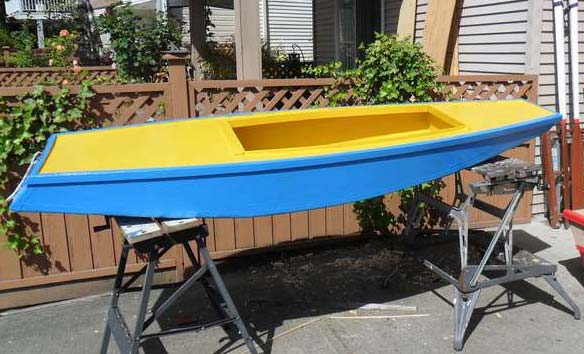
She will carry 130 lbs at the designed waterline a further inch of draft increases the displacement to just short of 200lbs. So I went about buying the necessary lumber all the while thinking that I had the business of panel development solved. I drew up the panels transferred the measurement to a sheet of 1/4 in. ply and began cutting. All went well until I came to sew the panels together and the two bottom panels wouldn't fit, expletive deleted! Back to the drawing board and only two weeks to go. I finally figured out that the reason that the panel development worked on Ode II was that the bottom was flat and that the waterline through the sides was at right angles to the surface of the panel. Problem solved. Go get another sheet of 1/4 ply. Since I had to build outside and the temperature was not conducive to using epoxy I went with polyester. I never knew that there is a marine grade of polyester but there is and guess what it's twice the price of regular polyester resin, so marine grade for the outside and regular for the inside, flour and white glue for the seam fillets. I also found a polyester lining material that comes 45 cm wide and costs only $5 a metre, one side is smooth and the other gives a non-skid so that went into the cockpit. Once I had the panels sorted it went together pretty quickly, the lucky lad's favourite colours are blue and yellow and TremClad was on sale so three coats and we're done.
I give you Vole. I've sent the complete plans to Chuck for inclusion in the free plans section. |
To comment on Duckworks articles, please visit one of the following:
|


 |