Keeping your (skinny-hulled) boat and you safe with proper anchor rigging.
Anchoring your canoe or kayak can add flexibility to your sailing. You can anchor out while fishing or having a picnic on the water, or you can just [and should] anchor your boat to the beach during rising tides or when the wind is not directly on-shore; I’ve had boats [yes—more than once, thank you for noticing] sail off the beach without me. It’s kind of embarrassing.
There are several ways to anchor your boat and only a couple that I’ve used consistently without problems. Let’s go over this list and pick out the why’s and wherefores.
-Stern - Anchoring from the back of the boat is convenient but has its hazards. As you know, when the wind is aft, your sail fills and stays filled. When anchored, bringing the sail back amidships can be very tough and can cause a knock-down under the right [wrong?] conditions. You also cannot drop your sail when pressure is on it, and raising it can cause damage. With some rigs you can let the sail swing forward of the mast, much like sharpie sailors did when oystering in the old days. In any event, you will find problems when anchored aft and will have to be very careful technique-wise when making sail again. I do it sometimes - I let the sail swing all the way forward - but not often at all.
-Abeam - An anchor line attached to the side of your boat can cause it to broach in a current or when hit by a wave or wake. ‘Nuf said.
-Anchor trolley - A trolley system is often used by kayak anglers so they - we - can adjust where the anchor is in relation to the boat. It allows us to move the anchor fore and aft on a traveling line to point the boat into or away from wind and current, or set us up for a convenient casting angle. Blocks are mounted to the boat, one forward and the other aft. I mount blocks on each side of my fishing kayak so I can move the anchor line from one to the other for full versatility. A line forms a snug loop between the two blocks. In the center point of this line is mounted a ring. The anchor line is passed through this ring. You then adjust where the anchor line’s attachment is expressed to the boat by pulling the ring fore and aft as needed. When weighing anchor, you can pull the ring to you and retrieve the anchor. It works like gangbusters on the kayak and it would do well on any canoe or kayak, though one must consider interference with lee boards and possibly the rudder.
-Bow - Attaching the anchor line to the bow is probably the safest and most common way to anchor, for good reason. When anchored off the bow the wind keeps the sail amidships without pressure, allowing it to be easily raised or lowered. However, anchoring from the bow also has its challenges. Having to crawl to the bow to set or weigh the anchor is just too troublesome to go into - can you see yourself doing it? Okay - no.
 |
A method my Uncle, Capt. Carl Stridfeldt, taught me was to have the anchor at hand. You can drop it when you need to easily enough. Now the trick is how to get it back to your hand when weighing it. Ah - the salty Capt. Carl taught me to sail above [upwind of] the anchor, let the boat fall off a bit, causing the anchor line to run across the rail. Grab the line and retrieve the anchor. It’s pretty cool, looks salty and takes skill. But, once the anchor is off the bottom, you’re sailing! So you have to get that thing aboard, free of weeds and mud, all while controlling your boat. I think it can be a fun exercise, maybe even a regatta event, but limited to open areas in light winds and downwind of where I’m anchored!
 |
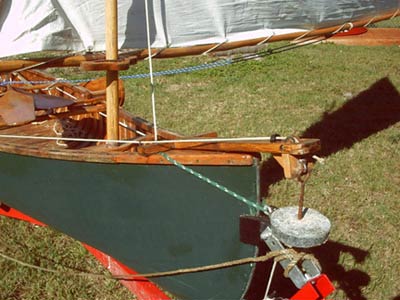
A third way of bow-anchoring is to use an anchor bow pulpit. A bow pulpit is simply an extension, a plank, off the bow. On some boats it’s used for sight-seeing; whalers use it for the harpooner [think “Moby Dick”], but most pulpits are for anchoring. I used a clamp-on anchor pulpit for years because it works so darn well. The anchor pulpit has a roller mounted forward with a deadeye or two aft to guide the anchor line back to hand. It protrudes far enough from the bow to allow the anchor to hang without banging on the hull. The anchor line goes from the anchor, through the roller and each deadeye, along the rail and back to a conveniently mounted cleat near the helm or crew. You can lower or raise the anchor easily and safely with little hassle. Again, the boat is under sail once the anchor leaves the bottom, but you can keep the boat in irons until the anchor is brought to the pulpit and secured. You can then just fall off and get underway. I love it.
Another, less challenging, way of bow-anchoring is to allow the anchor line to run over the bow rail, or as close as possible to the bow. (A fair lead may be indicated here.) Run a line with a loop or ring in the end from hand to the anchor line, passing the anchor line through the loop. Using this line you can pull the anchor alongside, or if it's stuck you can pull yourself above the anchor, and retrieve it. Keeping it it close to hand then, it's always ready to deploy. I've found this to be the safest, most convenient way to use my bow-mounted anchor.
A useful component mounted beneath and aft of the pulpit roller would be a block of wood or a bracket to capture the anchor stem to help keep it from swinging and banging while underway.
Anchors
There are many types of anchors available for small boaters that run the gamut from dirt cheap to bloody expensive. A simple sack full of sand has been used for centuries. I’ve successfully used a three - or four -pound disc of lead with an eyebolt cast into it. I once used a concrete block I scrounged off a nearby island when my rotted anchor line parted at the thimble, freeing my anchor from its nautical labors while under sail. Folding anchors do well, as do plow, mushroom and other types. Whichever you use, the scope is essential.
[Does not enlarge] |
Scope is the relative amount of rode - anchor line - you have out versus the depth of the water. A 10:1 scope—10 feet of line for every foot of depth - provides 100 percent holding power regardless of anchor type.
If the scope is too short, say you’re anchored straight down [1:1], the up and down movement of the boat can lift the anchor and cause it to lose its grip. If the scope is great enough, then the anchor will do its job under even storm conditions, which most of us should not encounter in sailing canoes and kayaks! Most of the time just ensure you use enough line to let the anchor do its job.
Anchor Line
A good quality nylon line about a quarter inch or more in diameter will hold your boat. Too big is overkill and a hassle; too small can be hard on your hands. Chain is generally not needed for our purposes.
A Leaden Anchor You Can Make Yourself
Way back when I was stationed in planet California, I fished a couple nearby reservoirs from my canoe and occasionally found my self having an anchor hang up in the rocky bottom. Forever.
So, having an iron pot to melt lead in for casting balls for my flintlock, it occurred to me I could make anchors that I could afford to lose.
Back home in Florida this simple design has proven to be very effective on both hard and soft bottoms and I have yet had it drag since the shank is about as tall as the width of the anchor. If it begins to drag it tips over and digs in.
This piece weighs about three pounds and is simply a nut and eye bolt cast into the lead base. I made this one today, remade to be more accurate, since the shank rusted almost through. The new shank is stainless and should last longer then the plain steel ones I've used.
Instructions:
Using an iron pot you can get at any hardware store, melt a couple pounds or so of lead. Insert the nut and eye bolt in the lead as shown. The nut keeps the bolt from pulling out of the lead. Don't over think it, as I know some of you will. Remove the pot from the heat. A gas camp stove is easier than a grill and is safer since you don't have to pick up a pot of molten lead. The kitchen stove may not be a good choice.
Caution: IT IS MOLTEN LEAD! If you splash or spill it you could have a fire or extremely serious burns. No kids, okay? Only heat it enough to melt the lead (621F); if it turns bluish, it's too hot. Don't worry about the fumes if you keep the temperature down, lead fumes at 842F so you have a 200F range to with. Better to do it outdoors anyway due to the fire hazard.
Lead Toxicity in Waterways
We are all now aware of the threat of lead in drinking water after hearing about the issues in Flint, Michigan and a number of other cities around the country. Lead is toxic but it also exists in what we could define as a “benign” state. Allow me to explain.
Lead is a malleable heavy metal that remains stable in the environment. It does not dissolve under natural conditions. It can, however, become a contaminant when exposed to chemicals in public water systems and when trapped in waterlines, like in our homes. It was a chemical issue that caused the problem in Flint, for example.
In the environment lead is a potential hazard in the form of lead bird shot that birds can ingest when foraging in bottom sediments, which is why it's banned in a number of waterways, but very few upland areas. Lead from fishing sinkers, weights and other sources can be physically – not chemically – degraded through erosive action. In that case, like gold, very small particles settle into the sediment and continue settling deeper and deeper into the earth where it becomes unavailable for consumption.
 |
 |
 |
 |
 |
Handling lead can expose us of course. Of all the fishermen throughout the ages who have used lead sinkers I don't believe any of them have elevated blood lead levels from having handled fishing weights, even those of us who held sinkers in our mouths (not that I'd recommend it). Heating lead for casting weights or bullets or making stained glass items poses the greatest risk of personal contamination. Lead should be heated only enough to melt it, 621F. If it starts turning blue, it's too hot. Exposure to lead fume can occur at a temperature of 842F, which is when it becomes an inhalation threat. Again – if it's turning blue, it's too hot. It may not being fuming but you're pushing the safety envelope. Melting lead, or, frankly, any metal, (which includes welding) should be done in a well ventilated area and away from children. At home, outdoors should be the rule. Clean up after yourself, wash your hands and you'll be okay.
Okay, crew, that’s it. Go forth and prosper!
(Originally in Canoe Sailing Magazine, September, 2008.)
|


