
 Custom Search
|
| boat plans |
| canoe/kayak |
| electrical |
| epoxy/supplies |
| fasteners |
| gear |
| gift certificates |
| hardware |
| hatches/deckplates |
| media |
| paint/varnish |
| rope/line |
| rowing/sculling |
| sailmaking |
| sails |
| tools |

| join |
| home |
| indexes |
| classifieds |
| calendar |
| archives |
| about |
| links |
| Join Duckworks Get free newsletter CLICK HERE |
|
|
| Name Board Ideas |
by Mike Olson - Houston, Texas - USA |
Graduate from Vinyl Stickers to Eye-Grabbing OriginalitySo you’ve built, or otherwise acquired, a boat you’re proud of. Congratulations! Hopefully you’ve put some thought into giving her a meaningful and fitting name. So why not show the world the name of your new love? I consider myself somewhat creative, but not artistic: I need a compass and a straight edge to draw a stick man. My first boat-building endeavor was a 16’ cedar strip Prospector canoe. When I finished, my graphic designer coworker came up with a design for the name, then I hired another designer to paint it on the bow.
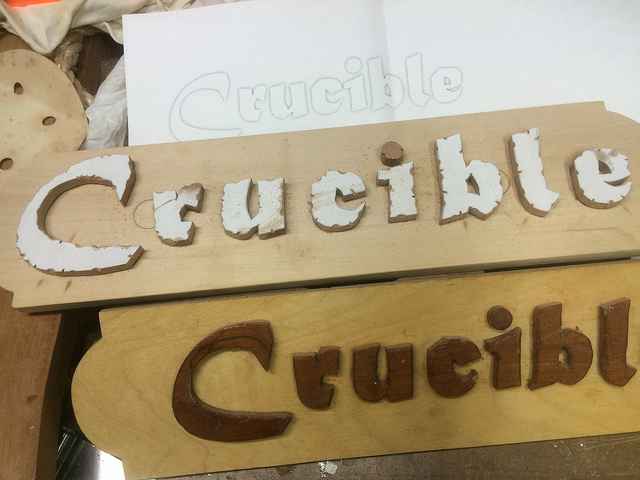
It came out nice and I like it, but for my Welsford Pathfinder I wanted something different. Some wooden boat aficionados insist on paying a professional to finish their boat names in gold leaf, but that seemed over the top for my plywood dinghy. Plus, I like the idea of making things myself. I had pondered my boat name for months and eventually landed on Crucible, inspired by the PBS documentary, The Viking Sword, made with crucible steel. It also means a test or challenge, as in the Arthur Miller play The Crucible about the Salem witch trials. I wanted a Lord of the Rings feel, so I started playing with different fonts on the computer, printing out different styles and sizes and taping them on the transom.
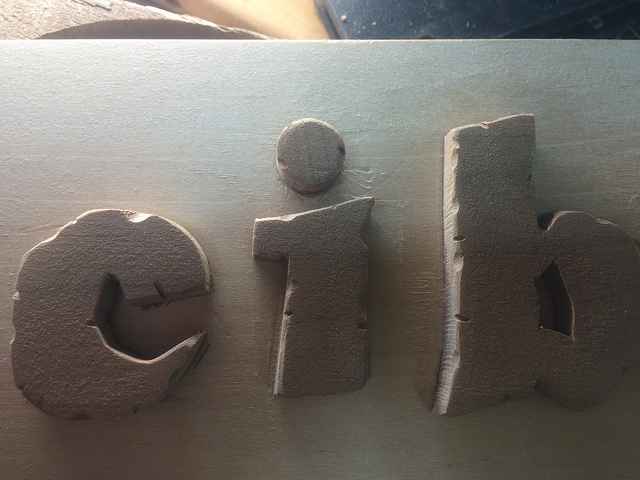
Printing the letters as outlines and using my printer’s economy mode saved ink. Look for a “landscape” orientation setting in your word processor’s page layout. Next I spray mounted the paper to some wood. The exteriors were rough cut on the band saw, but for smaller crevices and the interiors of letters b and e, the scroll saw is the tool. If you’re a glutton for punishment, you could probably make do with a coping saw. Cut as much of the small stuff as possible before freeing the letter from the main piece of wood. You get better control as you rotate the wood around and your fingers are further from the blade. A stationary disk sander or mounted belt sander helps to sneak up to the lines and keep the curves smooth. My prototype turned out better than expected. I hot-melt-glued the letters onto a piece of birch, knowing the cherry would darken in contrast. To emphasize the metal origin of the name, I gave the edges a distressed treatment: little gouges, dents and such as if to suggest the letters were hand forged. The faces are flat and smooth.
Pleased with the prototype, I made the final version, taking more care cutting each letter. For the board I used basswood, even lighter than birch.
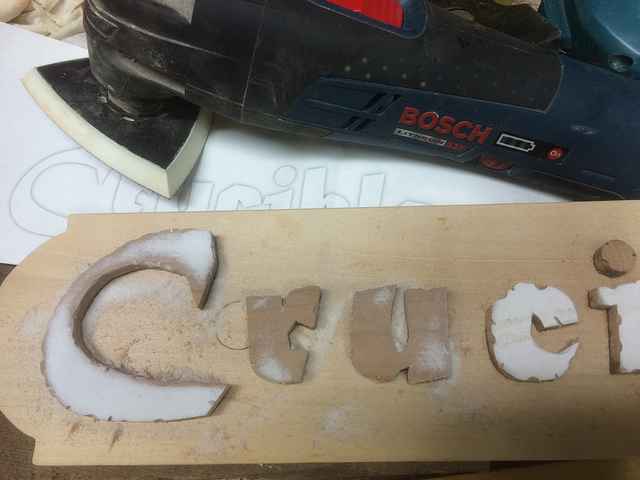
Some light pencil marks helped with alignment, then I carefully painted the backs with thickened epoxy, pressed lightly into place and let it sit overnight – no clamps, just gravity. Once cured, sanding removes the remaining paper from the face, then carefully trim epoxy squeeze out with a sharp chisel. A small power sander with a triangular pad is ideal for cleaning up around and between the letters as well as lightly rounding the edges.
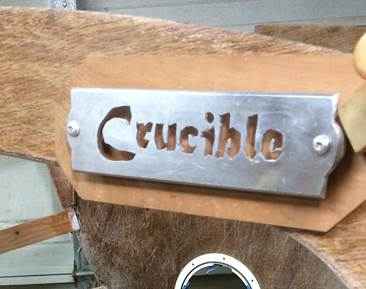
I think these 3D letters are much more visually interesting than vinyl stickers. I plan the same treatment for my registration numbers. Another graphic designer friend suggested cutting the letters out of metal, so I spray mounted my printout on a 1/8” thick bar of flat aluminum stock and cut out the field of each letter. You really need a scroll saw with a metal cutting blade — as many teeth per inch (TPI) as you can find. For letters with an interior hollow section (p, a, o, b, etc.) leave a tiny bridge to connect the interior hollow to the exterior, otherwise the whole thing falls out. This method is more time consuming: for each section of each letter you need to drill holes large enough to thread your scroll saw blade through. It requires a lot of stopping, starting and patience. Don’t rush it.
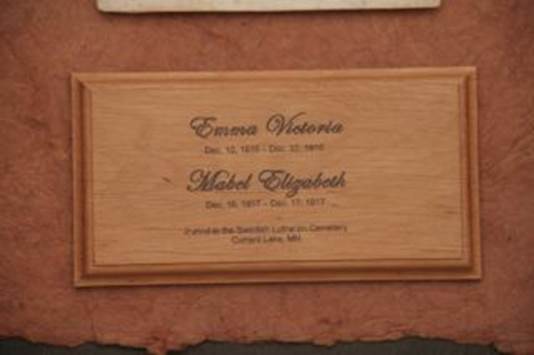
I really like the metal, especially given the connection with her name, but not enough to put it on the transom. However, this mini metal version gave me some other ideas: I will make a second aluminum version and mount them on each side of the coaming on the forward deck, or perhaps the edges of the bowsprit. I may someday swap metal letters for the wooden ones. For this reason I made the attachment points with SS carriage bolts (countersunk and hidden with basswood bungs) that are easily removed, rather than permanently affixed. This should make refinishing both the transom and the name board easier. The sky is the limit for name board ideas. Experiment with different materials, styles, textures and techniques. I wondered about hitting some wooden letters with a propane torch to lightly scorch them; maybe shield the tops of the letters and char the lower portion, extinguishing any flames right away. Or use a ferrous metal that will rust a bit, or copper with its greenish patina. And there is a variety of colorful woods like purple heart, rosewood and ebony, if you have access. Of course there is always paint too. Do a web search for custom signs for more cool ideas. One other technique I’ve used successfully involves toner and acetone, although this one might be better for smaller projects. You need to produce a “mirror” image of your project (think how emergency vehicles like police and ambulances are badged on their front hoods). Some photocopiers have this mirror setting, or get creative with your computer applications. Affix your backwards image toner-side-down onto a smooth piece of wood, saturate the paper with acetone and press firmly. The acetone transfers the toner to the wood. Below is a memorial plaque I made for my mom. It’s about 3”x5”. The pic is a little blurry, but you can see the level of detail that is possible. You need a light wood for the background.
Of course you’re limited to the color of the toner and you’ll need to protect it with plenty of varnish. PLEASE take care and properly air out your acetone-soaked rags or you’ll be seeing those emergency vehicles at your place: A wadded up rag with solvent can spontaneously burst into flames. Another suggestion: seek out a graphic designer friend. They may have great ideas to make your name board “pop” and really bring it to life – e.g., giving your name board a shapely arch for your transom. Just don’t expect them to work for free: take them out to lunch or figure out a mutually beneficial bartering exchange. |
To comment on Duckworks articles, please visit one of the following:
|


 |