| Last winter, as the cold finally settled over North Texas, I found myself once again looking at boat plans. My previous build was a Welsford Truant, which uses longitudinal stringers to define the chines and serve as a base for gluing the hull panels. This time I wanted to try my hand at stitch-and-glue, or taped seam construction. Further, I wanted a rowing boat that was light and easily transportable. It had to fit into the bed of my truck. I went with Jim Michalak’s WeeVee.
WeeVee’s small project size was appealing since I would be conducting self-directed OJT…without doubt involving some trial-and-error. For materials I chose very inexpensive 5mm Luan plywood and some leftover Douglas fir lumber. I also threw in some mahogany scrap bits here and there, and used a strong piece of oak for the tiler. My plan was to varnish the wales and inside of the boat, and paint the hull. Overall, I wanted to keep the build enjoyable while learning a new construction method.
Tracing and cutting the Luan panels took all of about 2 hours, and since there were no scarf/butt joints, I was ready to cut and glue the transom support “sticks,” as Michalak calls them. This was a lot of fun because Santa had managed to fit a new table saw down the chimney, and I was itching to try it out.
Once the transoms had been built up, the side panels bent easily around the temporary form and spreader pieces. The bevel angles provided in the plans made attaching the sides to the transoms a snap, and after these initial joins I got my first glimpse of the little boat’s lines. I used a long 1x2 batten to keep everything straight, and “eyeballed” the horizontals of the transoms and formers to keep it all level. Tightbond III was used for gluing where a good wood-wood surface was available…yet another nod to simplicity and thrift!
 |
WeeVee sides on, from bow |
There is no internal support structure to WeeVee, and the designer mentions that its strength comes from the curve of the hull panels and a robust perimeter. The plans call for a wide, I-beam like “flange wale” that provides both stiffness and strength. However, in keeping with the “learn by doing” theme of this build, I decided to instead use a traditional dual wale setup. I did this mainly because I read about a technique for cutting and trimming in-wales to a nice snug fit at the transom ends, and I wanted to try it out. Plus, a double wale with spacers looks really salty.
 |
WeeVee Hull with outwales |
I first attached the outer wales along the top of the side panels. Keeping the boat true was a bear, and a few choice words were used during the wrestling match. The difficulty came because the fir wales were stiff (I ripped them to 1 3/4” x 1/2”), and the structure at this point was extremely “wobbly”. I have no doubt that following Michalak’s flange wale design would have been much easier since it is really a lamination of smaller pieces built-up into a strong finale. Anyway, I managed to get it all together.
 |
WeeVee inwales on |
The stitch-and-glue part followed, and was remarkably simple. I referenced Jim’s book Boatbuilding for Beginners (And Beyond), which goes into great detail about taped-seam construction, and had seen Warren Messer’s Red Barn Boats YouTube videos as well. Creating the curved V shape with the bottom panels was especially cool. The panels are laid face together and stitched along the bottom seam, then opened up like butterfly wings. When spread open, the stitched edge forces the panels into an arching V, which then fits perfectly against the V shape of the transoms and temporary form. Really neat! I used a tube of Gel Magic thickened epoxy to set the seams, removed the wire stitches, then applied 3” fiberglass tape set in epoxy. I sheathed the hull’s exterior with 6oz. fiberglass cloth, again set in epoxy. This added time and expense, but in the end I don’t worry about the strength of the Luan or storing the boat outside. I designed-in a little flair by shaping the knees and bow cross piece, and by using spare bronze screws where visible.
 |
WeeVee hull glassed |
After the hull was glassed, I plopped the WeeVee in the pool and clambered aboard. The inertia of simply getting in the boat sent her gliding across the surface, which hinted at the slippery speed of her V hull. To the great amusement of my wiener dog Max, I flailed about trying to establish a good balanced location for the thwart. The plans provide sail rig specifications, but I intend to use this boat as a one-man exercise machine exclusively.
 |
WeeVee balance test |
The oars were made from 8’ clear pine 1x6 boards, which were soft and very easy to work. They are light, plenty strong, look nice varnished, and superbly balanced. I went with a 7’ length, and followed the detailed instructions in Jim’s book. Also, I fixed the oarlocks in place with pins that run through the oars. I get a better rowing experience and better control with fixed oarlocks. This is entirely a personal preference.
 |
WeeVee oars |
I’m happy to report that WeeVee lives up to all of my expectations and more. At about 40lbs., I can easily lift her into my truck bed and go. The long, slim oar blades move her along at a nice clip, and the extra mass in the square looms reduces the lifting weight of each stroke. The deep V bottom slices through smooth water with astonishing speed for a short boat, and she tracks well ahead. Stability isn’t really a problem with one’s weight on-center, the trickiest part being climbing in and out. I recently went rowing in a good 12-18 knot blow. WeeVee bobbed over the small waves, and was only a bit more squirrely with quartering swells. She’s a really sporty little boat to row.
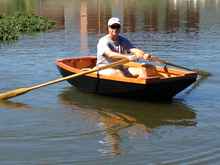 |
WeeVee afloat |
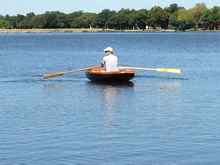 |
WeeVee rowing |
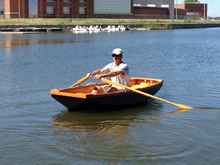 |
WeeVee slices through the surface |
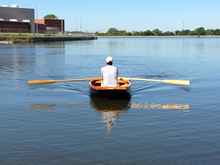 |
WeeVee rowing bow on |
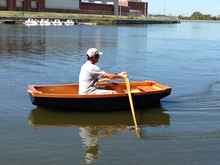 |
WeeVee side view |
All said, the project cost about $250, and took about 75 hours to complete (oars included). I use the boat a lot because of the ease of getting it to the lake, I enjoyed the fun build, and learned a few things along the way.
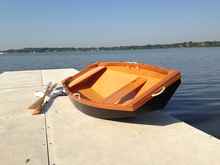 |
WeeVee on dock |
PS, I put in a little stern seat for Max, however, after watching me flail, and given his advanced years, he’ll have no part of it!
 |
Max in WeeVee |
|


