|
Folding Kayak
( Including complete plans and
instructions)
My friend Bob Williams built one of these folding kayaks from
plans that were printed in Popular Mechanics about forty years ago. It was also
published in Boy's Life and Field and Stream. He bought a reprint
from a magazine in 1978, and has had the plans ever since. After twenty two years
the boat came to be built in kind of a curious way.
Bob was interested in a houseboat that Rags Ragsdale of Florence
Oregon had built and later written up in Messing About In Boats. He called
Rags to talk about it, and during the course of the conversation, happened to mention the
folding kayak. Mr. Ragsdale then informed Bob that he, Rags, had bought the very
first set of plans from the original designer, Robert Romaneck. Rags went on to
reveal that he had built over fifty of the things, and was very enthusiastic about the
design. Bob could not help but catch some of that excitement, and the rest is
history.

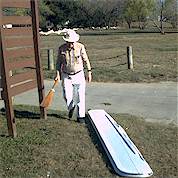
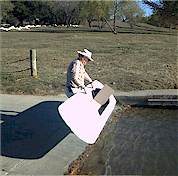
Here I am at the helm of this stable and fun little boat.
|
Bob called me up the other day and invited me to accompany him on the
christening and maiden voyage of this new folding kayak. We took her down to the
Guadalupe river near his home in Kerrville, Texas, and after unfolding the boat, each
enjoyed a brief cruise.
|
Assembly is easy
|
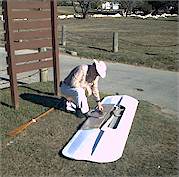
Unfold
|
Pop in spreaders
|
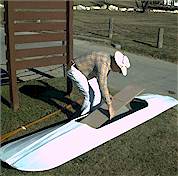
Drop in the seat
|
Pick up (only 40 lbs.)
|
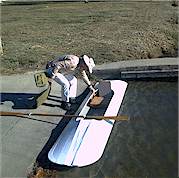
:Launch
|
| What follows are the photos, diagrams and
instructions as they apeared in the original Popular Mechanics' article |
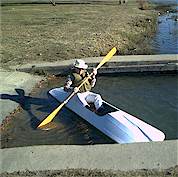
It floats!
|
NOTE: I should mention that Bob built his
folding kayak 12 feet long rather than the specified 10. |
| Click
here for a zipped version of the plans: thanks to Bryant Owen
Folding Kayak
By Jess E. Rathbun
It’s not fast, it’s not roomy and you won’t find many practical
uses for such an outlandish craft. In fact, this center-folding kayak has only one feature
to recommend it. It’s fun. At $15 apiece, you can afford to make one for every member
of the family. And you can tote a whole folded fleet on top of your car.
Construction is also unorthodox. Instead of using screws, nails or other common
fasteners, you "tape" the boat together with canvas and contact cement. No metal
parts are required. |
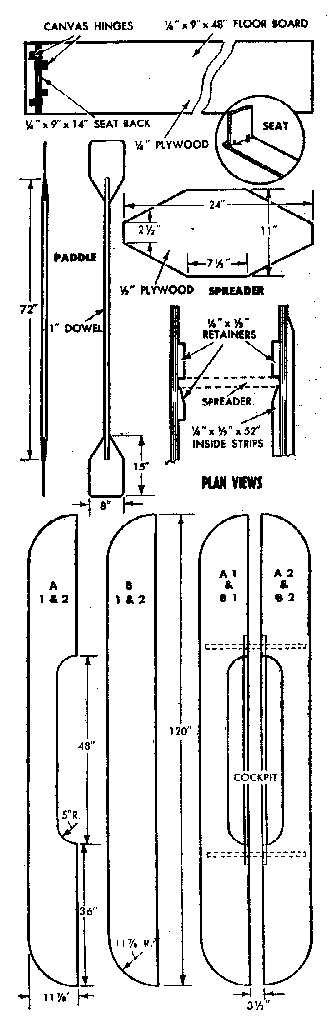
Materials
List |
| Plywood (Exterior
grade AA or AB) |
| 1 pc. |
1/4" x 4' x 10' |
Body panels |
| 1 pc. |
1/4" x 9" x 4' |
Floor board |
| 1 pc. |
1/4" x 9" x 14" |
Back rest |
| 2 pcs. |
1/4" x 8" x 15" |
Paddle blades |
| 2 pcs. |
1/2" x 1' x 2' |
Spreader boards |
| Lumber (All hardwood) |
| 2 pcs. |
1/4" x 1/2" x 6' |
Inside strips |
| 2 pcs. |
1/4" x 1/2" x 10' |
Outside skid strips |
| 1 pc. |
1" x 6' dowel |
Paddle bar |
| Misc. |
|
|
| 24-ft. strip of canvas 2-1/2 in.
wide, cut on bias |
| 17-ft. strip of canvas 10 in. wide |
| 1 qt. contact cement |
| Finishing materials (waterproofer,
paint, etc.) |
Built according to the specifications included here, the kayak will weigh only
about 40 lbs. And will accommodate an average-sized man. However, as long as the correct
proportions are maintained, you can shrink the dimensions to turn out a midget version or
increase them slightly to gain a little more leg room.While marine
plywood may be used for the side panels, exterior grade AA (or even AB) will do just as
well here. Canvas can be anywhere between 14 and 18-oz. weight, but should have a tight,
close weave for easy waterproofing.
|
Begin construction by cutting the four side panels from a 4 x 10-ft. sheet of
¼-in. plywood. All these panels have the same outline, the only difference between the
top and bottom pair being the cockpit cutouts. If you’re planning to make two or
three kayaks, cut the required number of panels at one time so that you can use the first
two as patterns. The rounded ends of each panel are squared off slightly to present a 1 ½
-in. straight edge so that the canvas will go around from top to bottom without wrinkling.Next,
cement the ¼ x ½ -in. inside strips and retainers to the panels, positioning them flush
to the edge with the ½ -in. face down. The strips are designed to provide reinforcement
for the seat bottom-floor board, but also to form notches to hold the spreader boards.
Taper the ends of these strips and the inner retainers so that you can remove and insert
the spreaders easily. Outer retainers act as stop blocks and need not be tapered.
Once these are in place, paint the inner surfaces of the panels since they will
be almost inaccessible once the boat is assembled. Be careful to keep paint off the
outside surfaces for this will prevent the contact cement from adhering well. |
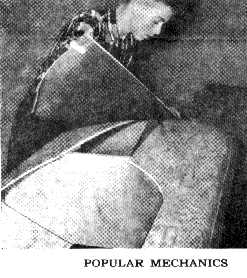
| To assemble, position top panels on bottom panels. Then, using clamps and a
spacer block at teach end, mount the right-hand pair 3 ½ in. from the left, as shown in
the photo on the opposite page. You’ll have to cut the canvas edging strip at a
45-degree angle to the weave to provide the necessary stretch so that it will fit around
curves without wrinkling. Apply cement to both wood and canvas surfaces, but do not cement
the canvas which stretches across the gap between the two pairs of panels since this will
stiffen it. |
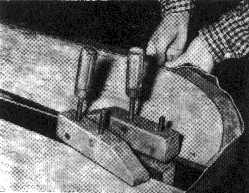 CLAMPS AND SPACER
block are used to position the two pairs of panels the correct distance apart so that the
2 ½ -in. strip of canvas edging can be applied. |
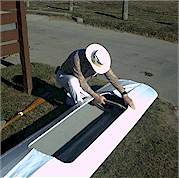
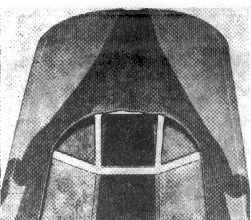
 INSTALL
SPREADERS after "taping" edges of panels. These should be trimmed for a proper
fit before the center gap is covered with canvas. Allow enough slack so that spreader may
be removed for folding.
COVERING GAP between the right and left pairs of panels is the last
step before finishing the hull. Allow 2 in. extra at cockpit and fold it underneath.
|
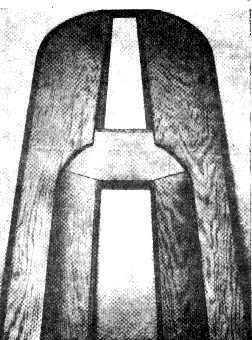
  CUTTING OUT
portions of the spreader will lighten it without reducing strength to the critical point.
Note alligator treatment used to decorate the hull. CUTTING OUT
portions of the spreader will lighten it without reducing strength to the critical point.
Note alligator treatment used to decorate the hull.
|
| To apply the canvas edging, hold one end flat against the edges of the plywood
and stretch it. Then, while it is stretched, fold the sides of the strip over both top and
bottom panels at the same time. Do a short section at a time, overlapping joints in the
canvas about 2 in. (Try a practice session with scrap plywood before attempting it on the
boat itself.) After edging is complete, pound the cemented surfaces with a block of wood
and hammer or mallet to insure a good joint, then let the cement set overnight before
inserting the spreader boards. Next, cut the spreader boards, check the
fit and trim if necessary. However, keep in mind that there will have to be a certain
amount of slack in order to remove the spreader boards easily. With the spreaders in
place, cover the center gap with canvas, then remove the spreaders and cement the skid
strips to the bottom. After making the seat and the double-blade paddles, waterproof the
canvas and paint all wood parts. |

Here is the letter we got from Popular Mechanix
giving us permission to publish the article above
From: Joseph Oldham
12/02/99 09:38 AM
To: Duckworks Magazine
Subject: Re: OK to reprint?
All editorial material is copyrighted by us. So technically, you cannot use any of
our material without our written permission. But since the plans are not currently
available, I will give you permission to use the plans on your website for now. If
the situation changes, and we are thinking about reissuing many of our old plans, you may
have to remove the plans at some future date. Thanks for inquiring.
Joe Oldham |
|

