|
Quick and Dirty
Cleats
By David Beede simplicityboats@clmg.com or david@fools.net
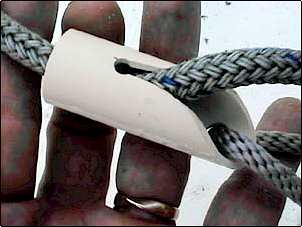
Here are some cleats I've come up with made from plastic tubing. These are very
"quick and dirty." I made all of the ones pictured in about an hour. The
material cost is negligible. This ivory colored plastic pipe, (I believe it's called
CPVC) is available in different diameters. The brand name on it is Coastline. The
ones in the pictures are 5/8" I.D. and about 7/8" O.D. Make sure you sand all
edges pretty smooth to prevent line chafe. These are my first experiments so I don't know
about UV resistance or longevity. I'll keep you posted. |
| The first one takes the place of a fair lead and cam cleats
on a small boat. I have mine tied to the middle of the central frame with 3/16" line.
It's not as foolproof as "the real thing" but is far better than just hanging
onto the main sheet, or wrapping it around a normal cleat. |
 |
 |
Here's a close up of it. It's cut at a 45 degree angle. A
3/16" hole is drilled in the side. Sketch out then cut a tapered V to this hole.
Drill the mounting hole the size you need for your mounting cord. (mine is 1/4") With
practice you can adjust it with one hand. A downward sqeeeze with the thumb will release
it. Works well in combination with a tiller tamer of some sort. (A simple one of these
soon!) |
| This one is similar to a horn cleat or jam cleat, being a bit of
both. Again, the slot holes are 3/16" as are the mounting holes. They are drilled all
the way through, then the upper holes are enlarged to 5/16" to allow clearance for
the screw head and driver for mounting. |
 |
 |
This last one is pretty experimental. It's designed to take a line
or bungee cord running through it that can then be prevented from running out either way.
Not often necessary, but handy for things like the loop of line used on my Venture
McGreggor's rudder to both hold the rudder up and down. Experiment with
different sized tubing and slots for the line you're using. Let me know your
results! |
| Here's my latest variation on tube cleats. I discovered PVC is
very willing to bend with minimal heat. I use a hot air gun like those used for scraping
paint. This has the same "jaws" as the others, but with more flair in the
"fair lead" end. Since it is more rigid yet movable, it is much easier to
operate with one hand. The PVC costs about 15 cents. Greatest cost is the stainless bolts
to mount it to the frame. |
 |
 |
Heat and pliers create a nice flare to allow the line to feed
in smoothly. I matched the angle to the line that feed into it from the bridal over my
transom. |
| Experiment with different sized tubing and slots for the line
you're using. Let me know your results! simplicityboats@clmg.com |
 |
 |
This is a simple notch cut in the mast step/
seat with a saber saw. I have one on either end. The halyard and down haul go
through 1/2" holes at the base of the mast, then come under seat and up into jam
slot. Works great with no hardware! For slippery line take a turn around the seat
before jamming. |
| This is about as simple as a boat dolly can get. It's a piece
of 2x4 covered with carpet with 1/2" bolts hammered into holes in the end
for axles. These plastic wheels are off a discarded kids toy, but you can use lawn
mower wheels, or the best would be those small (12" or so?) pneumatic wheels they use
on some hand carts. I sandwiched the wheels between large fender washers. The boat just
sits on it, bow or stern, and rolls. I can tie it on for longer trecks, and it also
clamps easily to the transom so the boat can be maneuvered upside down. |
 |
|