| QBI is named for the Questing Beast from the novel. The Once and Future King,
in which the Questing Beast was the lifelong obsession of King Pellinore a knight of the
round table. They shared innocuous relationship that defined their very being, but was of
no importance to either society, or to the events of the day. I've always been struck by
how appropriate the name would be for one of my boats. My only previous use of the name
was for a Mylar covered kayak named the Leasty Beastie during its short, UV ravaged
existence. Most of my boats have more generic names like 14' solo canoe or more
descriptive names like Easy Does It (16' Kayak) or Bionic Log, a wood veneer covered foam
sit on top that quickly became Bionic Waterlogged. The Rig, Sail and Foils
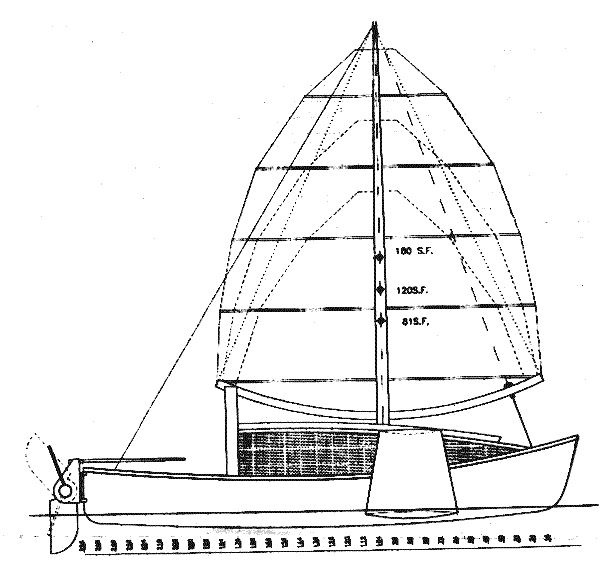
The rig, sail and lee foils are both the best and the worst (less tested)
aspects of the design. There won’t be much more development until spring. I'm a
warm water wuss, and my friend Brendan Conroy always finds himself very busy during the
holiday season. Let me point out right now that it is my firm opinion that there is
nothing so elegantly simple as a double blade paddle and a boat to go with it. The canoe
additions are just a way to try out some concepts without investing a lot of time and
money. The lee foils are about 12% thick ogival (circular) sections made out of salvaged
door skin ply connected with a curved crossbeam laminated out of 6mm construction (cheap)
plywood on each side of a piece of 3/4" blue foam insulation board. The lee foils are
bolted to the crossbeam and the crossbeam is strapped to the canoe through the spaced
gunnels. The mast is a 12' piece of 2" 0.60 +/- wall aluminum tubing left over from a
previous attempt at the same general concept 15 or so years ago. The sail is a piece of
Tyvek house wrap some 60 square feet in area with PVC pipe battens and a curved, laminated
boom that rolls on a surplus $1.50 plastic square cross section pulley. The sail is
biaxial. That is, it is symmetrical about a vertical centerline and flips (rolls) from one
side of the mast to the other on different tacks. In my first experiments some years ago
on a previous canoe the sail had two tacks, and like Phil Bolgers Proa sail, it was a mess
that was compounded by the circular plan form and angled lee foils that ventilated like
crazy. That early rig worked like gangbusters in bursts followed by tangles, twists and
Chaos.
In the first of two and also the only outings with the current rig, the
following was discovered. Surprisingly, the thing that worked least well the first time
out was the rudder. My hold down setup for the rudder was terribly inadequate, and the
Dacron ‘cables’ and foot bar weren't much better. We did determine the lead of
the sail plan to the lee foils was far too much, since the canoe had an enormous amount of
lee helm (possibly aggravated by my 190# being too far back in the boat. The lee foils did
seem to work just as expected, providing just enough stability and not obviously
ventilating when pressed. With all the lee helm, it was hard to determine much about the
windward ability of the rig, but downwind was plenty quick enough, particularly with a
rudder that didn't work and a stone lined bank rapidly approaching.
Back home, the crossbeam was turned 180 degrees to move the mast back about
12" and a slightly better rudder pedal setup was installed which also moved me
forward about 8". Back to the lake. Much better. The rudder stayed down, and stepping
on a pedal caused the boat to turn. The-sail rig is still going to take some work, but I
was tacking through about 100 degrees, discounting all the way I lost coming about. The
big problem in coming about (after thinking it through after the fact), was that the sail
was going way out over the bow when swapping sides which kept the boat pushed over on the
current tack. It is also quite possible to go over 90 degrees if the roller jams a little
bit and you get the wind on the wrong side of the sail and pinned against the mast. All in
all, the first two trials were great fun, and I hope to carry on with the trials a bit
more in the spring before taking on the bigger boat.
Advantages and disadvantages. For the lee foils, given the need to run (and
beat) in shallow water, I can't think of a better system. A low aspect ratio foil is
always going to be less efficient than a higher aspect ratio, but in 2' of water it’s
best to do the most with what you've got. Rectangular planform with endplates gets the
most from the available depth. Actually, there's a little reverse taper to counteract
ventilation on the inside surface of the foil. Running upright or under power(ed), the
foils are just out of the water and not adding any surface area drag.
The sail is a little more problematical, many advantages, but untested.
Advantages include, efficient foil shape, with no blanketing by mast. Easily reefed, with
no change in balance. No chance of a jibe, plus running downwind has a slight upward lift
component to help keep bow up. End(s) of boom are automatically far from the water and not
likely to trip under any circumstance. The elliptical planform is very efficient almost by
definition. The balanced layout allows a large area without requiring winches or multipart
purchases. With practice, it should be possible to back down and maneuver in ways not
possible with a conventional rig. Disadvantages: it is unconventional. Tacking will
require handling at least two different lines and quickly to boot. Its also possible to
get in trouble with the sail backwinded when there isn't any maneuver room. There is a lot
of line in the design.
In short, to my admittedly biased eye, it looks really good, but different.
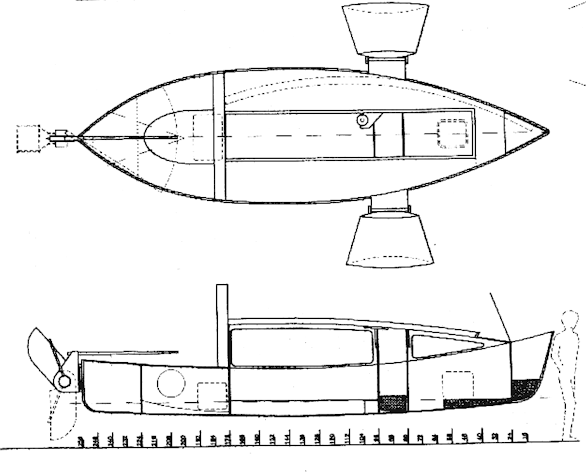
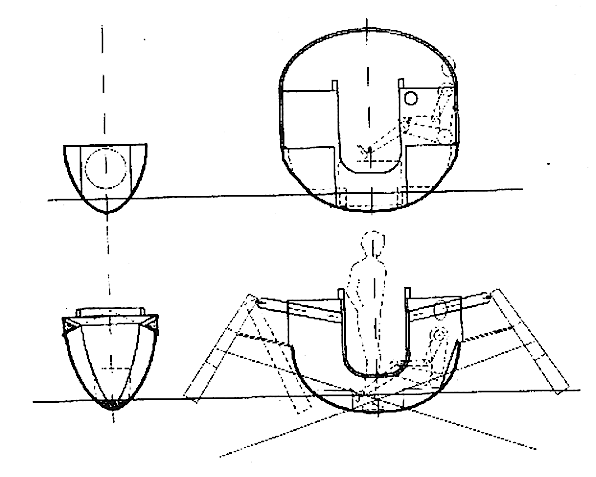
QB I is basically an oversized canoe fitted with a Birdwatcher style
superstructure. I realize that most entrants in the contest will use stitch and glue type
construction, but wood stripped canoes are the only way I know to build. The extra effort
is minimal, confined to the hull proper and truly beautiful when done. Actually there
would be a bit of stitch and glue at the juncture of the ½"(12mm) window frame and
the deck. I had agonized over how to build that part without a lot of elaborate temporary
framing when I realized that two precut pieces at 90 degrees to each other would fall
right into place.
Construction
The particulars of construction are pretty conventional, 5 permanent bulkheads
of 9mm ply, pre-finished, plus temporary frames of 5/8":particle board or equivalent
at 16" o.c. provide the form for 3/8" x l" cedar strips. Once faired,
outside of hull is covered with 12 oz biaxial glass, 2 layers on bottom and stem. Turned
over, inside is covered with one layer 8.5 oz. unidirectional across hull with epoxy/wood
flour fillets at bulkheads and ends. Interior hull stripping to be left finished clear,
balance of boat to be paint finish. Upright and chocked, fit in outriggers for lee foils,
window frames and decks with epoxy and wood flour fillets. Syntactic foam, epoxy and
microballons with perhaps some foam peanuts thrown in, form the bottom of the anchor well
and porta potty base. Two part expanding foams have a tendency to disintegrate and absorb
water over time so use at your own risk. Finish hull to suit
Foils
Lee foils are built from 6mm ply like a large model airplane wing. Pre-finish
framing and interior of skins, then assemble. Pivots are based on 1/2" S.S. rods with
braces fabricated from 7/8" S.S. tubing and standard bimini top hardware fittings.
Strategically placed foam pads and heavy shock cord straps should keep the lee foils
tucked in for trailering, and be quick and easy-to fold out at the boat ramp.
Mast
Mast to be built up from octagonal ‘birdmouth’ section, 6"
diameter, heavily tapered, finished weight about 40#. That’s too heavy, but with
roller at the bow and gallows, you should never have to handle the whole weight, 20# I can
do. Based on my experience with a hollow kayak paddle, an octagonal 'birdmouth' section
turns out surprisingly easy to build, if you prefab an assembly clamp (a board with a
tapered hole in it). For the mast, make up several 12" square pieces from scrap
particle board or whatever with properly sized tapered hole in center of square.
Gather several friends on a 20' long flat surface with all the stuff and assemble.
An alternative would be a foam or very thin wall wood section with carbon fibre skin but I
think there's enough new stuff here already.
Boom
Boom is laminated to radius shown or can be fabricated as a box beam. Roller
assembly is shown to be Harken midrange traveller car with curved track. An alternative,
at your own risk, would be a roller assembly based on some (3) in line skate wheels
running in grooves routed in top and bottom of boom. Battens are made from PVC plumbing
pipe cut to length with ends heated and flattened. Battens are curved bowstring style with
deadeyes and cleats to adjust draft of sail. Sail to be fabricated from white polyethylene
sail kit, with several extra grommet kits. Sail to be laced to battens with dacron line
through grommets in sail. The area between bottom batten and boom to be gathered and
darted as required to make curve, place grommets in darts.
Rudder
Rudder is fairly conventional, laminated up from several layers of plywood.
Based on my kayak experience, the planform shown with a straight trailing edge and
relatively thick foil section is much, much more effective than a flat plate. The 6"
PVC center shaft for the rudder pivot is an affectation of mine; the effective area-of the
pivot is around the perimeter so the center doesn't really do anything, feel free to
disregard, but then you'll either lose the ladder or have to rig it some other way.
Electric Auxillary
The trolling motor and gel cell battery called for are primarily a loading ramp
and dockside maneuvering device rather than a true auxiliary. The units specified should
manage 4 or more hours of operation on a full charge, running at almost hull speed, which
should be sufficient for the intended use. The batteries also help pay their somewhat
expensive way by serving as some functional self righting ballast and promising not to
drip acid when upset. A solar panel would probably not be very cost effective, since QBI
would normally be under cover except when in the water.
With about 60 square feet of wetted surface in the hull and a rig that holds
its shape in a calm, QBI should ghost with the best. If there's absolutely no wind, go for
a swim, it's relatively easy to board with the concentric ladder at the rudder.
Milton "Skip" Johnson
Home (281)373-0815
13022 Maxwell Road
Cyprus TX 77429
Office (281) 890-3893
Broad Spectrum Services
10601 Grant Road, Suite 110
Houston, TX 77070
Email: skipj@argolink.net
I'm a 57 year old Architect (small commercial & residential) with a life
long love of boats, all kinds except maybe jet skis. Built my first boat 40+years ago, a
15' canoe. Currently have a Larsen 16' Flyer, which replaced the runabout we'd had
for 20 years Home built boats currently in the stable, 14' solo canoe, 16'kayak and my
granddaughters' 8' first canoe, all strip built. |