|
The Design
I have wanted to build a trailer-sailer for coastal cruising
for some time now. Back in 1995, my son Bonham and I built
a Bolger designed Tennessee.
He was fifteen, and wanted nothing to do with no sailboat.
The mistake I made was in subjecting him at an early age to
the supreme embarrassment of riding in a 16ft sailboat while
really fast and impressive motor boats zipped past us in all
directions. No, he would not help me build one of those
worthless things. He wanted a boat for fishing.
At that point, I hatched the idea of us building a cabin cruiser.
We could go to the coast for a week at a time, and fish 'til
we'd had our fill.
 He went for it, and
after about nine months of Saturdays, we ended up with a great little OB camp
cruiser. We went to the coast and fished and fished.
Unfortunately boys grow up, and as in Bonham's case, go off to
college. At that point, I somehow convinced my better half,
Sandra, to go for a cruise with me in the Tennessee. To my
astonishment, she actually liked it! So, never one to let good
enough alone, I told her that it would be lots more fun cruising in
a sailboat. As I held my breath, she replied,
"Lets build one", and the search was on for the perfect
design. He went for it, and
after about nine months of Saturdays, we ended up with a great little OB camp
cruiser. We went to the coast and fished and fished.
Unfortunately boys grow up, and as in Bonham's case, go off to
college. At that point, I somehow convinced my better half,
Sandra, to go for a cruise with me in the Tennessee. To my
astonishment, she actually liked it! So, never one to let good
enough alone, I told her that it would be lots more fun cruising in
a sailboat. As I held my breath, she replied,
"Lets build one", and the search was on for the perfect
design.
Being a Bolger builder, not to mention a big fan, I had my
eye on one of his designs. Martha Jane is a 24' trailerable
cruiser. She has water ballast for light trailer weight, low
tech sails for simplicity, leeboards for shallow draft, a folding
mast for quick setup, and room enough for two for a couple of weeks
of fun on the water. This seemed at first blush like that
elusive perfect boat, until I found out that she weighed 1500
lbs. I have always driven small vehicles, so that weight was a
little on the high side. My tow car of choice was to be my
four cylinder Ford Ranger.
So what does that leave? There are lots of smallish
boats with little cuddy cabins made for elves. Problem was,
Sandra was spoiled by the separate galley in the Tennessee.
Just when I was about to decide I needed a bigger truck, along came
Jim Michalak's Caprice.
Jim designed the boat for Bill Moffitt, whom I corresponded
with. He was not quite ready to begin building at that
time, but I sure was. This boat was everything the Martha Jane
was but somehow she was 600 lbs lighter. The layout of the two
is very similar, the main difference being Caprice's multichine hull
(The MJ is a flat bottomed sharpie). I got the plans right
away, and began to study them.
Building the
hull
My philosophy of boat building is based on two
assumptions: 1) You will never get much when you sell a homemade
boat, even if you use the most expensive materials. 2) the fun you have
with a boat is inversely proportional to
the concern you have for its appearance. This leads me to
believe in building quick and dirty boats. I have heard it
described as building to workboat finish. Whatever you call
it, I use inexpensive materials but not junk. I buy Douglas
Fir plywood for its strength, light weight, and rot
resistance. We can't really get fir lumber around here, so I
use Southern Yellow pine where strength is needed, and Western Red
Cedar where I want less weight. I never use
"whitewood" or any soft hardwoods like Poplar, or Birch.
This would be my first stitch and glue boat, but with five
other boats under my belt, I wasn't too concerned. She goes
together "instant" fashion: no strongback is
used.
 The first job was to build the bulkheads. These are
plywood with some framing pieces around the edges where they will
attach to the skin. The bulkhead that the mast tabernacle
attaches to has framing pieces cut from 2"X 8"
material. The first job was to build the bulkheads. These are
plywood with some framing pieces around the edges where they will
attach to the skin. The bulkhead that the mast tabernacle
attaches to has framing pieces cut from 2"X 8"
material.
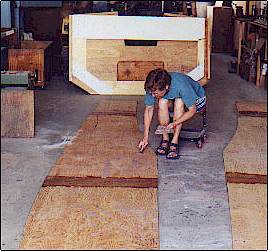
Next the sides are built by joining four 1/4" ply pieces
together edge to edge. I used the Payson tape method but with
epoxy: Two layers of glass tape in resin over the joint. I did
some joints both sides at once, and some one side at a time. I
discovered that the most important thing is to have a level, flat
surface under the joint.
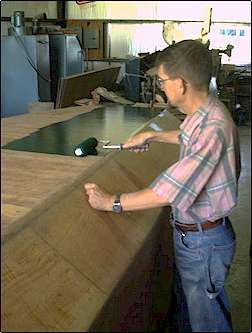
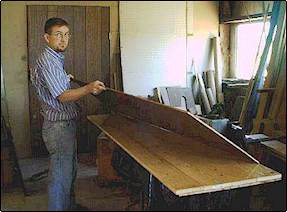
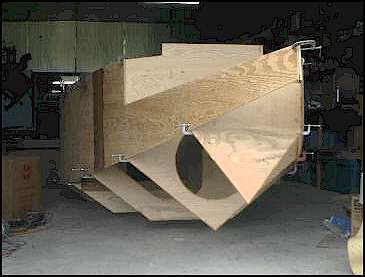 The boat goes 3D when the sides are screwed and glued to the
bulkheads. I did a dry run with the whole thing right side up
just to get a feel for the size of the boat (see picture on right). This also gave me
screw holes to follow when I got the glue ready. The hull was assembled
upside down using thickened epoxy in the joints, and square drive SS
screws from www.mcfeelys.com
. The centerlines of the bulkheads are marked, and kept
straight by way of a stretched string. The boat goes 3D when the sides are screwed and glued to the
bulkheads. I did a dry run with the whole thing right side up
just to get a feel for the size of the boat (see picture on right). This also gave me
screw holes to follow when I got the glue ready. The hull was assembled
upside down using thickened epoxy in the joints, and square drive SS
screws from www.mcfeelys.com
. The centerlines of the bulkheads are marked, and kept
straight by way of a stretched string.
For gluing, I use fumed silica (which made my wife
extremely nervous as she worried about the dangers of inhaling
silica) from www.raka.com
mixed with resin to the consistency of Vaseline. It is best to
precoat the surfaces to be joined with liquid epoxy, and let it get
tacky before gluing. When some of the thickened resin squishes
out of the joint, you can make a little fillet
there.
The bottom is two layers of 1/2" ply with the joints overlapping.
The pieces are first precut according to Jim's excellent
instructions. I predrilled the second layer with 3/16"
holes on 6" centers to accept temporary drywall clamping
screws. It helps to use screws long enough to go through the
two layers, and to spray the screws with WD-40 to make them easy to
remove. 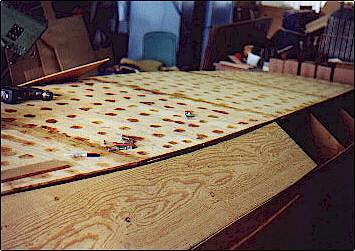 I applied the first layer of ply across the bottom
with glue and screws at the bulkheads, and temporary butt blocks underneath the
joints. Then, when I had a block of free time, I used a roller to coat
the bottom and the second layer of 1/2" ply with epoxy, putting the
screws in as I went, to glue the whole bottom lamination up at once. I put the clamping screws in, in the direction that I am
putting the ply pieces down, so that the excess resin was squeezed
onto the next area to be laminated. Later I removed the drywall screws,
filled the holes (see picture on left), and removed the temporary
butt blocks. That was time consuming, but I don't know of a
better way to do a good job of it. I applied the first layer of ply across the bottom
with glue and screws at the bulkheads, and temporary butt blocks underneath the
joints. Then, when I had a block of free time, I used a roller to coat
the bottom and the second layer of 1/2" ply with epoxy, putting the
screws in as I went, to glue the whole bottom lamination up at once. I put the clamping screws in, in the direction that I am
putting the ply pieces down, so that the excess resin was squeezed
onto the next area to be laminated. Later I removed the drywall screws,
filled the holes (see picture on left), and removed the temporary
butt blocks. That was time consuming, but I don't know of a
better way to do a good job of it.
The next step is to cut out the bilge panels and wire them
between the bottom and the sides. I put scraps up to the
gap, put a couple of screws in to hold them in place, then crawled
under the boat, and marked where they needed to be cut to more or
less fill the space. This is not a critical fit, as the
filleting and taping covers gaps (in my case) of over a half
inch. Once the bilge panels were "stitched" in
place, I returned to the underside of the hull, and duct taped all
along the seams. 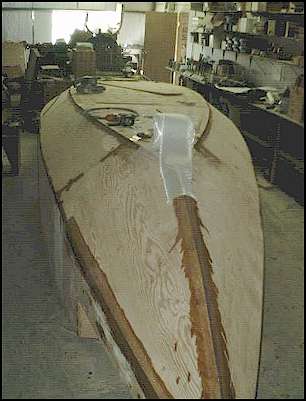 I used epoxy from www.raka.com
mixed with wood flour to fill the seams, after brushing liquid resin
on to prime them. There are different ways of handling the tie
wires (I used baling wire), but I just puttied up to about an inch
from them, removed the wires when the epoxy was set, and finished
filling those little gaps. The belt sander (fifty grit) did a
quick job of smoothing out the lumps in my seams.
I used epoxy from www.raka.com
mixed with wood flour to fill the seams, after brushing liquid resin
on to prime them. There are different ways of handling the tie
wires (I used baling wire), but I just puttied up to about an inch
from them, removed the wires when the epoxy was set, and finished
filling those little gaps. The belt sander (fifty grit) did a
quick job of smoothing out the lumps in my seams.
For taping the external seams, I use 12oz. biaxial tape (again
from RAKA) first a three inch
layer, then, a six inch one. After everything cured, I used a
random orbital sander to feather the edges of the tape. This part went very fast, and soon
I was ready to cover the whole hull with 2.5oz cloth. This
may seem a little light, but it was mostly to prevent checking of
the fir ply. I have found that the bottoms of boats where we
cruise don't get much damage from the abundant sand and few rocks. It was difficult
(next to impossible) to get all the wrinkles out of the
light fabric, but heavier stuff would have eaten a lot of epoxy.
 I
have agonized a lot over paint. Considering my above mentioned
philosophy about building cheap boats, I was not going to use one of
those $50 a quart wonder paints. On the other hand, we put
some Wal-Mart house paint on the topsides of the Tennessee, and it
came off in sheets after a day in the water. On that same
boat, we used some latex floor enamel for the bottom, and it did
great. Still, I thought that an oil based floor paint would be
really good. I got a nice green brand name enamel from McCoys.
It sold me with two magic words on the label: boats, and
polyurethane. Was this the high dollar stuff for twenty bucks a
gallon? Who knows. Now that it is cured, it seems pretty tough, but I had
my reservations for a while. We painted the hull on a typical
West Texas summer day - temperature near a hundred, and humidity
near zero. I thought it was perfect for drying paint.
The next day I
came back expecting to find the paint somewhat dry, but no, it was
perfectly wet. By the third day (with big fans running and all
doors open) I called the company. The tech guy said that this
was typical for paint over epoxy, and sure enough it did dry in
about a week. The second coat dried overnight. Go
figure. I
have agonized a lot over paint. Considering my above mentioned
philosophy about building cheap boats, I was not going to use one of
those $50 a quart wonder paints. On the other hand, we put
some Wal-Mart house paint on the topsides of the Tennessee, and it
came off in sheets after a day in the water. On that same
boat, we used some latex floor enamel for the bottom, and it did
great. Still, I thought that an oil based floor paint would be
really good. I got a nice green brand name enamel from McCoys.
It sold me with two magic words on the label: boats, and
polyurethane. Was this the high dollar stuff for twenty bucks a
gallon? Who knows. Now that it is cured, it seems pretty tough, but I had
my reservations for a while. We painted the hull on a typical
West Texas summer day - temperature near a hundred, and humidity
near zero. I thought it was perfect for drying paint.
The next day I
came back expecting to find the paint somewhat dry, but no, it was
perfectly wet. By the third day (with big fans running and all
doors open) I called the company. The tech guy said that this
was typical for paint over epoxy, and sure enough it did dry in
about a week. The second coat dried overnight. Go
figure.
The turn-over went well with nothing broken. I called a
bunch of friends, and we just picked it up, and turned it in
place. Wow! There was a boat under there. Now
we're getting somewhere. First though, we had a little more
work to do. After pulling out all the duct tape, I got ready
for glass taping the inside of the seams. Jim Michalak instructed me
in this process, and his method made it truly a breeze. The
first thing to do is to pick an area that you can do all at
once. After grinding off any protruding epoxy warts, prime the
joint with liquid epoxy. When that coat is tacky, use a wood flour
mix the consistency of peanut butter to make the fillet. I use
a metal paddle about an inch wide and rounded on the end. What
makes Jim's method easy is this: Apply the tape while the
fillet is still soft. In fact, apply both layers at the same
time. You may have to go back over the joint while it is
curing with some additional liquid, as it tends to run down and out
of the weave of the tape. When everything sets up, you only to
have to sand it once, and you are done. I need to give Sandra
special credit here of mixing epoxy and cutting tape all through
this process, thus saving me having to climb in and out of the
boat. In fact, she was a big help throughout the whole
process.
Leeboard
 About this time, I put the big lee board together. I
was a little dubious about building it out of all ply, as per the
plans, since I had
been aboard one boat (Scram Pram) when the board failed, and had
heard a report of one on a June Bug. What I decided to do,
instead, was to lay a board core, and use ply on the outsides, then
cover the whole thing with a layer of glass. It was pointed
out the I should have used the boards on the surface where the
compression and tension strength was needed, and ply in the
center. This would have made the whole thing too thick unless I had
planed the boards down. About this time, I put the big lee board together. I
was a little dubious about building it out of all ply, as per the
plans, since I had
been aboard one boat (Scram Pram) when the board failed, and had
heard a report of one on a June Bug. What I decided to do,
instead, was to lay a board core, and use ply on the outsides, then
cover the whole thing with a layer of glass. It was pointed
out the I should have used the boards on the surface where the
compression and tension strength was needed, and ply in the
center. This would have made the whole thing too thick unless I had
planed the boards down.
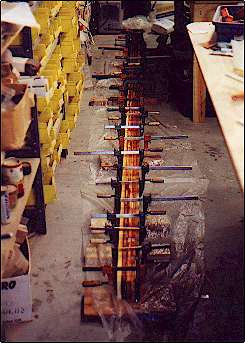
Phil Bolger once suggested using two courses of boards glued
together where the first course used several boards edge to edge (as
in the picture above). The second course would begin with one
of the boards ripped diagonally from corner to corner. The two
resulting triangles would be positioned at the edges of the
previously assembly, and the remaining boards placed between so that
all the joints are overlapping.
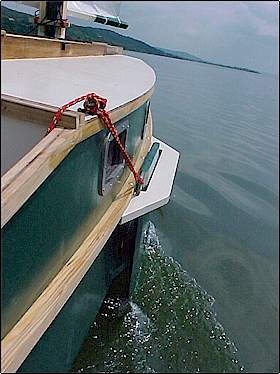
Ballast Tanks
 The
ballast tanks were easy to do. I basically framed them up,
taped the seams, and
epoxied the inside of two of them. I glassed the other two.
The covers I made out of ply and gave the same treatment. The
purpose of using two different techniques was to use the boat as an experiment. I
had observed that plywood that is not exposed to sunlight would not
check, but would remain sealed with epoxy alone. On upper
decks, however, Doug Fir ply will open right up no matter how much
epoxy is on it, even if resanded and re epoxied after a couple of
years of exposure. A thin layer of glass or other fabric will
stop this nonsense. That means that the tanks should be Ok
with epoxy only, right? I was not convinced, thus the
experiment. The
ballast tanks were easy to do. I basically framed them up,
taped the seams, and
epoxied the inside of two of them. I glassed the other two.
The covers I made out of ply and gave the same treatment. The
purpose of using two different techniques was to use the boat as an experiment. I
had observed that plywood that is not exposed to sunlight would not
check, but would remain sealed with epoxy alone. On upper
decks, however, Doug Fir ply will open right up no matter how much
epoxy is on it, even if resanded and re epoxied after a couple of
years of exposure. A thin layer of glass or other fabric will
stop this nonsense. That means that the tanks should be Ok
with epoxy only, right? I was not convinced, thus the
experiment.
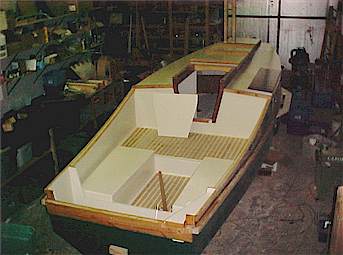
I put the tank tops down with silicone and lots of SS
screws. There is a Beckson type port in each (see picture
above), and a regular 1" transom plug in the bottom under each
side. the adjoining tanks are connected with openings so that
one opening will flood both tanks. A Rule 1000 GPH bilge pump
is located on each side to empty the tanks before retrieving, or for
motoring. So the filling process is as follows:
Open the observation ports P&S; Remove the plugs; Wait for the
tanks to fill; Replace the plugs; Replace the inspection port
covers.
Spars
 I
could not find any Fir or Spruce for a decent price, so I decided to
use Western Red Cedar which is abundant and cheap in our area.
This is a light wood similar to redwood with little strength, so I
figured I needed to cover it with glass. I found some
unidirectional 9 oz. material, and used two layers on each
spar. I
could not find any Fir or Spruce for a decent price, so I decided to
use Western Red Cedar which is abundant and cheap in our area.
This is a light wood similar to redwood with little strength, so I
figured I needed to cover it with glass. I found some
unidirectional 9 oz. material, and used two layers on each
spar.
There are six sticks on the boat: main & mizzen masts,
yardarm, main boom, sprit boom, and boomkin. I only used Red
Cedar for the first four. For the sprit boom, I had my eye on
regular Southern Yellow Pine closet pole material. This stuff
is clear, strong, and comes in 8 foot lengths. I made the
boomkin out of a 2 X 4 of the same material. SYP is heavy but
strong and cheap, and I figured that since it was located low in the
boat, there would not be too much of a penalty.
I could have used the birdsmouth method, and would like to do
that sometime, but for this project, I elected to scarf and laminate
solid blanks to make the spars out of. I used epoxy to glue
everything up, then bandsawed the taper, and used my belt sander to
smooth them up. Then the glass was added. So far they
seem to be holding up.
Finishing Up
 One
thing we did that turned out to be of uncertain value was to paint
the interior of the cabin before adding the the top. I say
uncertain because by the time we had the top on, the painted
surfaces were pretty shopworn, and required repainting anyway.
the rest of the finishing was pretty routine. We did so one
thing in the cockpit that I thought worked out pretty well. We
wanted some kind of nonskid surface that would not require too much
maintenance and would be cheap and good looking. We hit on the
idea of cutting the scraps of Cedar into strips about 3/8th by 1.5
inches and gluing them to the surfaces of the bridge deck and
footwell. First we cut out the plywood pieces for those areas,
then we arranged and glued the strips down. When the epoxy had
set, we painted between the strips, and glued the assemblies into
the boat. I thought it made a nice job. One
thing we did that turned out to be of uncertain value was to paint
the interior of the cabin before adding the the top. I say
uncertain because by the time we had the top on, the painted
surfaces were pretty shopworn, and required repainting anyway.
the rest of the finishing was pretty routine. We did so one
thing in the cockpit that I thought worked out pretty well. We
wanted some kind of nonskid surface that would not require too much
maintenance and would be cheap and good looking. We hit on the
idea of cutting the scraps of Cedar into strips about 3/8th by 1.5
inches and gluing them to the surfaces of the bridge deck and
footwell. First we cut out the plywood pieces for those areas,
then we arranged and glued the strips down. When the epoxy had
set, we painted between the strips, and glued the assemblies into
the boat. I thought it made a nice job.
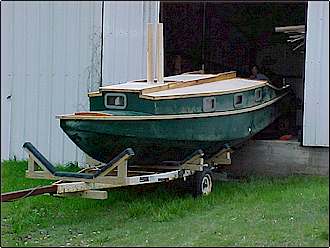 I
got a good deal on a used trailer, so I went with that even though
it took a little modification. I had to extend the tongue
eight feet. Then I built a couple of bunks out of treated pine
4 X 4s. At first I covered the bunks with regular carpet
scraps, but the boat did not want to slide on and off these very
well, so I substituted strips of polyethylene "Astroturf"
welcome mats from Walmart, and they work much better. I
got a good deal on a used trailer, so I went with that even though
it took a little modification. I had to extend the tongue
eight feet. Then I built a couple of bunks out of treated pine
4 X 4s. At first I covered the bunks with regular carpet
scraps, but the boat did not want to slide on and off these very
well, so I substituted strips of polyethylene "Astroturf"
welcome mats from Walmart, and they work much better.
Sandra and I got the boat onto the trailer all by
ourselves. We used 1" dowels for rollers, and she slid
right onto her berth. It did help that it was down hill most
of the way.
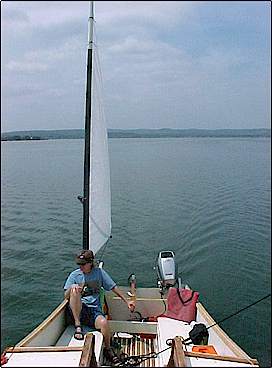
In a later article, Sandra will tell about making the sails,
and soon we will have some cruises to report on.

|
