| The process was not really bad, but looking back on how I did, I would do some things differently. I might have gone with the wider transom (which came with the plans) vs. the true dory transom. I would have considered using less epoxy on the bottom possibly to reduce the weight (130#), which ruled out car-topping, and forced the issue of trailering. I took it over to the local grain mill during their off-peak time to have it weighed on the scale.
 I used the recommended 3/8"for the bottom and garboard planks, with 1/4" for the following strakes. I first lofted the lines to the ply and then using a jig saw cut these out of the 4' x 8' sheet(s). Then I clamped them together to rasp them down even with one another, I used a surform plane to do this. Once they were all true to one another I then oriented them with the correct face to be outside vs. inside and laid them out on the garage floor, on plastic. I took some strapping and with some short screws set the ply into the strapping approx. 4 inches from the butt seam. I then made up some epoxy (MAS) without the filler and wet the seams and laid in some fiberglass tape cut in alternating layers of 8" strips to go between the strapping and then another layer of strips the width of the ply strake so they alternated the direction. I rolled these flat and had foot long clamps holding the strapping and butt joint together the entire time. Once these cured, I then carefully removed the clamps and flipped the strakes, supporting the joint. I then repeated the layering of the fiberglass on the reverse side. This established the full length of the strake I needed for the boat. I did use a butt cheek block on the garboard and bottom plank, as I was uncertain of the joint maintaining with just fiberglass. I also used some filler to make it more goopy when gluing up the garboard and bottom with the cheek blocks. I used the recommended 3/8"for the bottom and garboard planks, with 1/4" for the following strakes. I first lofted the lines to the ply and then using a jig saw cut these out of the 4' x 8' sheet(s). Then I clamped them together to rasp them down even with one another, I used a surform plane to do this. Once they were all true to one another I then oriented them with the correct face to be outside vs. inside and laid them out on the garage floor, on plastic. I took some strapping and with some short screws set the ply into the strapping approx. 4 inches from the butt seam. I then made up some epoxy (MAS) without the filler and wet the seams and laid in some fiberglass tape cut in alternating layers of 8" strips to go between the strapping and then another layer of strips the width of the ply strake so they alternated the direction. I rolled these flat and had foot long clamps holding the strapping and butt joint together the entire time. Once these cured, I then carefully removed the clamps and flipped the strakes, supporting the joint. I then repeated the layering of the fiberglass on the reverse side. This established the full length of the strake I needed for the boat. I did use a butt cheek block on the garboard and bottom plank, as I was uncertain of the joint maintaining with just fiberglass. I also used some filler to make it more goopy when gluing up the garboard and bottom with the cheek blocks.
I let these cure a good week and then set to cleaning them up and establishing their fit with one another as pairs (starboard and port). Using four sawhorses, I then set the bottom plank on the sawhorses and laid one of the garboard planks next to it's contour to determine the spacing and placement of the holes for stitching. For the stitching I used plastic electrical ties, and found that some would not take the torque and tension placed on them, snapping as a result. So on some holes I had to double up the ties to make sure it held until epoxied. Take your time on this and make sure you have good positioning on the stem and garboard plank to the bottom. This will determine what is built up beyond this point. I found that to get the bottom plank to have some camber in it I had to weight it down a little to get it to have some rocker. I used a seventy pound bag of play sand, and moved the two center sawhorses out to get more rocker out of it before stitching it up tighter.
I also at this point made a stretcher out of 1" x 2" pine to space the garboard to the correct width, and then began to add more strakes overlapping each one 1/4", rather than butting them together. Once the garboard plank was stitched from stem to stern, and I stitched the stem last, first stitching the sides of the bottom edge of the garboard to the bottom plank, then I brought the stem together. I was able to get all the strakes on in one day stitched and braced with more stretchers to get the beam correct and have the stem line up straight.
 I then, with the wife's help, flipped the boat briefly onto the sawhorses, resting them on the stretchers. I then duct taped the seams on the outside. At this point I did not have the transom in place. The aft end of the strakes were merely tied together with some twine at the approximate distance. So after a reflip, I then began to take accurate measurements for the transom from the plans, and laid them out on some Ext. grade 5/16" ply (seats too) and then made sure (I thought) of the dimensions fitting the lines of the strakes. Upon cutting it out and setting it in the end; stitching it in place, I found that I was gapping more than I wanted,...so back to the drawing board with a template this time, before I removed the other. This time it fit nice and tight without any gap near the bottom. I stitched and taped the outside seam with duct tape and mixed up my first of many batches of epoxy (slow) with wood flour filler to peanut butter consistency and began to lay it in the seams. I used some plastic spoons that came with soup at a oriental food place. They were more round and left a nice bevel on the inside seams. Next without much delay, I went to mixing up batches of non-filled epoxy (slow) to wet out the seams and then laid some lengths of fiberglass tape over the seams rolling them out. This took a while on the interior. I then, with the wife's help, flipped the boat briefly onto the sawhorses, resting them on the stretchers. I then duct taped the seams on the outside. At this point I did not have the transom in place. The aft end of the strakes were merely tied together with some twine at the approximate distance. So after a reflip, I then began to take accurate measurements for the transom from the plans, and laid them out on some Ext. grade 5/16" ply (seats too) and then made sure (I thought) of the dimensions fitting the lines of the strakes. Upon cutting it out and setting it in the end; stitching it in place, I found that I was gapping more than I wanted,...so back to the drawing board with a template this time, before I removed the other. This time it fit nice and tight without any gap near the bottom. I stitched and taped the outside seam with duct tape and mixed up my first of many batches of epoxy (slow) with wood flour filler to peanut butter consistency and began to lay it in the seams. I used some plastic spoons that came with soup at a oriental food place. They were more round and left a nice bevel on the inside seams. Next without much delay, I went to mixing up batches of non-filled epoxy (slow) to wet out the seams and then laid some lengths of fiberglass tape over the seams rolling them out. This took a while on the interior.
After the interior seams had cured I then began to measure out the seats and cut them taking the bevels of the interior hull to set the saw to then cut the seat at the right angle. The seats sought their placement for me and needed little coaxing except a rasp here or there. Once set in place I used a can of paint to help weight them down to prevent slippage and then began to set fillets in where they met the walls of the interior. At this point I became smitten with the idea of creating side bench seats between the aft seat and the mid-ship seat that would allow a place to park the cheeks when sailing. In retrospect I wonder if I will ever get off the bottom of the boat for fact of the tenderness of the craft (thus, my notion that I should have opted to go with the wider stern). I waited to let the seats cure, which didn't take long, with the 'fast' type of epoxy. CAREFUL, if you use 'fast' setting epoxy, it will build incredible exothermic heat and melt just about anything it is contained within.
Now with some help of the neighbor (wife wouldn't do it this time :[ ) I flipped the hull and set to mixing up 'slow' epoxy with filler and took care of the outside seams. I have to say this went much faster and with the other side filled, I didn't have the occasional goo slipping through the duct tape. Bear in mind I also had ground off the ties on the exterior surface and scraped the goo that had come through in places. At this time I also took advantage of the boat being upside down and went in under and epoxied the underside edges of the seats, and set fiberglass in place to reinforce the fillets. CAUTION: You will want to wear a mask of some kind to give yourself a margin of filter to the fumes of the epoxy as you do this. I found it very strong and 'heady' with the boat upside down catching the fumes and smell. Retrospect would suggest a fan set up to help circulate the air. I also then set fiberglass on the bottom seam clear around on the exterior; the transom seam(s); and the stem.
Now was the time to prepare the daggerboard box. I had been working it up as a unit, framing it out in my ash strips, and the sides were from 1/4" luan ply cut to the dimensions on the plans. Before assembly I had coated the inside surfaces with several coats of epoxy and polyurethane. I had to really psych myself up to do next step, which was cutting a slot in the bottom of a potentially good boat. I measured more than twice to be certain of the positioning of the would be slot, and drilled a hole at both ends and then using the jig saw cut shy of the line. I had purposely extended the upright end frames of the box (ash) to extend
throughout the bottom planking. I then went with the plan of using some of my bronze screws to fasten the daggerboard box to the boat. To do this I mounted the box in place by passing two rubber straps with 'S' hooks doubled down through the box. I pushed doubled ends down with a scrap piece and my son passed a screw driver through it to hold each one. This created good tension to hold it in place to drill pilot holes and through the bottom up in to the ash strips that framed the bottom of the box. I then buttered the bottom of the box, having disassembled the 'clamp system', with slow epoxy with filler (wood flour) and with my son's assistance re-assembled the 'clamp' of rubber straps and set the bronze screws. This was a wonderful creation. It worked better than I could have hoped. I then put into place the triangular pieces to help brace and support the daggerboard box, filleting these into place with thickened epoxy.
After some time I then set to cleaning off the bottom and sanded it several times with my orbital grinder and palm sander, all the way up the sides. I did this from stem to stern, and then with enough epoxy wet out the bottom with 'slow' and then with some biaxal weave (6 oz.) cloth laid a section measuring 38" x 12' over the bottom and rolled this out. At the stem, I cut it up to the bottom of the stem at the point of the bottom plank and overlapped the two flaps, and did similar to the back near the transom. This gave these areas extra coverage. It is after this that I took and made up about a pint of 'slow' mix and poured it over the bottom smoothing it out to the edges. This is one way in which I gave it a lot of weight unsuspecting, but was going for some protection.
I flipped it back over, now with the Father-in-Law, and started on the rub rails. I used some white ash I had left over from
a zealous attempt at making snowshoes. I had ten foot lengths that were 1/2" by 3/4". I had to scarf a joint on each side but with epoxy it was just a matter of clamps. In the end I had to redo the glue job as the first didn't take quite well, partly because I clamped so tight that I squeezed all the goo out first time out. I used goo and some bronze screws (1/2") that I landed off a guy here locally, that gave up on a small power racer years ago. I spaced the screws every 6 inches. Then on the inside edge I took several blocks of ash spaced apart and used some new stuff instead of epoxy - Gorilla Glue (polyurethane glue). WOW this stuff was incredible. I lubed up the edges I wanted to have against the inside edge and then
overlaid another long complete strip of ash over this to create the gaps for tie-offs etc. I had to settle for a butt joint with this as it required one ten foot section and then another to take it the full distance. Again I used Gorilla Glue and bronze screws (1") (to join them into place, through the inner strip, into the spacer blocks and the inwall, with pilot holes drilled first. In strategic places I had longer spacers (oarlocks) to permit me to install certain fasteners later.
I decided to go forward with the side bench seats. I first set into place the ash strip that would help support the seat, both aft and
amidships, and then measured meticulously for the dimensions of the extensions. I cut 3/8" ply in tandem to then sandwich with epoxy, and set it to cure. When the time came to put them into place, I was mixing epoxy and ran out of wood flour, so I freaked. It was a Sunday, I was wearing two days of garage stink and had little on other than a epoxy stained sweatshirt, tattered shorts, and tennies. I told the wife I was headed to Wal-Mart, and went straight to the health care isle. I had read that talc was a good filler with epoxy and could be substituted in place of other fillers due to it's properties as a mineral. The surface when cured would sand well, be smooth, and have good hardness. I grabbed four big bottles of the store brand of Baby Powder and headed for the checkout. I got there and set them down for the lady at the cash register to ring up. She gave me an uncertain look as she rang up the first, then as she grabbed the second container she looked more at me from head to toe, and as she reached for the third container,
I stated: "I'm chaffing really bad." Her eyes got huge for a second and she quickly scanned that container while reaching for the fourth and told me the cost ($8.47). It was all I could do to keep my composure and not break out laughing in her face. It could have only been better if I had suddenly needed to itch.
Upon my return to the garage I finished the side benches filleting top and underside of the bench seats as well as taping along the seams at the wall, and where it met each of the other seats perpendicular. In the use of the boat for sailing I will have to see if they are worth keeping. If not I will have to deconstruct them carefully, possibly taking them back to within an inch of the wall of the boat, so as to not risk breaching the hull.
I then began the arduous task of sanding the interior and then primed the interior with a good primer (2 coats) followed by your basic average basement/concrete floor paint (2 coats). Once dry, I flipped again (can't remember who helped me this time) and taped off the exterior with 2" wide mask; 2" below the rub rail; taped off the rub rails with newspaper; taped off the 1" stripe at around the water line and set to spraying the yellow. I had bought a 'boat load' of automotive spray enamel paint from a discount store here in the US called Odd Lots.
I installed Styrofoam blocking (procured from work that arrived in shipping packages). I used construction adhesive to put them in place on the undersides of all seats. My mast step went in some time ago and instead of having a strap to fasten it to the seat, I placed my bow seat a little back from the front of the boat, took the mast through the seat drilling a 2" hole
through the seat with a hole saw. The step is two layers of 5/16" ply laminated together and set in a bed of epoxy with fillets around the base. I also set some bronze screws up into it through the bottom of the boat before the layers of epoxy and fiberglass went on.
I found that the leveling of the hull with filler mixes of epoxy went well using the talcum powder. I used a consistency of what would have been similar to baby food and a smooth spatula. Of course I had sanded the area and vacuumed off before this.
 I am probably most proud of the tiller handle I manufactured. It was three layers of ash (again part of the would be snowshoes) that I cut to approximately 3 foot lengths and then using a mixed epoxy buttered the layers and sandwiched them together with a clamp at one end, then added pressure at the other end until it had a nice sweeping curve, and set more clamps to it along the length. Once it cured up I then routered a nice relief along the edge to within 6 inches of the aft end, and sanded it for quite a while. I then took the jig saw and made two cuts in the aft end going up toward the leading edge of it, on either side at specified places that would allow the thickness of the tiller. On the tiller I cut a small diameter slot to accept a rod. On the arm of the tiller I
chiseled an angle that matched the tiller angle. I then obtained a length of bar steel, that matched the height of the tiller arm. I then cut it and smoothed the trailing edge round. Two of these flanges were inserted up into the slits cut in the tiller arm, and I then drilled through the tiller and steel fastening it in two places. At the back end of the steel, I drilled a hole for a flat headed bolt that I put through the steel, with a bearing tube to cover the threads. This fits so perfectly in the slot on the tiller head and then the arm snugs down and over the tiller head. I have coated it with 5 layers of spar varnish and it is smooth and glass-like. I have set the gudgeons on the back of the transom, but still need to finish out the daggerboard, tiller and mast. I have ripped the wood for the mast out of 10 foot lengths of select Douglas Fir, and have opted for a solid mast vs. hollow since the benefits gained in it being hollow aren't going to be that dramatic. I have laminated the three layers of fir for the mast and will be doing the same for the sprit pole, which is made of three strips, two side to side, with one laid on top spanning the widths of the two. I will then shape both spars round by making the typical 45 degree cuts to reduce them down and round them up. I am probably most proud of the tiller handle I manufactured. It was three layers of ash (again part of the would be snowshoes) that I cut to approximately 3 foot lengths and then using a mixed epoxy buttered the layers and sandwiched them together with a clamp at one end, then added pressure at the other end until it had a nice sweeping curve, and set more clamps to it along the length. Once it cured up I then routered a nice relief along the edge to within 6 inches of the aft end, and sanded it for quite a while. I then took the jig saw and made two cuts in the aft end going up toward the leading edge of it, on either side at specified places that would allow the thickness of the tiller. On the tiller I cut a small diameter slot to accept a rod. On the arm of the tiller I
chiseled an angle that matched the tiller angle. I then obtained a length of bar steel, that matched the height of the tiller arm. I then cut it and smoothed the trailing edge round. Two of these flanges were inserted up into the slits cut in the tiller arm, and I then drilled through the tiller and steel fastening it in two places. At the back end of the steel, I drilled a hole for a flat headed bolt that I put through the steel, with a bearing tube to cover the threads. This fits so perfectly in the slot on the tiller head and then the arm snugs down and over the tiller head. I have coated it with 5 layers of spar varnish and it is smooth and glass-like. I have set the gudgeons on the back of the transom, but still need to finish out the daggerboard, tiller and mast. I have ripped the wood for the mast out of 10 foot lengths of select Douglas Fir, and have opted for a solid mast vs. hollow since the benefits gained in it being hollow aren't going to be that dramatic. I have laminated the three layers of fir for the mast and will be doing the same for the sprit pole, which is made of three strips, two side to side, with one laid on top spanning the widths of the two. I will then shape both spars round by making the typical 45 degree cuts to reduce them down and round them up.
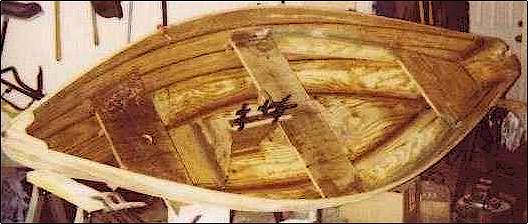
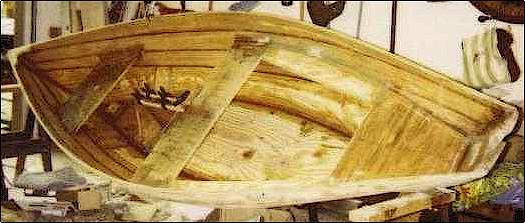
I have enclosed two pics of the boat as it is as of Oct. 2000. The other pics are of it close to the stage when I did lots of sanding and fairing of the hull. I plan to add some rub strips to the bottom ( the last of my ash strips - I had hoped to make three pairs of snowshoes, one for me and two other pairs for two old camping friends of mine). I added a second place for rowing from the bow seat as it is off balance when someone is in the
amidships at the oars, and another is in the stern. I will sail it with a sprit rig as described by Selway-Fisher.
I learned a lot in doing this and know what I'd do differently and what I would do the same. I have obtained a trailer and am attempting to get it set to haul the boat after adapting it and have put together a pulley system in my garage to hang the boat for storage over my
Subaru wagon. I will adapt it further, as I originally designed it to aid in lowering the boat onto the top of the car. My adaptations to the storage system will instead allow me to store the boat upright vs. upside down so that when I lower it down, it won't need to be flipped to set on the trailer. I can just set it down on the trailer and fasten it down to go. When I return I can roll it in the garage on the trailer, fasten the straps and raise it up again. I plan to take a picture of the system so I can share it with others.
Stephen Jenkins, Lima, OH
|
