Spars
By spars I refer to the mast, boom and gaff. If
expense is not to be considered, then proprietary aluminium
alloy spars are available, but apart from the fearful price
of the things I do not think I am alone in finding parallel
tubes of metal offensive to the eye. There is also the problem
of attaching bits and bobs to them, and the noise of tapping
lines also offends. For economy I recommend the use of solid
round wood spars. I have heard of a method of making T-section
masts out of two planks, and of tripod masts of small diameter
metal tubing, but I feel that masts should look like masts,
and not resemble demented Meccano sets, or builders’ planks.
I forget where the quote comes from, but one Yachting Classic
records that “Straight is the line of duty, curved is
the line of Beauty.” This keeps me with round bilge boats
instead of hard chine.
Due to an unfortunate accident when a 2500-ton
ship broke away and ran amok amongst the Club moorings, I had
to replace all three main spars on my boat. My enquiries round
the local Lancashire woodyards brought forth the intelligence
that Sitka spruce was unobtainable in England and that some
other wood should be considered. As Sitka spruce is considered
to be the ideal, I looked into the question of direct supply.
I went north to Grisedale, in the Lake District, and asked the
head Forester there, at the Forestry Commission, if he had any.
He replied that he had two or three hundred acres of the stuff.
I told him my purpose and he invited me to choose my trees.
In the following week he had them felled, and I collected them
a few days later. I stored the wood horizontally, resting on
ladders, for as long as I could. This period was about ten months,
but ideally should have been two years. During this time the
bark was left on. I de-barked one piece for the gaff, using
a drawknife, planed it square, and found that it twisted, but
did not have any shakes. Shakes are longitudinal shallow splits,
and are not harmful, apart from the danger of fresh water lodging
in them and assisting rot. When shakes occur I guard against
rot by swabbing them with Cuprinol. It is vital that shakes
are not filled with hard stopper, as this causes them to extend
in length and width. If the wood splits other than along the
grain, then that does mean trouble and the piece should be discarded.
When seasoning is complete, or as long as circumstances
permit, then spar making can be undertaken. This is one of the
most rewarding jobs in boat maintenance. The bark is removed
using a drawknife. This is the proper tool for the job, and
although new ones are obtainable, a second (or tenth) hand one
may be found in an old joiner’s shop. Breaking off work
at regular intervals, and giving the edge a few strokes with
a scythe stone, to keep it keen, facilitates the use of a drawknife.
The hallmark of the old time professional woodworker was the
frequent break to resharpen edge tools.
When all the bark has been removed, the next step
is to clean off any knot stubs. I tried to use an adze, but
am not expert enough, so resorted to a large chisel and mallet.
When the knots and stubs have been cleaned off, and the piece
is reasonably straight, it is laid along a plank, or a ladder
will do, and planed as flat as possible on one side. If a friendly
neighbourhood joiner allows you to use his planing machine,
the task is much eased. Having planed one side, the piece is
turned over on to the flat side, and the opposite side is planed
off. This work is then repeated on the other two sides until
you have a square section. It appears odd that you have first
to square off a round tree, and afterwards round it off again,
but as one old joiner told me “You have to make it square,
to make it round again.” Once the piece is square it is
time to apply whatever taper is desired.
Most masts taper from the gooseneck down to the
step, and also up, with ideally a more pronounced taper above
the point where the gaff jaws bear, up to the masthead. Gaffs
and gunter yards are generally thicker in the middle and taper
towards each end, whilst booms are usually parallel in section.
After the spar has been squared off, and the desired taper applied,
then the next stage is to bring the spar back to round. This
is done with the use of a jig.
The spar-maker’s jig is simple to make.
Take a piece of wood 14x1x1/2ins, and measure out a full 12
inches along it, leaving one inch at each end. At the 3 1/2ins
and the 8 1/2ins points drill two holes to take two pencils.
At each end of the marked twelve inches drive a 2” nail
right home, with the points protruding. The pencils should have
stubby blunt tips, and not protrude too far, or more time will
be spent on sharpening than using them. The jig is placed on
one of the planed and tapered faces, twisted until the two nails
touch each side, then drawn along the spar from end to end.
This leaves two pencil marks, and the operation is repeated
on all four sides. The corners are then planed off down to the
pencil marks, leaving the spar with eight sides, and still tapered.
It is then a simple task to plane off the eight corners to leave
a sixteen-sided spar, then again to make 32 sides. The final
rounding is done with coarse sandpaper, or a hollow bottomed
plane if you possess one. Professional time-served joiners express
amazement at the finished article, finding it hard to believe
that an amateur with hand tools can achieve such a result.
After the woodwork is completed comes the job
of applying the necessary fitments. On a mast these comprise
the step, the gooseneck and the masthead fitting. I spent a
little time thinking about the latter, eventually arriving at
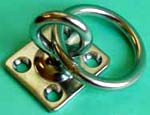
the following. A ring is the basis, laid on tightly and preferably
against a bit of a shoulder, to prevent pulling down. Then I
needed eyes for the stays etc. I had my masthead fitting capped
with a solid plate to protect the end grain of the wood. Eyes
for the forestay and shrouds could have been butt-welded, but
as there was a plate capping I was able to extend the welds
on to the top, for a stronger job. The peak halliard is generally
shackled to the after side of the masthead, but this does not
give a fair lead when the mainsail is squared off. In practice,
when on a dead run, with the boom hard against the shroud, the
yard is well forward of the boom, due to the unavoidable twist
in the sail. I therefore made the after eyelet in the form of
a large hoop in a horizontal plane, to give a fairer lead to
the peak halliard. I had mine made from stainless steel but
mild steel would be just as good, if it were galvanised after
all operations were completed.
One countersunk hole is made for a single fixing
screw, through the side of the ring, and even that is not vital,
as the downward pull of the stays holds it firmly on. It does
need careful fitting to the mast however, and before finally
whacking it on with a hammer, it is a good idea to give the
top of the mast a good swabbing with water-repellent wood preserver.
This, in addition to the metal capping should prevent any possibility
of water getting into the endgrain with the subsequent risk
of rot. To avoid too big a cluster of shackles at the masthead,
I used small cheek blocks for the twin topping lifts. On the
market there are some small cheek blocks used by racing dinghies
for spinnaker sheets, and these are ideal. In practice, though,
loose blocks with shackles do seem to give a much better lead
to the topping lifts.
On my original mast supplied by the builder of
my boat, there was a sheave mortised into the mast, near the
top, which I used for the throat halliard. The sheave was made
from solid bronze and weighed the best part of half a pound.
This weight at the masthead offended me, so on the new mast
I used a nylon sheave weighing only an ounce or two. This was
turned up from a nylon castor sold for fitting to workshop machinery
and was obtained from my local ex-government shop.
One more innovation was to put a wrapping of glassfibre
around the mast where the gaff jaws rub. This extended for about
three feet, and the appearance is very similar to that of varnish.
Varnish quickly rubs away where the jaws bear, but the glassfibre
lasts a lot longer.
Fittings for gunter yards or gaffs are very simple.
The jaws are the main difficulty. Metal ones are hard to find,
but if they can be obtained they need a lining of leather, which
is then given a good lathering of tallow. Tallow can be hard
to get, too, but very often can be had from plumbers who used
to use it for wiping joints in lead pipes. If metal gaff jaws
cannot be found then wooden ones can be made up, preferably
from ash, which should also be leather lined. I have also recently
found that elbow crutches have a suitable plastic piece (which
clips around the arm) and would be strong enough for the task,
if such a thing could be found.
Gaff jaws require some means of holding close
to the mast, and the answer is to use a short line with parrel
beads. Ideally these are made from wood, and can be difficult
to find. One source is to cannibalise one of those beaded seat
covers often used by taxi-drivers. The things can often be seen
on car boot (garage) sales, at minimal cost. I put mine into
a jam jar with some linseed oil, and gave them a shake every
time I passed, until I was ready to use them.
Next Month: Auxiliary Power