|
Bufflehead - Part 2 Hull Construction
design by Gary Lepak
Part 1 - Part 2 - Part 3 - Part 4
One reason I decided against building the 24' proa was my lack of a good building area. I plan to eventually build a 24' or longer boat shed in the back yard, but if I did that this winter, 2004/5, the boat wouldn't be done by next summer. I have a 20' long concrete slab next to my garage though. So I decided to do the quicker build monohull and put up a temporary shed roof off of my garage over the concrete to make a 10' x 24' carport. I used all the old pieces of crappy plywood and 2x's that I saved for a rainy day, and a couple used tarps left over from a roofing job. It's good I save all this junk as it came in handy. I only spent about $20 in new materials for the roof. The strongback is visible in the picture.
I started this in December. This was the only snow we had all winter.
(click images to enlarge)
|
 |
|
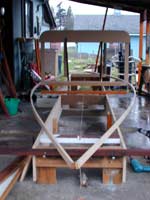
I built the strongback out of 3/4" particle board with 2x2 crosspieces and 2x6 vertical supports bolted to the concrete in a few places with angle brackets. Then I made the first frame from the same particle board, with a 6" radius on the chines. The 1x2 hemlock stringers are made with two scarfs, as I saved money by buying shorts that were on sale at my local lumberyard, less than half the cost of the same wood in long lengths. I figured once I was set for scarfing it would be easy to do twice as many. Since I had to make 20' pieces out of three 7' pieces, I could only make 6" scarfs, so backed them up with 1/8" ply butt blocks. Then I sprung one set of stringers around the main frame and eyeballed it for the shape I wanted. The aft half of the boat will be asked to carry a lot of the weight, the crew in the cockpit, and gear under the seats, so I wanted as much of the 5' beam aft of the middle as I could get for carrying the weight and also to have wide spread between the oarlocks. I stuck another frame, 3' wide, towards the stern about where the aft bulkhead would be and widened out the aft end as much as I could. Then another 5' frame forward of the first one, close to the aft side of the cabin. This gave me the shape I wanted over a couple days of juggling frames back and forth and eyeballing and thinking and pondering, and finally coming to the conclusion of, "What the hell, it's only a boat. Just do it!"
|
Two frames up looking aft: |
|
|
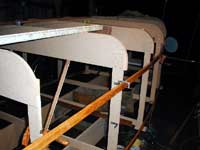
Then it was just a matter of measuring and building a frame to fill in every couple feet, then add two more stringers, and laminated stem pieces, until I ended up with this:
|
 |
|
|
The vertical sides of the frames are set back the right amount to allow the stringers to line up with the curved part of the frame that will support the cedar strips. |
|
|
I held the stringers to the frames with angle brackets so they could be easily removed later. Also the angle brackets allowed a little fine tuning when it came to aligning the ply with chine section of the frames.
|
 |
|
The stem pieces were made by laminating two layers of 1x4 together with the joint staggered. Then the stringers were glued to the stems, and the precut and precoated sheets of 6mm ply were glued and screwed on. I am using Okoume BS6566 ply, like 1088 but not quite as pretty and a little cheaper, $44 per sheet. From www.edensaw.com The resin is System Three with the fast hardener. I did a lot of this when our temps were upper 20's F, in the night and upper 30's to low 40's as the daytime high. I have a small area of garage that I used to precoat the plywood on both sides. I used buttblocks rather than scarfs on the plywood joints.
|
The plywood just overlaps the bottom section of the frame so as to align with the cedar strips. |
|
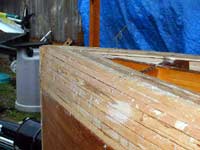
The next step is adding the cedar strips for the chine. I got a deal from a local tree man who has a big bandsaw in his yard. Most of the 1x5 cedar was a full inch or so in thickness, and it varied from 3/4" to 1 and 1/8th". I should have ripped all the strips to 3/4" wide but thought I would try to save a few strips by using one inch wide, but it made the bending more difficult as I got closer to the bottom. I ended up using all 3/4" strips for the last few where the bending is more severe.
|
This picture below shows the small partial frames I had to add between every pair of main frames to help hold the strips aligned in the proper curve. If I were doing it over I would use all 3/4" x 1/4" strips for easier bending.
|
 |
|
The strips were held in place on the frames with hexhead sheetmetal screws, and the edges held aligned with staples while the Titebond III glue cured. I didn't bevel the edges but filled the gaps with epoxy before glassing.
|
This is a pic of the stern where the shape comes to more of a point than the more rounded bow: |
|
|
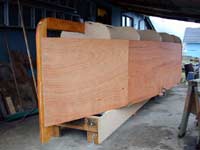
Stripping completed, the hull was now ready to have the ply bottom scribed and installed
|
 |
|
The plywood sheets for the bottom were just layed on top while I went underneath to scribe the joint with the strips. Then it was just edge glued with epoxy to the cedar strips. No buttblocks or scarfs were used in the plywood at this point as the two joints will be covered from inside when I thicken the the bottom with another layer of ply.
|
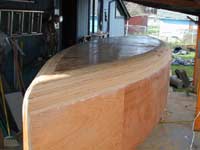
Precoated bottom pieces installed, strips have had staples and screws removed and have been sanded fair. Hey, it is starting to look something like a boat: |
|
Then came the job of resining and microballooning and sanding the strips. There were some uneven areas due to my using 1' wide strips that didn't want to go where I wanted them too, but all in all I am happy with it. As my neighbor from across the street who visits daily keeps reminding me, "You ain't buildin' a piano!"
|
As my neighbor from across the street who visits daily keeps reminding me, "You ain't buildin' a piano!"
|
 |
|
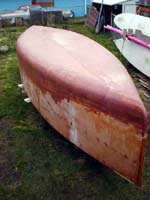
At this stage I decide to glass just the bottom and not the sides because of the vertical difficulty of the job. I will lay the boat on it's side for that after the framing is built in. Also I thought there might be some places I want to put screw through from the outside to hold things in place while epoxy cures. I used two layers of 6 oz cloth on the bottom, ending it a few inches past the cedar onto the ply.
I removed all but 5 of the mold frames and added a couple 2x2's across the gun'l to stiffen it for turning. All I really had at this point was a 1/4" hull skin with 3 1x2 stringers on each side, and I didn't want to hear any cracking noises when we rolled it over. There isn't enough headroom under the roof to turn it over easily, so I made dolly to span the strongback, jacked the hull up and put it on the dolly and rolled it out into the yard. The glass has a coat of unsanded microballoons on it, so when I get to finishing the outside it will be ready to sand. I could have rolled it myself with jacks and comealongs and blocking, but some friends wanted to help so I waited for them.
|
Glassed and microballooned, on the dolly: |
|
|
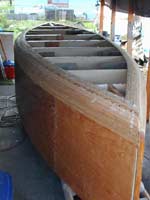
This was my first chance to stand back and above the hull to get a good look at the shape. I took some pictures from up on a stepladder.
|
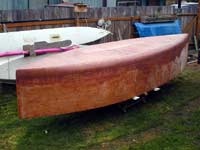 |
|
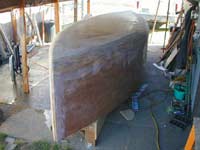
Four of us easily picked it up and turned it over so fast I did't get any pictures of the process. In two minutes it was back sitting on the strongback. Hey, wait a minute guys! Can we do that again? Oh well, I will be turning it over at least one more time to finish the bottom, and I can roll it out to work in the yard with the dolly if I want to, and turn it over slowly myself.
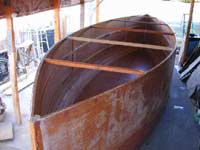
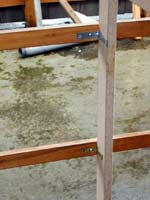
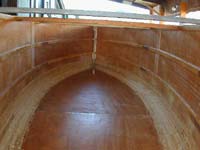
Looking forward we see the temporary thwarts that hold the shape since all the mold frames have been removed.
|
In this picture, looking forward, the first (aft) 2x2 is where the aft bulkhead will go and the third one is the aft side of the cabin, about 9' back from the bow. |
|
|
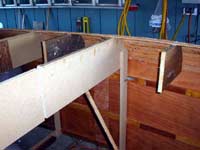
This picture, looking aft, shows the size of the hull, the cedar chines waiting to be glassed with 2 layers of 6 oz, The aft side of the cabin will be just forward of the visible bottom plywood joint, below the brown colored 2x2.
|
 |
|
Although the cedar strip chine added a couple weeks of work to the construction, I think it is worth it in this design. I used this method once before on a 30 trimaran hull and it was quite successful, a good way to get a rounded shape into sheet ply boat where it matters most. Now comes a lot of decision making and designing as I go.
Gary
|