|
|
| 
Bufflehead - Part-4 - Finishing Details
design by Gary Lepak
Part 1 - Part 2 - Part 3 - Part 4
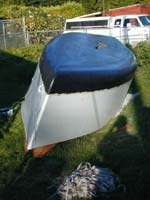
After painting the topsides with white waterbased porch and deck enamel, I rolled the hull over to make it easier to put on two coats of black bottom paint.
|
I considered just epoxying the bottom with graphite and maintaining it on the beach or the trailer, but the flat bottom shape would be difficult to get at to scrub, so I painted with two coats of Interlux Micron CSC, which should last a long time, as the boat will be on the trailer most of the year. |
|
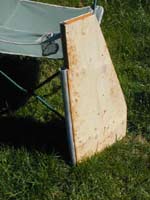
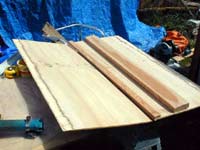
Two 1/4" ply halves of the daggerboard with the center piece and leading edge of fir. Note the bevelled insides of the trailing edges.
|
 |
|
|
This picture is of a dry run before the insides of the trailing edge were beveled. |
|
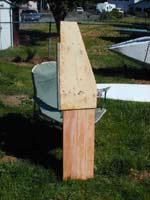
The two sides are glued together and clamped, making a pretty fair foil shape with very little effort. Another piece of wood is attached to the front and faired, the bottom covered with plywood with a small hole in each section to let water flood it, then the whole thing was glassed. The board is 17" x 42" x 2" thick. About 35" sticks out of the hull, giving a draft of about 40" board down. I thought of building a board like this made from prefabbed solid glass skins for more weight. Water would be trapped in it while sailing, to give more righting moment in a total knockdown. I also thought of adding a lead casting of 50 or so pounds to the bottom if the boat needs it.
| I wanted to leave the 6"x14" well open in case I want to try another type of pedal drive, or an electric or small outboard at some point, so the Mirage drive was fitted into a removeable box that fits into the well.
|
|
|
|
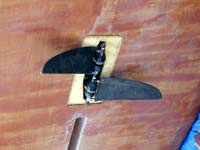
Rudder cheek assembly. The tube on the front is heavy pvc electrical conduit with grooves in it. It was then glassed onto the ply cheeks before the fir reinforcement pieces were added. |
|
|
Rudder cheeks with blade fitted. The 1 1/4" thick blade was made from some pieces of fir edge glued and dowelled, then hand shaped. |
 |
|
|
|
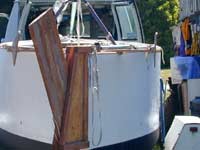
The finished rudder in kicked up position. It has pull-up and pull-down lines leading to the rudderhead and tiller to clam cleats. |
|
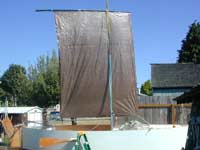
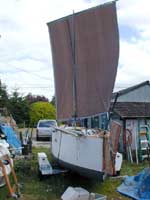
 I am experimenting with various rigs with this boat. I want an unstayed rig with short spars that will come down and stow quickly and be out of the way for living aboard and rowing. I have made a few prototypes from tarps, but this was the first rig I put together from old sails I had that I recut. It is a split lug sail with the jib attached to a forward extension of the boom as on the Aerorig and EZ rig. I couldn't get it to set at all and the fabric was so weak that I abandoned it, but it was an educational experience. The picture shows the mast partners made from an old North windsurfing boom, with the aluminum tubes reversed and cut to length to go down along the main bulkhead where they are held with U-bolts. The clamp rotates for lowering the mast. The oars are laying on the deck. I am experimenting with various rigs with this boat. I want an unstayed rig with short spars that will come down and stow quickly and be out of the way for living aboard and rowing. I have made a few prototypes from tarps, but this was the first rig I put together from old sails I had that I recut. It is a split lug sail with the jib attached to a forward extension of the boom as on the Aerorig and EZ rig. I couldn't get it to set at all and the fabric was so weak that I abandoned it, but it was an educational experience. The picture shows the mast partners made from an old North windsurfing boom, with the aluminum tubes reversed and cut to length to go down along the main bulkhead where they are held with U-bolts. The clamp rotates for lowering the mast. The oars are laying on the deck. |
|
|
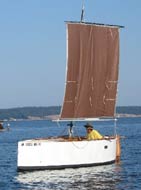
I then set up a dipping lug sail made from an unrecut 8'x10' heavy duty tarp. This picture shows the sail to windward of the mast, with the tack taken out to windward on the track. An oar sticks out of the oarport. |
|
|
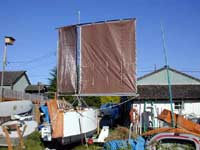
I later tried a larger, 9'x12' tarp, as a dipping lug sail. The tack is attached to a rope track so can be moved from side to side for better sheeting angles. |
 |
|
|
 The 80sf dipping lug can also be used as a balanced lug. I reinforced the edges and added reefing points with dacron webbing. All the spars of these rigs are pieces of old windsurfer masts except for the boom which is an aluminum tube from a salvage yard I found for $4. Tarp investment so far is about $32. The mast is made of three pieces of windsurfer masts sleeved together with epoxy. It is 16' long and weighs 7 lbs. The 80sf dipping lug can also be used as a balanced lug. I reinforced the edges and added reefing points with dacron webbing. All the spars of these rigs are pieces of old windsurfer masts except for the boom which is an aluminum tube from a salvage yard I found for $4. Tarp investment so far is about $32. The mast is made of three pieces of windsurfer masts sleeved together with epoxy. It is 16' long and weighs 7 lbs. |
|
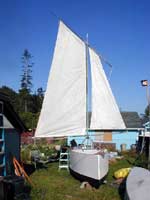
 Version 2 of the split lugsail made from the 80sf tarp, used here as the mainsail, and a 25sf jib cut from another tarp. The main is laced to the mast and the self-tacking jib is set on a club boom off the main boom. This rig set a lot better than the first split lug. (All my present boats are in this picture: on the fence to the left is a 17' blue foam paddle board/windsurfer, and below it a 16' ply rowboat. To the right are visible parts of the Stoaproa. I don't count the inflatable.) Not too bad a pile is it? Version 2 of the split lugsail made from the 80sf tarp, used here as the mainsail, and a 25sf jib cut from another tarp. The main is laced to the mast and the self-tacking jib is set on a club boom off the main boom. This rig set a lot better than the first split lug. (All my present boats are in this picture: on the fence to the left is a 17' blue foam paddle board/windsurfer, and below it a 16' ply rowboat. To the right are visible parts of the Stoaproa. I don't count the inflatable.) Not too bad a pile is it? |
|
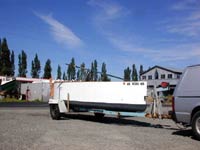 At the launching ramp in Port Townsend, Washington: The mast is in the lowered trailering position.
I am still (Sept. '05) experimenting with the various prototype rigs and trying to decide which one to focus on and to make from dacron. |
|
Gary Lepak
Port Angeles, WA, USA
|
|
|