|
Part 6: Bottom Planking and Hull Finishing
At the end of the last installment, the Lake Skiff had a floor to walk on, but not yet an actual bottom. Before the bottom planking could be applied, I needed to install the vertical component of the keelson, which would give the hull its moderate-deadrise shape, with triangular cross-sections for strength and two long watertight spaces between floor and bottom for floatation.
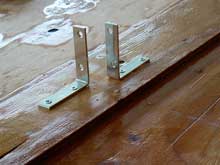 |
As I mentioned last time, the keelson piece had to be refitted. Hardware-store steel angle brackets were first screwed to the floor.
click images for larger views |
|
Then the precut (dumb to do that) vertical board was slid into place and scribed and cut to match the floor’s rocker. The forward section of the board as cut presented a problem: Rather than continue the nice curve of the bow, it had its own, different, curve that didn’t match up at all. I’d made that curve shallow to allow for easy planking, but it just didn’t look right on the boat. |
 |
Using a batten I determined the proper shape and spliced a piece on with 4-inch fiberglass tape. I suspected the deeper forefoot would make for more difficult planking, but it would be worth it for aesthetic reasons and probably make for a smoother, more efficient entry (I told myself). |
The keelson vertical avec splice was permanently installed with screws through the brackets and fiberglass tape. I suppose I could have sprung for stainless brackets and screws here, but I reasoned that the zinc-plated stuff would suffice in an area that should, barring a puncture, remain dry. That’s why I also sealed this area with paint (Kilz acrylic primer-sealer) rather than epoxy. Paint is much, much cheaper.
Once the epoxy had set up, I had to shape the keelson to accept the bottom panels. To get the proper angle I just laid a stick between the chine and keelson, then removed material with 50-grit paper on my antique Craftsman belt sander until the stick would lie flat. The last time I did this I used a power planer; the sander IMHO is much more easily controllable.
|
I guess this is as good a place as any to talk about sanders in general. If I ever get rich (I’m not holding my breath) the first thing I’ll do is hire somebody to do all the sanding on my boat projects. Ya gotta do it, of course, but it’s the only part of the process that always makes me wonder why I didn’t just buy a boat. That being said, a good sander can make the work a little less miserable. I count that old Craftsman as one of the good ones. I’ve had it for about 30 years, 20-plus of which I made my living as a contractor (Yeah, I admit it, a house carpenter). I think I’ve replaced the brushes once. I occasionally squirt some oil on the rollers. The platen is onionskin thin by now and the cord has been run over and patched so many times I’ve only got about two feet of it left, but this machine always works just fine. On a boat project I use it for shaping and for removing particularly gross globs of dried epoxy. |
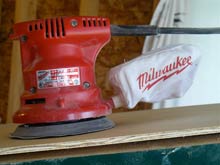 |
The rest of the sanding on a boat I’ve been trusting to random orbital sanders, and I’m not sure I’ll do that anymore. The first one I bought for this project was a Milwaukee. My Milwaukee circular saw and router are real gems. This sander is junk. It does remove material, but out of the box it was really difficult to control with one hand, and if you use it for more than twenty minutes straight it gets so hot it burns your hand. Don’t buy one. |
|
Now my Bosch jigsaw is probably the one power tool I’d keep if I had to make that choice, and I’d read good things about Bosch sanders, so I ordered a reconditioned one from CPO on sale. I wound up with two of them due to the truly comical ineptitude of that company’s customer service department, but that’s a whole ‘nother story. The first sander I unpacked worked great from the start--easy to control, relatively quiet, not much vibration, and with really good dust removal as long as the filter was kept clean. I nearly completed the Lake Skiff project before it went kerflooey-- it still sands, but it now sprays dust around instead of collecting it, and acts more like a grinder than a sander. I suspect the plastic disk that controls the circular motion has worn out. I know that’s an expendable part, but after only a few weeks of use? |
“But wait--I have TWO sanders. I’ll just use the other one,” I said to myself cleverly. Wrong. The second one will not run properly, period. Under the tiniest bit of pressure the motor just bogs down and stops. Tried to use if for about three minutes before I gave up. Makes me wonder what “factory reconditioned” means. At least for this one, I think it means Bosch just put it in a clean box and shipped it out again. I intend to explore warranty options. I regretfully went back to the Milwaukee for the duration of the project. Next time I think I’ll look at air-powered sanders.
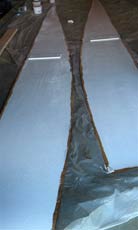 |
But back to the boat. Bottom planks were fitted, cut and joined with butt blocks. There wasn’t anything particularly challenging here. As expected the forward sections were difficult to twist into place, but the 3/8-inch plywood took the twist OK. I think half-inch stuff would have been too stiff. The planking was painted on the inside, except around the edges where a coat of epoxy was applied. |
 |
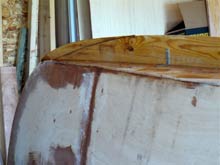
The edges of the floor were treated the same way, and I built a really heavy line of thickened epoxy all the way around and. on the keelson. There would be no opportunity to tape the inside of these joints, so I wanted to make sure there was a lot of glue to fill them. You can see the edge goop in this photo. |
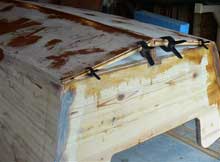 |
The bottom planks were installed with bronze ring nails and stiffeners were added at the transom end. |
 |
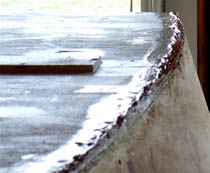
Once all the edges of the bottom planking had been shaped, filled and taped, the outer layer of the transom was applied and glassed. |
Then the entire hull was glassed and it was time for some serious, laborious, mind-numbing sanding. Epoxy thickened with microballoons was used to fill gouges and fair seams. As always, I followed the advice I read somewhere a long time ago to use sandpaper as if somebody else were buying it, to avoid wasting time with dull abrasive.
|
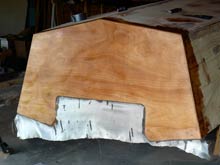
Once I thought everything was smooth enough, I applied Interlux Pre-Kote primer and discovered, as I always do, that everything wasn’t smooth enough. It’s amazing how many flaws show up for the first time when the paint goes on. Pre-Kote is a high-build primer, though, and with a bit more sanding the project reached the stage I call “as good as it’s going to get with me doing it.” I applied the finish paint--two coats of Interlux Brightsides polyurethane--with a foam roller immediately followed by a foam brush to get rid of the little bubbles, a technique I learned from the folks at Chesapeake Light Craft. To the second coat I added a liberal dose of flattening agent. There are still multiple imperfections, but the lowered gloss helps hide them a little bit. This photo shows the first (very glossy) coat. |
Next time the completed hull gets turned over onto its trailer, the permanent bulkheads are installed, and the cabin and decks begin to take shape.
*****
|