|
|
|
by Charlie Ewers - Maine - USA |
 |
|
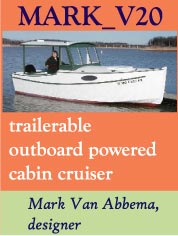
Part 8: Finished Enough to Launch
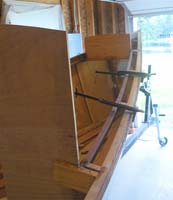 With the bulkheads in place, the next step was to install the front and side decks. Cutting the deck beams was one of the tedious jobs: There were a lot of them, and each pair required different compound angles to accommodate the horizontal and vertical curvature of the gunwales. I finally got them all right, but not before crafting a sizable collection of interesting yellow pine kindling sticks. The photo shows a carline being glued into place. I ripped these long, slender timbers out of some old redwood boards that had sat on a shelf in my shop for years, ever since I’d removed them--they’d been used as floorboards--in the course of rebuilding my baidarka. Never throw anything away. With the bulkheads in place, the next step was to install the front and side decks. Cutting the deck beams was one of the tedious jobs: There were a lot of them, and each pair required different compound angles to accommodate the horizontal and vertical curvature of the gunwales. I finally got them all right, but not before crafting a sizable collection of interesting yellow pine kindling sticks. The photo shows a carline being glued into place. I ripped these long, slender timbers out of some old redwood boards that had sat on a shelf in my shop for years, ever since I’d removed them--they’d been used as floorboards--in the course of rebuilding my baidarka. Never throw anything away.
|
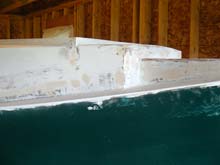
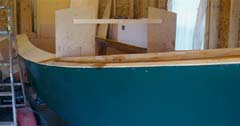 After plywood nailers (for the cabin sides) were attached to the inside of the carlines, the decks were fastened into place. As you can see, they’re very narrow next to the cabin and broaden out into fairly wide washboards in the cockpit area. After the photo was taken, redwood coamings were added to the washboards. I probably wouldn’t have used redwood here if I’d been buying all the lumber new, but it’s what I had. In this exposed position I figure it’s a tradeoff: I get excellent rot resistance but have to put up with the redwood’s softness. There will no doubt be dents and worse down the road. After plywood nailers (for the cabin sides) were attached to the inside of the carlines, the decks were fastened into place. As you can see, they’re very narrow next to the cabin and broaden out into fairly wide washboards in the cockpit area. After the photo was taken, redwood coamings were added to the washboards. I probably wouldn’t have used redwood here if I’d been buying all the lumber new, but it’s what I had. In this exposed position I figure it’s a tradeoff: I get excellent rot resistance but have to put up with the redwood’s softness. There will no doubt be dents and worse down the road.
|
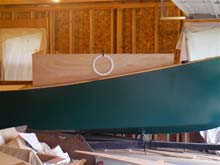 The cabin sides were then fitted, which allowed me to play with possible locations for the portlights by lightly tacking a trim ring in place, moving back and taking a look, moving the trim ring to another location, looking again, and so forth. The cabin sides were then fitted, which allowed me to play with possible locations for the portlights by lightly tacking a trim ring in place, moving back and taking a look, moving the trim ring to another location, looking again, and so forth. |
 Once I was happy with the location as determined by the trim ring test, I cut the portlight openings. No going back now! Once I was happy with the location as determined by the trim ring test, I cut the portlight openings. No going back now! |
 The next step was to frame the forward hatch. Still using those redwood scraps. The next step was to frame the forward hatch. Still using those redwood scraps. |
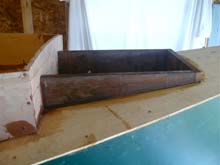
 The sides of the slop shelf aft were trimmed out as shown here. The sides of the slop shelf aft were trimmed out as shown here. |
 Finally, the cabin and hatch tops were attached. Finally, the cabin and hatch tops were attached. |
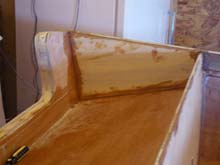
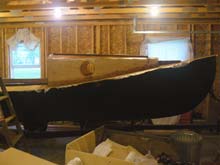 Next came another messy part: glassing all the top surfaces and the seams where vertical surfaces met horizontal ones. I used a lot of fiberglass scraps here instead of cutting nice long strips out of new material. The result is perfectly functional from a watertightness perspective, but it was a real pain in the butt to sand. Next came another messy part: glassing all the top surfaces and the seams where vertical surfaces met horizontal ones. I used a lot of fiberglass scraps here instead of cutting nice long strips out of new material. The result is perfectly functional from a watertightness perspective, but it was a real pain in the butt to sand.
|
 After sanding, primer revealed (as is always does) lumps and bumps that needed to be smoothed out. I used an exterior-rated spackling compound (from DAP, I think) here above the waterline instead of the epoxy-microballoon mix I’d used on the hull. Time will tell if that was a wise choice, but it sure sands nicely. After sanding, primer revealed (as is always does) lumps and bumps that needed to be smoothed out. I used an exterior-rated spackling compound (from DAP, I think) here above the waterline instead of the epoxy-microballoon mix I’d used on the hull. Time will tell if that was a wise choice, but it sure sands nicely. |
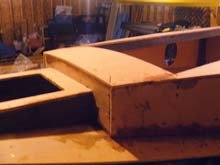
 Then it was time for painting--red acrylic porch paint inside and satin acrylic house paint outside. Here’s what the aft end of the cockpit looked like after one coat. Note the extra thickness of plywood in front of the bulkhead to support the gas tank and battery, and also the clear deck plates for access to the floatation bladder behind the bulkhead and for off-season ventilation both of that space and the one between the floor and the outer hull. Then it was time for painting--red acrylic porch paint inside and satin acrylic house paint outside. Here’s what the aft end of the cockpit looked like after one coat. Note the extra thickness of plywood in front of the bulkhead to support the gas tank and battery, and also the clear deck plates for access to the floatation bladder behind the bulkhead and for off-season ventilation both of that space and the one between the floor and the outer hull.
|
 The last assembly step was attaching the ash rub rail. I lucked out here, because the same friend who sold me the trailer for this boat also had some wonderful long, clear ash boards. He threw one of those boards in to complete the deal, and even helped me plane the rub rails once I cut them out. They were still a bit green when I put them on--good for bending--so I haven’t varnished them yet. That’ll be my first job next season. The last assembly step was attaching the ash rub rail. I lucked out here, because the same friend who sold me the trailer for this boat also had some wonderful long, clear ash boards. He threw one of those boards in to complete the deal, and even helped me plane the rub rails once I cut them out. They were still a bit green when I put them on--good for bending--so I haven’t varnished them yet. That’ll be my first job next season.
|
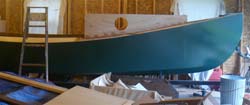
After a little more touch-up painting the Lake Skiff was just about ready for motor installation and launching. The summer was coming to an end, and even though the boat didn’t have seats yet, or a roof for the cabin slot, I really wanted to get it on the water.
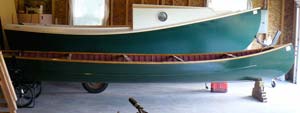
But first a photo op. I mentioned way back in the first installment that one of my inspirations for this design was the most famous indigenous boat of our region, the Grand Laker canoe. In the fourth installment I noted that the choice of a round stem was made in homage to that beautiful craft. Well, here’s what the Lake Skiff looks like next to a real Grand Laker. I hope you see the family resemblance. |
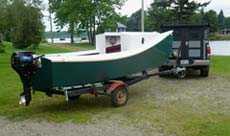 The motor is a 9.8 hp electric start Tohatsu 4-stroke. One of my initial design considerations had been a low power requirement--hence the hull shape only slightly modified from that of an old sailing skiff. I wasn’t sure just how low I could go, though, and considered everything from an electric trolling motor up to 20 hp. I chose the 9.8 due to a combination of circumstances. One was weight. I knew I wanted a four-stroke, and I knew I wanted electric start not so much for starting as for the larger alternator. The Tohatsu 9.8 with electric start weighs 90 pounds or so, which is about all I can handle by myself. More power (or equivalent 4-stroke power from other manufacturers) would weigh more. The other factor was that our local Tohatsu dealer (Moose Island Marine in Eastport) had a leftover 9.8 from the previous model year at a substantial discount, which allowed me to buy from an actual dealer with real service facilities for the same price the Internet dealers from god-knows-where were charging. Seemed like a bargain to me. Here’s the boat with motor installed on its way to the water for the first time. The motor is a 9.8 hp electric start Tohatsu 4-stroke. One of my initial design considerations had been a low power requirement--hence the hull shape only slightly modified from that of an old sailing skiff. I wasn’t sure just how low I could go, though, and considered everything from an electric trolling motor up to 20 hp. I chose the 9.8 due to a combination of circumstances. One was weight. I knew I wanted a four-stroke, and I knew I wanted electric start not so much for starting as for the larger alternator. The Tohatsu 9.8 with electric start weighs 90 pounds or so, which is about all I can handle by myself. More power (or equivalent 4-stroke power from other manufacturers) would weigh more. The other factor was that our local Tohatsu dealer (Moose Island Marine in Eastport) had a leftover 9.8 from the previous model year at a substantial discount, which allowed me to buy from an actual dealer with real service facilities for the same price the Internet dealers from god-knows-where were charging. Seemed like a bargain to me. Here’s the boat with motor installed on its way to the water for the first time. |
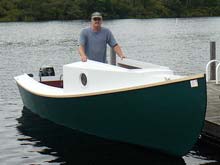
Since our boating season was coming to an end and we were already packing up to go back south for the winter, we had time for only one trial run down the river a few miles and back. And since the motor was brand new and still in its break-in period, we weren’t able to take it up past half throttle, but judging from that brief cruise, I think the boat and motor are well matched. My neighbor, who bravely accompanied me on that trip, noted that the boat was “hardly in the water,” and marveled at how easily and quietly the little motor pushed it. I myself noticed that the boat went where I pointed it and didn’t leak or fall apart.
There’s still some work to do, but I think the Lake Skiff is going to be a good boat. See me smiling? |
*****
|
|
|
|
|