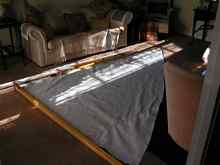
After my initial article "Dinghy on a budget - Part 1" I was eager to complete the sail and rigging to get the boat on the water for a test, my wife suggested (or I should say insisted) that we take her for a row "as the sails may take till next year to complete". As it transpired this was a very good idea as it also gave us chance to reconnoitre the local water park. To help get the boat to the water I built a two wheeled shoe that can be hooked over a notch in the skeg and fastened on to the lower rudder pintle, this makes the boat easy to move, even through loose gravel.
|
Going for a row, it handles very well even in gravel and the breasthook provides a handy grip at the front |
My impression was that the boat was very responsive and easy to row, with one person on board, sitting on the dagger board case it felt very light and sat high in the water. With two people on board it was noticeably heavier to row and sat stern down. To balance it I needed to sit about 18" further forward which made rowing difficult even with long arms, it definitely needed another set of rowlocks installing as per the designers instructions.
|
In the water at last, this is fun! |
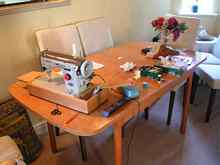
Family, commitments and holidays conspired to delay the first sail, to the point I thought that the cold weather would intervene, but no, the moderately warm days still keep coming and no sign of the fall yet. In building the dinghy I found that Joe Dobler had done a good job of the design and implementation of the hull and the plans. The only problem I had was in fitting the gunwale, but I suspect that was because I used white oak laminated up to 1.5", not something you would bend easily. Fitting the rigging was a different proposition. I chose the Gunter rig option as the spars were shorter and easier to stow, a very valid option, and well worth the slight extra complexity in rigging and fittings. The spars were easy to make and varnish, the mast took more time to shape and smooth ready for its coat of fibreglass and paint. The boom jaws in white oak and Gunter jaws in aluminium took time to shape and fit but were a relatively simple task, the only job left was the sail and running rigging. For the sail I chose some heavy duty cloth that my father saved from a skip some 40 years ago, when he worked as a shop fitter. I think it is nylon as it has more stretch than would be ideal, but as it was free and this was a dinghy on a budget it was worth a try. My mothers old Pinnock sewing machine was more heavy duty and solidly built than ours, it worked a treat and soon the sail was built to specifications with one foot shatter proof plastic rulers for the battens.
|
The lofting floor, at least its warm |
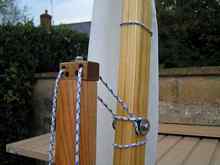
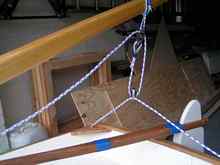
Rigging the boat was more difficult than expected and in the end I had to consult Justin Pipkorn, for whom the boat was originally designed. Between my dumb questions and his erudite answer the confusion was settled and the rigging proved to be both simple and elegant. At the top of the short mast is a small wooden block which can turn freely, it has four horizontal holes which are aligned in the fore/aft direction. The top two holes are for the halyard and the lower two holes are for the topping lift. The halyard has an ingenious mechanism for looping round a holding system made from two pulley sheaves and two penny washers on a piece of threaded rod. To reef the sail the halyard loop is unhitched and fastened on an identical point two foot further up the gunter. This clever system allows the sail, gunter and boom to freely rotate round the mast as required.
|
For clarity this view only shows the halyards |
|
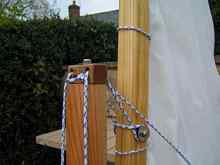
The topping lift has now been included. I may round off the top of the mast to prevent wear on the rigging |
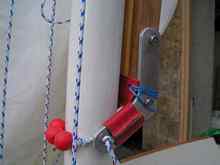
At the bottom of the mast a turning block and cleat to fasten off the halyard at each side of the mast. To the fore of the mast is a further cleat to tie off the topping lift. The photos describe the system far more eloquently than I ever could.
|
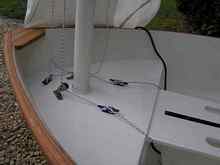
The deployment of pulleys and cleats at the base of the mast |
|
Main sheet pulleys with traveller system and tiller |
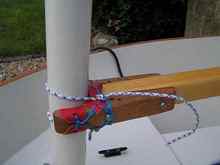
After having painted the working part of the mast (lower 5 foot) with two part epoxy I didn't want it to get scratched and dirty so the best solution seemed to be to line the jaws with leather. This was easy to do and I hope it will protect the moving parts for the next three or four years, if it doesn't last I can easily sew another couple of pieces of leather, provided the design is right.
|
I decided to make the Gunter jaws from aluminium and pack them out with white oak and padded with leather to protect the mast |
|
Boom jaws worked out easier in white oak |
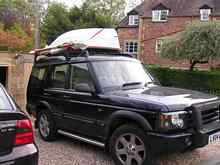
Getting the dinghy on the car for its maiden voyage proved to be a bit of a struggle , more due to the size rather than the weight, the car is over 6 foot high so it's a long way up to push a dinghy and the spare wheel does tend to catch on the way down if care is not taken. To make the job a bit easier I have installed a piece of drain pipe on the rear roof rack member for protection as the dinghy slides on and off. You will probably notice that it is on the front in this picture, my only defence is to say that it was a very early start that day.
|
Getting the boat to water is always a problem, if its not wheel bearings causing the problem its something else |
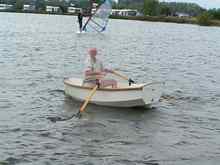
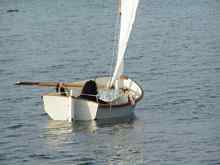
For the first sail I took my aquatic niece Davinia, see previous article "The long swim", for details. She was still suffering from an inflamed shoulder three weeks after the swim and welcomed a break and a chance to get out on the water again, as her doctor will not allow her in it yet. To some extent it was a case of the blind leading the infirm as she had never sailed before and I had never sailed anything as small as a dinghy.
Okay lets cut to the chase, how did the boat sail. Very well I thought, despite the problems. It was very responsive and we only missed a couple of tacks due to poor handling, to save face I maintained it was because I was teaching a novice and wanted to demonstrate what would happen. A bit more wind would have been very welcome on the one hand, but on the other we didn't get scared, so a further outing is a distinct possibility. After an hour or so of teaching I got out of the boat and let Davinia take her out alone, the response was a bit more lively, and weight trim was more critical with only one person. We didn't try reefing as there was barely enough wind, but after trying it ashore I am happy it works well and is an elegant system.
|
Davinia sailing while I take the photographs |
There were several problems, I need to rectify to improve performance and ease of handling. All of these were due to my implementation and I am happy to recommend the dinghy design as it stands to anyone who needs a tender, which was the original design intention. It would also make a very good boat for a child to learn sailing and have a few adventures on.
The Problems
- The sail is a bit too large due to the stretchy nature of the sail material and my inaccurate measurement. On the test sail I had a tight topping lift to avoid the boom hitting the rudder, this caused the sail to be rather floppy. I need to cut down the sail a bit and maybe invest in some proper sail material at some future date.
- The lower sheet pulley scrapes on the rope traveller and could do with changing for one with a second sheave at 90 degrees to allow a smooth travel.
- Splicing 6mm multiplat is next to impossible, so I sewed and whipped the joints, I allowed too much overlap and this interferes with the mainsheet pullies.
- The sail outhaul needs a quick release fastener rather than a knot to secure the sail
- Fit the second set of rowlocks
*****
Click HERE for a list of articles by Mike Machnicki |